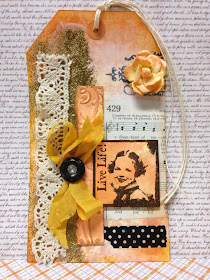
Spring tag love & life tutorial: For this tag, start by applying Tattered Rose and Milled Lavendar Distress inks directly to your craft sheet, or in my case a sheet of wax paper. Spritz with water and dip the tag into the wet ink. Heat set to dry. Brush white Distress paint over center area of tag.
Sponge the edges of your tag with Butterscotch Adirondack and Dried Magnolia Distress inks. Stamp chicken wire by onto tag in Dried Magnolia.
Next I experimented by gluing a piece of white tissue over the tag on the left side. I wadded it up as I adhered it, then inked it with Dried Marigold. I wasn't too happy with the effect so I put more glue over it and lightly poured gold embossing powder onto the wet glue and embossed. I love the way the wrinkles in the tissue paper were highlighted with the embossing powder. Sorry, I should have photographed between the stages...
Apply Butterscotch and Dried Magnolia inks directly to your craft sheet again, spritz slightly with water to make it a little darker than before. Dip a scrap of manila cardstock into the wet ink. Heat set to dry.
Stamp girl by Paperbag Studios, an oldie but goodie, in Walnut Stain Distress ink onto inked scrap and cut out. Sidenote: I am committed to reviving some of my old stamps. I have been stamping for over 15 years and have too much in my collection to justify buying every new product that comes along, so look forward to seeing many other "revivals" to come. :)
Sponge a torn scrap of dry embossed manila cardstock with Dried Marigold and Vintage Photo and mount over tag. Hot glue a piece of crocheted lace, bow, and button onto tag, really I have found this is the BEST method for adhering such trims. Mount stamped girl onto tag. Stamp label by 7Gypsies at top in black ink. Sponge purchased yellow flower with Dried Marigold and spritz to spread ink. Hot glue flower over stamped label. Attach strings at top of tag.
Viola! Thanks so much for visiting today and please do share a link in the comments section if you attempt a tag of your own. :)


No comments:
Post a Comment