Pages

Nov 30, 2017

PaperArtsy Snowflakes and Tim Holtz Deer Reverse Canvas


It's time for a new challenge at A Vintage Journey.  Our hostess Sandy has chosen the theme Winter Wonderland.  She says, "For the month of December let's think of the season as well as the holiday with Winter Wonderland.  As the song goes, sleigh bells ring, snow is glistening! Let's see some snow, snowmen, bare trees would be nice or some snow covered pines in the meadow.  Whatever Winter Wonderland means to you in your vintage, shabby, mixed media; art journaling; industrial or steampunk style."


My winter wonderland scene is filled with my favorite elements and techniques, bursting the edges of a 12x16" reverse canvas.  I was determined to stretch my products to new dimension and make a panel large enough to grace the fireplace mantle.  I knew I wanted to base my entire project on using the new PaperArtsy Stencil {by Kay Carley} 070.  This stencil is so beautiful and the size is perfect for a larger project.


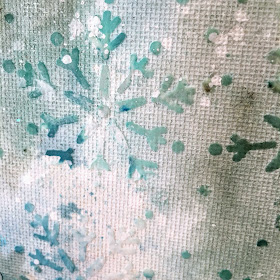
I taped the back of my wrapped canvas to disguise the staples, then added crackle paste over the tape.  I gessoed inside the canvas then stenciled on my snowflakes with texture paste.  Then came the fun part.  I decided to sprinkle A Bit Jaded Infusions onto my dry canvas then activate with a variety of Lindy's Stamp Gang spray inks.  I spritzed them with more water to blend and bleed.  I did the same thing over the crackle.


I stamped the tree border from PaperArtsy {Ink & the Dog Collection (A6)} Noel Plate 3 across the top of the canvas with Archival Cornflower Blue ink, then added a strip of thin metallic washi tape across the top.


I thought it would be so cool to have icicles hanging from the frame, so I tried making some with hot glue and it worked!  :)  I pooled the glue in various places then let it drip down.  It dried as it dripped.  Some of the dripping glue broke, but I think that compliments the look.  I painted the dried drips with gesso.


I stamped the sentiment from the same stamp set onto a scrap of inky card.


I used two beautiful treeline die cuts sent to me by my friend Sara Emily - thank you my dear friend!  These created the drama at the base of my frame.  I nestled a couple of die cut deer in the scene.


Since the trees were cut from cardstock and I only had two, I decided to texturise them with Golden crackle paste.  I laid the die cut on my craft mat then carefully scraped on a thick application of the paste.  When you lift the die from the mat, the excess paste stays on the mat.  You can easily scrape it back off and return to your jar.  The Golden paste is very airy and dry, so it didn't warp the paper much.


I found a jar of Stampendous Shaved Ice - yay!  I wanted to use it on my landscape.  I applied hot glue to build up a base , then gessoed the glue, then scraped on more texture paste.  When this dried, I used Mod Podge to glue the Shaved Ice down randomly.


Look at those snowy drips!  EEK!


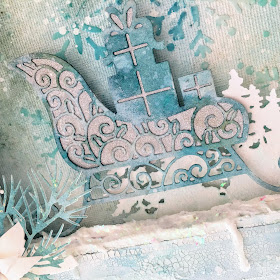
I used the Tutti Designs sled, died with Lindy's spray, over a glitter stock background.


I textured two Tutti Designs Arched Fir Branch dies the same way, then layered with Tim Holtz greens and a handmade white poinsettia.  This is the Memory Box die my sweet friend Marty gifted me.  :)  I accented the petals with Stickles and the center with a Prima gemstone.


I particularly love the snowy look the paste gave to the greens.


The tape I used to cover the staples cracked a little, which I'm OK with, but perhaps if you try this, you should used gel medium below and above the tape.


Now, I just need a mantle to display this on.  He he...  My art room shelf will do.  I hope this got your wheels turning for your own Winter Wonderland project.  Do play along to win a prize bundle from Andy Skinner.  Find our challenge HERE.


You are invited to the Inlinkz link party!

Click here to enter

Nov 28, 2017

Angelic Stamped and Metallic Tree Christmas Cards


Hello sweeties!  I hope you had a lovely long Thanksgiving weekend.  We had a wonderful time and I feel more rested and less stressed than I have in a long time.  :)  Today I'm sharing the cards my mom, Barbara and I made on our Friday play day.  Our goal was to make four cards and we managed six, but for the life of me I cannot find the first two we made (and can't even remember what they looked like...)  Anywho, I'll share the rest.  :)


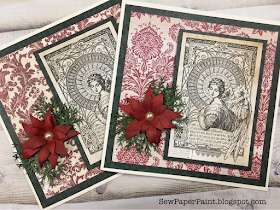
I started feeling better from my nasty caugh/fever Wednesday and cut each of us three sets of Memory Box poinsettia dies so we could make flower embellishments for our cards.  These are cut from red paper and inked.  Each petal is curled, then they are glued together by pressing the centers into a soft foam with a stylus.  A simple pearl adorns the center and they rest on a bed of punched springs (McGill). 


I raided my stamp stash and decided on a few select images that we hadn't used much.  This fair lady made the cut.  Isn't it a wonderful image?


We always try to make two of each design. 


These cards came together in a jiff!  I'm sharing them along with another winter card on the Tutti Designs blog today if you'd care to hop over.  They were made with one of my favorite Tutti Designs dies, Viney Christmas Tree.  The regal gold really makes a statement against the red.  Thanks Barbara for working out this beautiful design.  I look forward to catching up with you all this week.  Hugs, Autumn


I'm sharing with:
(Angels We Have Heard on High)

Nov 24, 2017

Tim Holtz Woodland Deer and Poinsettia Handmade Card


I am truly delighted today to be a guest designer at Fussy and Fancy.  I could hardly believe my eyes when my Prima Amber Moon Album was picked HERE.  


I was thrilled to hear of the challenge theme, Blue & Brown/Beige Winter.  Nothing says fussy and fancy and shabby to me like Maja Design papers.  I chose some neutral prints and blues and browns for my design.


I used Prima texture paste with a Tim Holtz Holiday Knit stencil for my circle panel  I poured IndigoBlu Unicorn Sparkle onto the wet paste for a high dose of shimmer.  Beneath the circle I tucked in glittery snowflake dies to create a frame.  I cut my Tim Holtz deer die from thin chipboard and sponged the edges with VP DOX to give it some variation.


I stamped one of my favorite Verve Stamps Christmas sentiments onto a curled banner.


The poinsettia is by Memory Box and was gifted to me by my precious friend Marty when she last visited SC.  I love that this die also imprints the flower veins.  I cut one of each size, then curled the individual petals with my bone folder.  The center blue brad is by TH.  I added Stickles along the edges of my petals and treeline.  The greens are also TH.  Here is the card in a bit of different lighting.  I hope you like it and will pull out your blue and brown items and play along with the current Fussy & Fancy challenge.  Thanks for visiting!


I'm also sharing with:

Nov 23, 2017

Happy Thanksgiving With Stamped Cards and Recipes


My lovely friends and visitors, I wish you the most wonderful Thanksgiving Day!  I hope that you are enjoying time of reflection and love with the ones closest to you.  I thought I would share a few cards I will be handing out for the occasion.  My mother and I made the first two and were heavily inspired by Ann Chuang's gorgeous card HERE.  These were the "long lost stamps" found in the box in the closet - what fun!  They were colored with DI.  This one layered over Kaisercraft paper.


Isn't that Stampendous fairy leaf the cutest!  The next card of mine had a boo boo and I fussy cut the leaf and started over, thus the uneccessary dimension.  


I thought I would share a couple of my favorite recipes with you too.  The first is my alternate to Sweet Potato Casserole, a much easier version that is most delicious.  The second, an easy leftover recipe.

Pumpkin Soufflé

1 Can Pumpkin (Not Pumpkin Pie Filling)
1 Can Evaporated Milk
3 Eggs
½ Cup Sugar
¼ TSP Cinnamon
½ TSP Vanilla
Dash Nutmeg

Mix all ingredients well and pour into 9x13” pan.

1 Box Yellow Cake Mix
½ Sticks Butter (Not Margarine)
1 ½ Cups Pecans or Walnuts, Chopped

Sprinkle cake mix over soufflĂ©.  Melt butter and drizzle over cake mix.  Top with chopped nuts.  Bake at 350 for 1 hour.  Allow cooling time before serving.


Cranberry Butter

Mix equal parts cranberry sauce and softened butter well.  Refrigerate to smooth on hot biscuits in the morning.  (And rest those tired feet for the day!)


The last card will be for mom, since she was with me during the making of the first two.  I found this stamp at HL and just had to have it!  I used a new mini pad of Authentique paper and my new and most loved Lace die by Tim Holtz, this time using it to thread the seam binding through.  :)


I cut a few leaves from scrap inky paper to embellish the lovely script.


I will give the second to my dear friend Barbara, who always comes over for a card making play day on the day after Thanksgiving.  Last, I must say I am quite bothered with the fuss over "Black Friday".  It seems this infamous day is celebrated higher than "Good Friday".  And for that, we must continue to pray for America and thank God for his grace.


I'm sharing with:

Nov 22, 2017

Wendy Vecchi Stamped Backgrounds Thank You Cards


It's time for a new challenge at Frilly & Funkie and our hostess Sara Emily has chosen the theme Give Thanks!   She says, "We have so much to be grateful for! The Frilly and Funkie team is thankful for our loyal readers and our newest visitors! For this challenge, simply create a vintage or shabby chic project that expresses gratitude."


I really needed to work on my stash of thank you cards.  I had been playing around making backgrounds with my Wendy Vecchi stamps and came up with these panels using Distress Inks and repetitive stamping.  I used a square die to cut part of the darker background out so that I could use it on my other card for contrast.


I cut another square from the lighter background and mounted it the same way, using metallic kraft core as a mat and to cut my sentiments.  I used a filigree metal as my focal point on each card.  This one with a fancy Tim Holtz brad topper.


I added a Tim Holtz lace die cut border and seam binding bow to each card.


And here's the finished set.  I really love these colors.  I hope you're inspired to play along with our challenge for a chance to win a $25 gift card to the Funkie Junkie Boutique.  Our team wishes each of you a lovely and blessed Thanksgiving!


Find these and many more amazing products at the Funkie Junkie Boutique: