Pages

Jul 26, 2018

Tim Holtz Entomology and 3D Botanical Texture Fade Card


Hi friends!  Today I'm sharing a grungy little card featuring the Tim Holtz Entomology stamp set.  If you saw Tim Holtz on Facebook live, you will know he is soon to release the die cut set to coordinate with these lovely images!  Hooray!  If you missed the sneak peek, you can find it HERE.


I finally picked up one of Tim's new 3D Texture Fades, the Botanical embossing folder.  I was thinking of doing something very soft and delicate with a Paper Doll and had sponged my first pass of this gorgeous folders like shown, but I didn't like the combination of collage elements I had come up with.  After a couple of weeks, I pulled the panel out and revisited it.  I coated it with a thin coat of Distress Crazing Medium.


While I sat it aside to dry, I stamped several of the moth images onto natural card and then watercolored and fussy cut them.


I was inspired by THIS post by the crazy talented Jenny Marples and dug out my Distress Crayons.  I burnished each color with a not too wet baby wipe.


See that crazing?!  Next I cut a window in my panel with the Tim Holtz Stacked Baroque dies, then cut a second panel as a frame.  I used the same crazing techniques on the frame with more saturated color.


I layered my moths over a bunch of sisal fibers and added a french book page in the background.


I used the Metallic Quotations sticker over Tim's crocheted trim with some Ideaology findings with a snippet from a dictionary to complete the design.  There is a hint of sparkle from the gold Distress Crayon and the Metallic Kraft Core mat, even though I stitched over it to grunge it up.  I hope you're inspired to have a play today!

"Released from my chains I'm a prisoner no more
My shame was a ransom He faithfully bore
He cancelled my debt and He called me His friend
When death was arrested and my life began
Oh, Your grace so free
Washes over me
You have made me new
Now life begins with You..."

Songwriters: Ryan Heath Balltzglier / Adam Kersh / Paul Taylor Smith / Brandon Coker
Death Was Arrested lyrics © Capitol Christian Music Group

Jul 24, 2018

Darkroom Door Stamps and Karen Burniston Die Cuts Blog Hop


I am absolutely busting with joy today!  I've had the great privilege to work with new die cuts by Karen Burniston and images by Darkroom Door stamps.  My favorite thing is combining stamping with die cuts!  The dies I chose to work with are super fun and interactive, so I decided to break out of my grungy norm and do some bright and happy projects.  I hope you like them.  This post is power packed, so grab a cuppa, then make sure to see the list of other bloggers joining the hop at the bottom of this post.

Both Darkroom Door and Karen Burniston will be giving away a prize packs, with winners randomly chosen from ALL of the blog hop comments received by Sunday, June 29th, 2019. Lots of chances to win some goodies, so just leave a comment on this post or any other blog hop post to enter!


For my Twist Panel Pop-Up card I knew I wanted to use the small birds from the Garden Birds stamp set to decorate my pop-up panels.  


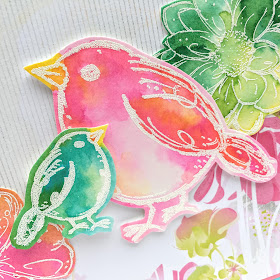
Rather than cutting apart the stamps, I embossed the entire sheet in white.  This was super easy and gave me a "coloring sheet" of birds to work with.  I tapped a Distress Ink rainbow onto my mat then used my water reservoir brush to watercolor the images.


I had an absolute BLAST coloring these cuties!  (The trick is to extend the color beyond the image for easier cutting.)  Of course, I had a ton of ink left on my mat, so I decided to dip the pop-up panels into the inks to make a fun background for my birdies.  I still had ink left, so I dipped some other scraps and then embossed some Fine Flowers Vol. 2 images onto those.  This card is bursting with color and fun when you open it!


I also got to work with the Tag Pop-Up Die Set.  I decided to use Distress Oxides to switch it up a little and show both techniques.


I knew I wanted to use the Friendship Flowers stamp set to do a resist of some sort.  I die cut my pop-up panels from watercolor paper and embossed the flowers in white.  (See how I positioned the flowers so that the stems extended the perimeter of the panel?)  I used a rainbow of Distress Oxide colors.  Tapping the pads on my mat, then spritzing with water and dipping the panel into the pooled ink.  I did one color at a time and dried between colors.  Oxides work really well this way.  Last I stamped around the white embossing in colored inks for more variation.  


I embossed the sentiment and floral collage from Botanical Script in black and colored the image with Oxides.  I repeated the dipping process with the other die cut elements to complete the tag book.  These are so much prettier in person!  I will do some videos on Instagram (@sewpaperpaint) so you get the full effect.  :)


Huge thanks to Karen and Rachel for making this hop a reality.!  Make sure to visit these other incredible designers along the hop:


Both Darkroom Door and Karen Burniston will be giving away a prize packs, with winners randomly chosen from ALL of the blog hop comments received by Sunday, June 29th, 2018. Lots of chances to win some goodies, so just leave a comment on this post or any other blog hop post to enter!

Autumn Clark >>>> YOU ARE HERE :)

Jul 21, 2018

Tim Holtz and Eileen Hull Steampunk Travelers Journal Tutorial


Hi my friends!  Today I'm sharing a steampunk themed travelers journal and a neat idea for upcycled packaging idea with you, as inspired by recent conversations on the Tim Holtz Addicts Facebook Group.  If you're not a member, you should be!  This is such an incredible group with so much talent and daily inspirational shares.


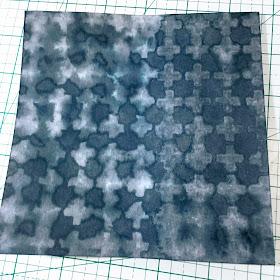
Now, normally the first thing I do when I get a haul is unpack everything and sort it into containers.  I always throw away the packaging because it takes up so much room and I have a tiny space.  I do save my acrylic packaging and use it for making shaker cards, but everything else goes.  Someone had mentioned using the backings for their projects and when I unpacked a new stencil, I saw the backing in a whole new light!  :)  I decided to cut off the top and emboss it to see what it would look like.  I lined up the folder along the bottom and embossed a second time for a continuous pattern.


I sanded the raised portions and dipped the panel in Distress Oxides (Fired Brick, Iced Spruce, Frayed Burlap), then dabbed my Veramark randomly and embossed with Seth Apter's Baked Texture, first in Rocky Road, then in Chunky Rust.  OH MY GAH!  I could have eaten it like rusty candy!  LOL!  Now, I was just playing around and supposed to be doing something else, but when I had gotten this far I just had to turn this awesome panel into something cool!  So I reached for my Eileen Hull Travelers Journal die.


I was thrilled that the stencil package backing was exactly the right width to use for this journal die, but it was too short.  To make it work with my size, I centered the rusted panel on my cover, then marked pencil lines to cut off each end.  Then I traced the front onto the back and cut off the ends of the back cover.  BTW, I used Graphix black chipboard to cut my covers.


I used the cut off portion to help mark new holes and cut those with my Crop-o-Dile.


I wrapped a piece of Tim's tissue tape around the spine of my front panel and extended to the inside so it didn't come off.  I put a bit of glue stick below it, then sanded it and coated it with matte varnish. This worked perfectly to remove the sheen and seal the tape.  Next, I lined my insides with Tim's Dapper paper stash.  I ADORE this script!  This time I lined the center panel, which is connected to the back side when the covers are sandwiched.


You can see how great it looks inside without the mass of black space.  I like making my journals with two inserts so the spine lines up better.  I used more Dapper paper and kraft paper with a long reach stapler to make my inserts.  I left things simple inside for the recipient of this journal to customize.  I have to say how much I LOOOOOVE the kraft paper inserts!!!  I cut my sheets all to 8.5 x 7" and folded them in half for a finished insert of 4.25 x 7".  


I put a huge stack of books on them to help them flatten, since kraft paper is a bit thicker than copy paper or graph paper, which I usually use.  I only added 4 sheets of kraft to each insert.  I wanted room for ephemera and pockets, and maybe a pen inside.


Now back to that collage...  I used one of Tim's older ephemera pack to build my composition.  I sponged a Small Talk sentiment with Antique Linen DOX.  I tried tinting my paper doll, as inspired by the one and only Paula Cheeny.  Only I don't have any Distress Markers.  So I tapped my ink pad onto my mat then used a dry brush to paint him.  I had sanded him, so you see how those areas accepted the ink more.  I sealed him with Distress Micro Glaze.


Behind him I added a die cut Bigz Gadget Gears #2 cut from chipboard and repeated the same embossing process.  I added some Fluted Fasteners in all of the corners with a brush of Prima Rust Paste, watered black gesso, and Walnut Stain DOX.  I covered the backs with the interior lining as shown above.


Oh my gosh how I love those gears!  Now, I used an old gear texture fade for my background, but imagine this technique with Tim's new 3D Mechanicals Texture Fade!!!  What!  #wishlist  The only thing missing is a matching back panel, so I need to buy a new stencil for that packaging!  I truly hope you've been inspired by this post and have thought of some new ways to use your packaging and die cuts.  Have an amazing weekend, Autumn

You are invited to the Inlinkz link party!

Click here to enter

Jul 19, 2018

Tim Holtz Theories Stamp Birthday Shaker Card


My sweet friend Bonnie was my partner in crime this weekend for an hour long drive to our LSS for me to get some new Distress Oxides!  Yes, these inks are still causing a buzz and I was busting at the seams to get some new colors after my experiment with two-toned stenciling in my last post.  


I wanted super vivid colors and tested out Peacock Feathers by sponging my entire panel, then tested Blueprint Sketch by sponging the edges.  I wasn't sure what next, so I dipped the panel in Twisted Citron, Picked Raspberry and Concord Grape until I was pleased with the color variations.


Next I embossed an image from the Tim Holtz Theories stamp set and cut out a portion of the panel using the Stitched Rectangle die.  I thought I'd make a simple shaker card, but wanted to add interest to the perimeter.  I decided to emboss with the Tiny Dots Texture Fade.  I love embossing my Distress Oxide backgrounds because the ink sits upon the surface of the paper and sands away easily, unlike regular inks.  This really brightened up my design.  I added a few shaker elements and a piece of acetate recycled from packaging.  I finished it off with a Small Talk sentiment sticker and a layered die cut from the Celebrations set, which I sponged with Peacock Feathers.  I'll add a video on Instagram (@sewpaperpaint) so you can see the card in action.  :)  Thanks for visiting today!

Jul 17, 2018

Two-Tone Distress Oxide Stenciling Tutorial


Today I'm sharing a little experiment I concocted with my Distress Oxide ink pads.  I was really pleased with the result and turned it into this simple masculine card using the Tim Holtz Theories stamp set.


First, I sponged a watercolor panel with Faded Jeans Distress Oxide, then layered the Plus Layering Stencil over the panel.


I lifted the ink with water in two ways to see which I liked best.  On the left I spritzed heavily with water then wiped with a baby wipe.  You can see how the color lifted more, but also bleed out more.  On the right I simply blotted with a very wet baby wipe.


I decided that it would be good to have two completely different patterns on the card, so I blotted away some more of the ink on the right side.  On the left, over the dried spritzed pattern, I realigned my stencil and sponged with Peeled Paint Distress Oxide.  I gave it a slight mist of water to help with the oxidization.  I'm just thrilled over this two-toned effect, which to me resembles patterned paper.  Of course, you could take it a step further and outline the stenciled design with a fine pen, but I didn't want that bold of a design.


I used my Stitched Square die to cut out a section of the panel, then raised it up with black card and Metallic Kraft Core.  The cutout is then hidden below.  This is a great way to build dimension and not cover up the background you've worked so hard on.  :)  I cut "happy" from the Celebrations set and layered with an On The Edge die.  The sentiment was cut from one of the stamps in the Theories set.  I used Tim's Fluted Fasteners in the corners of my card and the Ledger Script stamp to add text in the alternate corners.  I love coming up with new ways to use my oxides.  In case you've missed them, I've added the links to a few of my older tutorials below.  Have an awesome day and get inky!  


Jul 12, 2018

Tim Holtz Binder and Free Printable Recipe Card


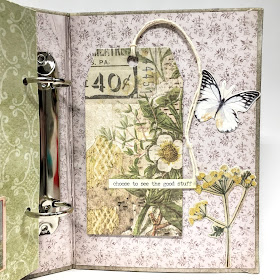
Hi everyone!  I've been working on this projects for a couple of weeks at a slow pace and finally have a chance to share.  I picked up several Tim Holtz binders earlier in the year and finally decided to give one some love.  I wasn't quite sure what to put inside and ultimately decided on a recipe book, inspired by the incredible Emma Williams.  I didn't want to use a food theme because the book will be stored in my craft room, so I built a little botanical scene using Tim's Botanical Ephemera.


I started with a thick piece of mat board cut to size.  I cut a window in the center, then covered it with Worn Wallpaper.  I cut an X in the center to wrap the wallpaper around the opening and layered with some burlap paper.  I sanded the edges and used a Distress Crayon to add some shading.  I layered with a Baseboard Frame and a half flower from my tutorial HERE.  The crocheted lace and word token are also Tim's.


I used my Wallflower Paper Stash to create the file dividers.  The tabs are from a die.  The pages measure 4.25 x 6.5".  The idea is to fill the binder with recipes and have a pocket for recipe cards to share.  It's so sweet to bake a casserole for a friend and attach the recipe card atop!  :)


To make the pocket, cut a 6" square and score all three sides at 15/16" and 13/16".  Burnish the folds and miter as shown.  Attach red line tape the the outermost scored section.  The pocket will hold 8-10 cards.


I've designed a free printable recipe card for you and you can download it HERE.  It is designed to be printed at 4x6".  This file is free for personal use, but if you share it on any website you must link back to this post.


I decorated the pages quite simply.  Here's the back.  I did alter the color of the binder by sponging it with Evergreen Bough Distress Ink, then going over it with a gesso wash to tone it down.


And the front cover again, which could also be a card design.


And now onto the winner of my wee giveaway of the stitched stamp set.  The random winner is Kate Yetter!  


Kate, please email me at teamclark@rocketmail.com to claim your prize.  I'll be on the lookout for another of these sets, so make sure to follow along for the next giveaway.  :)  And I hope you'll pin today's project and put the printable to good use.  Thanks for stopping by, Autumn
You are invited to the Inlinkz link party!
Click here to enter