Pages

Dec 28, 2016

A Snowy Hello Polaroid Frame DIY


A big HELLO to you on this lovely winter day!  Today I am sharing a fun tutorial on using an acrylic block to stamp ink to create a watercolor background on the Tutti Designs blog.  This snowy mixed media card features a DIY Polaroid frame using our Stitched Nesting Square dies and our newest Hello Word Set.  I hope you'll hop on over and have a closer look!


I'm sharing with:

Dec 23, 2016

Tim Holtz Die Cut Deer Card


I can hardly believe Christmas is upon us!  I've attempted a couple of Valentines, but still feel like we should have a few more weeks of Christmas.  Recently I found this lovely Basic Grey embossing folder for $2 at Tuesday morning and decided it was high time to do some dry embossing.  I have several folders, but have never used them much.  I layered with my handsome new deer.


Some simple sponging to highlight the pretty forest like embossing.  I made my own paper background by using a DIY Tim Holtz stencil cut from a die.  I sponged with cranberry ink and distressed the edges.  I cut the deer from chipboard and used Walnut Stain to color him.  I embossed the antlers for interest.


A simple bow and some embossed pine needles for embellishment.  So simple!  In fact, I made a pair.  Maybe this is my last card to share before the holidays, but at least I can use the design through the winter.


Dec 21, 2016

Twinkling Heart Garden Valentine Card


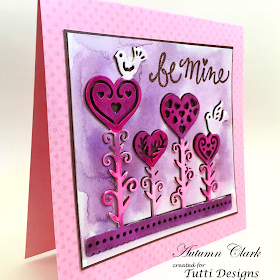
I'm sharing our new Heart Flower Garden die on the Tutti Designs Blog today.  I really enjoyed using my Twinkling H2Os to paint this die - what fun!  I hope you'll hop over and check it out.  Snatch up your Heart Flower Garden Die today HERE!


Speaking of love, look at these two!  Wasn't this a fun pose in their semi formal dresses for their school dance.  Sigh, they are growing up too fast!  My girls, my loves!  Seems like just yesterday when they would sit and stamp Valentine cards for everyone in their class.  Sniff, sniff...  My eldest (on the left) turned 17 yesterday!!!

I'm sharing my card with:

Dec 19, 2016

Snowy Ombre Distress Ink Background


I'm on the IndigoBlu blog today sharing inspiration with the design team.  As we near to Christmas Day, and winter well on its way, my thoughts went to blues and silent nights.  I created an ombre inked background with Distress Inks to set the stage.


You can do this with any colors, just pick three ranging from dark to light.  I gave two taps of each in rows onto my craft mat, as large as my watercolor panel, then spritzed with water.  I dipped the panel into the inks and let it set a minute so the ink would really soak in.  After, I heat set the panel, then sponged on additional ink as needed.  Finally, I flicked water onto the dried panel and blotted with a towel after about 20 seconds.  I did this over and over to get a really snowy looking background.


Now for the stamping!  I embossed the gorgeous tree from the Winterland Wood stamp set.  I embossed part of the White Christmas sentiment from the Sparkle and Glisten sentiment set along the bottom.


I dipped my seam binding into the same inks and did a wrap around fluffy bow.  For my layering panel, I dipped it into watery Pumice Stone Distress Ink , then sponged Evergreen Bough along the edge and stamped the Night Before Christmas stamp repeatedly.


Purchase your Sparkle and Glisten stamp set today HERE!


I'm also sharing with:

Dec 18, 2016

Wise Men Die Cut Christmas Card


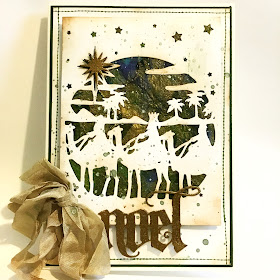
For my final card in The Funkie Junkie's 12 Tags of Christmas challenge, I was inspired by Linda's brilliant use of white and green.  I went a little overboard with the white, I suppose...  I picked up this Crafter's Companion wise men die cut for a song recently and really wanted to use it somehow.


I pieced together a tiny scrap of handmade paper to cover the cutouts.  The panel was lightly rubbed with Vintage Photo.  


I just love the new Tidings dies by Tim Holtz and thought this was the perfect card to incorporate one of the words.  I stamped faux stitching to frame all that white and gave her a good old splatter because I can't live without grunging stuff up!  I embossed the star and mounted it up for extra dimension.  A special thank you to Linda for hostessing this challenge and to The Funkie Junkie Boutique, the best ever sponsor!


To see all of my 12 Tags of Christmas click HERE.


I'm sharing with:

Dec 17, 2016

Tim Holtz Christmas Caroler and Damask Background


Week 11 tag from the Funkie Junkie 12 Tags of Christmas, can you believe it!  Just a few short days away until the winner of The Funkie Junkie Boutique giftcard is announced!  Since I went heavy on the dots in my last make, I decided to switch to a damask background for this go round.  I had so much fun creating this inky stamped background.  It is one of my favorites from this year!


I was so lucky to get to cut out some of the new word dies during our girl's weekend.  My friend Madelyn has all the latest and greatest and shares!  Thanks Mad!  I surrounded the die with snippets from a small talk sticker.  I layered several of the snowflakes together for dimension.


My friend Carol had the caroler stamp - how ironic!  He is my all time fav Tim Holtz stamp!  I was thrilled to ink him up.  I added another jingle bell, now it seems Christmas cards aren't complete without them!

To see all of my 12 Tags of Christmas click HERE.


I'm sharing with:

Dec 16, 2016

Deck the Halls with Boughs of Coffee Cups


What a grand week it has been sharing coffee themed cards with bloggers all over the world!  Thanks to each of you for your encouraging comments and visits.  My final card was inspired very much by THIS coffee cup card.  Kathy, this fun design hit all of my buttons as I recently purchased Tim Holtz Tea Time Bigz die.  I knew it would make a great start for a Sizzix arrangement of my own.


I cut my greenery and stems from various dies by Tim and tucked them into my mug with clear glue.  I added red pearls for a festive "berry" accent.  I layered onto some of the final snippets of Tim's Christmas paper pad left in my stash.


I would actually like to copy this IRL for my Christmas table setting, wouldn't that be fun with fresh greenery & berries in china cups at each place setting?!  I finished off with some stamped red stitching and the Wonderful die, which is exactly what Christmas and Coffee are to me!

To see all of my coffee cards click HERE.


I'm sharing with:

You are invited to the Inlinkz link party!

Click here to enter

Dec 15, 2016

Coffee and Cream and Chalkboard and Polkadots


It's double feature Thursday, where you get two cards in one visit.  :)  I created this card for The Funkie Junkie's 12 Tags of Christmas challenge.  I can't believe all 12 tags are finally posted!  Yikes, we have less than a week to finish up and have the chance to win a gift card for The Funkie Junkie Boutique, the event sponsor.

I am head over heels in love with Linda's use of red polkadots and chalkboard, but don't have much luck with red inky backgrounds so I went with a neutral.  I embossed this favorite Penny Black sentiment in white and rubbed with chalk.  I really want Tim's new chalkboard set, but haven't been able to order it.  I was glad that I had this image in my stash.  :)  I used the new snowflake thinlet dies with black paper and rubbed them with chalk too.  The music is stamped and layered onto burlap.


I had made two of these background panels because I loved the result so much.  The dotty stamp is an old clear set.  I don't know the maker.  I decided to CASE my own card and do a coffee spin with my new coffee mug stamp.  I really like the variation, the color is perfectly yummy like a good cuppa.  I hope you like it too!


Since I reversed the direction, I thought I'd do a side-by-side.  Maybe you will want to CASE this layout yourself - feel free!  <3


To see all of my 12 Tags of Christmas click HERE.
To see all of my Coffee cards click HERE.


I'm sharing with:

You are invited to the Inlinkz link party!

Click here to enter