I'm so excited to share this new tutorial with you today. If you missed my tutorial on creating a large mixed media album with removable pages, head on over HERE. Making that book got me in the mood to do a cloth covered mini album. Most of the details on the construction are found on the first post, but with this book I wanted to do a nestled spine. Again, the purpose of these books is to have room to add bulk in my mixed media pages. This type of signature gives plenty of space between the pages for such.
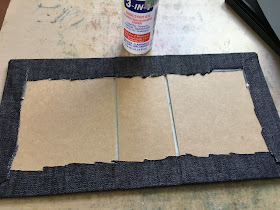
For this album I covered the covers and spine with a continuous piece of batting (or fleece).
Wrapped a chambray denim around the covers.
Then used black cardstock on the inside.
You can make this album in any size you want, but I based my size off of the chipboard pieces I used for the colleges in THIS post. Here is a handy reference for you for making your own album.
Signatures for 6 Flaps (12 Pages Front and Back) with Gap Between Pages of 3/8.
1. Height of Pages X 1 3/8
2. Height of Pages X 2 1/8
3. Height of Pages X 2 7/8
Score each Signature ½” from each end.
Spine Width: Height of Covers X 2 5/8
My pages will fit perfectly onto the flaps.
I use red line tape to adhere everything. It is important to burnish the tape well. I adhere the pages in place one side at a time to help with alignment.
You can see that the tops of the pages are open. You could attach tape to the bottom on the inside of your pages and use these openings for tags, but I wasn't going for that look in this particular book.
Here she is folded up and ready to have the cover altered. I'm going to wait for just the right challenge to inspire the direction of my cover collage.
Here's a look at my first collages inside of my new album. They are posted HERE for your reference. This is going to be so much fun to fill!


What a fabulous tutorial Autumn, such a handy sized mini album. I love the way it folds giving each page room allowance for any large embellishments. Thank you so much for sharing. Hugs Tracey x
ReplyDeleteFantastic album! Hugs, Valerie
ReplyDeleteWow, Autumn, what an amazing album!! Your tutorial is perfect!! And those two first pages are show-stoppers!! Love this, my talented friend!! Have a great day!! Big hugs :)
ReplyDeleteLisa
A Mermaid's Crafts
Wow so amazing and so very creative x
ReplyDeleteAn excellent tutorial Autumn, your new album has a wonderful professional finish. I am looking forward to seeing more! Hugs, Anne xx
ReplyDeleteWhat a great tutorial! I've been wanting to do a mini album again, but I just haven't found the time! Love that you made this one cloth covered!
ReplyDeleteOh my, what a marvelous album with the fabric covering. Bet it will hold up extremely well, and the batting will make it so comfortable to hold. You are such a whiz at making these albums so interesting with the memorabilia that you select and it looks so professionally done. You must be a seamstress in another hobby to know about the batting. Well done!! TFS
ReplyDeleteOh Autumn this is such a wonderful looking album, and so sturdy!
ReplyDeleteBlessings
Maxine
A brilliant post Autumn, love your album and what a great place to keep your work xxx
ReplyDeleteYour album, and the pages in it already, are amazing! Thank you for sharing your tutorial, Autumn, love that denim cover, too! This might be a future project for sis and I at the bungalow...Hugs!!
ReplyDeleteLove your new album. This binding is great for when you want to add some bulk to your pages. Easy too. Can't wait to see all the finished pages!
ReplyDeleteWOW!!! This is amazing! Thanks so much for the tutorial! I owuld love to do an album sometime...seriously, incredible creation Autumn!
ReplyDeleteSherrie k
I love it! You inspire me to try making one myself.I'm sure the cover will be amazing as well.Hugs, Elli.
ReplyDeleteWhat an amazing project! Thanks for all the step by step pictures! Love the colors on your pages!
ReplyDeleteOutstanding Autumn! I am in love with this journal- or at least an art crush! heehee
ReplyDeletehugs,Jackie
I'm totally having an art crush too, Jackie :)
DeleteWow, this is superb! Both the binding and those two completed pages! It's perfect for dimensional artwork. Super inspiring!
ReplyDeleteAmazing Autumn! Hugs xx
ReplyDeleteI enjoyed your first book tutorial and like this one too. It's a very clever and useful idea.
ReplyDeleteAn inspiring step by step to demonstrate the making of this gorgeous mini album. Perfect for storing bulky treasures. I'm going to give this a try; you make it look achievable. Thanks for sharing :D
ReplyDelete