Sep 30, 2016

Funky Fall Watercolored Coffee Card


TGIF!  I'm sharing a second card today featuring this awesome stamp set by STAMPlorations.  They have a cool freebie image HERE if you're interested.   I was in the mood to make an inky mess and did some stenciling with texture paste, then added some Distress Ink watercolor pools.  I layered with my inky papers, dies & embellies in a haphazardly way.  Click on my label Coffee Lovers Hop to see all of my coffee themed cards.  Thanks again for all of your visits and comment love this week!!!  <3  Happy Coffee Loving Cardmaking & hopping.  :)
I'm sharing with:
Aqua and Orange - because they are such a striking contrast!

You are invited to the Inlinkz link party!

Click here to enter

Fancy Fold Fall Coffee Card


Happy Friday!  Today I have two cards for you.  For this fun fold card I'm using the STAMPlorations coffee stamp set.  I love the sketchy vibe of this set.  They are offering a free pumpkin/coffee download HERE if you're interested.  Click on my label Coffee Lovers Hop to see all of my coffee themed cards.


I stamped my mug in brown ink onto kraft paper and sponged more brown to add shading.  I used a white Galaxy pen to add some contrast.  The papers are by Authentique, both favorites.  I used a scalloped circle die with brown paper and rubbed it with chalk to give it a grungy feel.  Thanks again for your visits this week.  I have one final card to share and it's on to starting my winter themed coffee card stash!

Sep 29, 2016

Free Printable Stacked Coffee Mugs Card


Today I have a fun card to share using more of the Heidi Swap cutouts.  Here I layered a sheet over patterned paper.  I am madly in love with these!  You will be seeing them lots and lots.  I found this awesome free printable image and pinned it HERE.  To color them I used my Colorbox stylus and sponged Distress Ink onto each mug going from the outside in, which created the highlights.  This is so easy and effective.


I love how deeply the inks go into the paper, but that the paper doesn't warp like when you use watercolor.  I used the same technique in the coffee tag below for the Summer Coffee Lovers Blog Hop.  Click on my label Coffee Lovers Hop to see all of my coffee themed cards.


I found the circle image online and computer generated the other text.  This card seems to have so much dimension, but is actually quite flat for mailing.  Great bonus!


You are invited to the Inlinkz link party!

Click here to enter

Sep 28, 2016

Ink It Up and Drink It Up Distressed Coffee Card


Another Distress Ink and stamped background card for you today.  The awesome newsprint background stamp is by Prima, partially stamped here and there.  I layered with a few pretty dies, including my favorite Verve Stamps die, "coffee."  The flower and leaf die are by Prima.


I just can't get enough of making my own grungy backgrounds with Distress Ink.  I love the ability to coordinate with the colors of my ephemera.  Thanks again for your visit!  Happy Coffee Loving Cardmaking & hopping.  :)  Click on my label Coffee Lovers Hop to see all of my coffee themed cards.  
I'm sharing with:

You are invited to the Inlinkz link party!

Click here to enter

Sep 27, 2016

Pumpkin Spice and Everything Nice Coffee Card


Last year Julee shared this amazing set of free printable images on the Verve Stamps blog.  Thanks Julee!  I printed a super sized mug and colored with my Colorbox stylus.


I recently picked up the Tim Holtz coffee embossing folder on clearance and decided to do an inky background with Distress Inks.  I added water flicks to everything to grunge it up.


I layered with some of Tim's tattered leaves die cuts and vintage seam binding for a fun, yet simple card.  Click on my label Coffee Lovers Hop to see all of my coffee themed cards.  And thanks again for your visit!  Happy Coffee Loving Cardmaking & hopping.  :)

I'm sharing with:

You are invited to the Inlinkz link party!

Click here to enter

Sep 26, 2016

Chalkboard Printable Pumpkin Latte Card


I'm back again with another card featuring these amazing digital images offered as freebies by Julee on the Verve Blog during last year's Coffee Lovers Blog Hop.  Thanks Julee!  Do check out her shop because she has some amazing coffee themed sets, and a new release coming next week!  I'm still in my chalkboard phase and decided to invert the sentiment and create a chalkboard background.  I rubbed it with chalk to complete the look.  I recolored the cups to a nice pumpkin color and watercolored them with Distress Inks.


Click on my label Coffee Lovers Hop to see all of my coffee themed cards.  Thanks again for your visit!  Happy Coffee Loving Cardmaking & hopping.  :)

I'm sharing with:

You are invited to the Inlinkz link party!

Click here to enter

Sep 25, 2016

All About the Ink Mixed Media and Coffee


I have a funky little quickie card to share with you today featuring this adorable coffee mug stamp by STAMPlorations.  They have so generously shared a freebie printable coffee image, so if you don't have any coffee stamps visit THIS page to download.  As a bonus, you can enter your project into their never ending challenge and possibly win some STAMPlorations stamps like I did with winning this set.  YAY for challenges!  :) I have used that image many times throughout these hops.  Click on my label Coffee Lovers Hop to see all of my coffee themed cards.


I used a Kaisercraft background stamp, embossed in white, and inked the panel with Distress Inks.  The text was computer generated and printed.  Thanks again for your visit!  Happy Coffee Loving Cardmaking & hopping.  :)

You are invited to the Inlinkz link party!

Click here to enter

Sep 24, 2016

Stamped Teacups Background Coffee Card


I squeezed in 9 cards for my goal of creating 8 cards for each day of the Coffee Lovers Blog Hop because somehow I had forgotten that I bought this gorgeous Prima Finnabair stamp just for this year's hop!  Doh!  Well I just had to go traditional with it and do a china themed card.  I thought the cup would be beautiful as a background, so I cut the text off of the stamp with an Xacto knife and glued it to the side of the stamp so I could still use it.


I layered with a Prima flower over a Prima die cut doily.  I thought the natural yellows/browns from the burlap helped balance the starkness of the blue and white.  The blue ink is "denim" by Adirondack.  It is the best ink ever!  I mixed some with water and gave my card a splash.  I picked up this pack of tiny silverware just to coordinate with this stamp.  So sweet!  Thanks again for your visit!  Happy Coffee Loving Cardmaking & hopping.  :)  Click on my label Coffee Lovers Hop to see all of my coffee themed cards.


You are invited to the Inlinkz link party!

Click here to enter

Sep 23, 2016

Distressed Plaid Background for a Fall Coffee Card


Happy fall y'all!  And happy Coffee Lovers Blog Hop to you!  I always get so excited when another coffee themed card making celebration comes around.  Join me daily through next Friday for coffee themed projects and inspiration.  To kick the week off I'm starting with my favorite card of this round made with this amazing image by STAMPlorations.  They have so generously shared this freebie printable coffee image, so if you don't have any coffee stamps visit THIS page to download.  As a bonus, you can enter your project into their never ending challenge and possibly win some STAMPlorations stamps.  I have used this image many times throughout these hops.  Click on my label Coffee Lovers Hop to see all of my coffee themed cards.


I started out by creating an inky background with Distress Inks.  I flicked some water to further grunge up my panel.  Then I stamped a Wendy Vecchi plaid stamp diagonally randomly over it to create what is to me the essence of fall - earth tones and plaid!  :)  I layered with a burlap doily and the images, also colored with Distress.


The flower is handmade using the Tattered Florals die and kraft paper.  The beautiful coffee die is by Verve stamps and the other text is computer generated.  Thanks again for your visit!  Happy Coffee Loving Cardmaking & hopping.  :)

I'm sharing with:

You are invited to the Inlinkz link party!

Click here to enter

Sep 22, 2016

Altered Jar Lid Christmas Ornament


I'm so excited to be sharing this altered candle jar lid as a guest at Frilly & Funkie today.  Our lovely hostess Sue has selected the challenge theme Going Round in Circles!  She says, "Including circles in my projects is one of my favourite things to do, so for this challenge I want to see circles, lots of circles, not just one!  Stencilled, stamped or even a circular project such as a wreath!"


I hope you will hop on over and see how I created this project.  It is truly an simple concept for creating holiday gifts.


I had in mind the little girl dressing up and wanting to be just like mommy for a Christmas gala.  I guess I am feeling nostalgic these days seeing my lovely daughters growing up so fast...


Here they are at last weekend's school dance.  So pretty and just as sweet!


I was so happy to find this braided jute trim on clearance for fifty cents and that it was the perfect width to cover the rim of my jar lid.  Don't you just love these "found relatives" photos by Tim Holtz?


I'm also sharing with:
Cards and More: No Designer Paper (I stamped the pattern on the burlap)
Retro Rubber: Anything Goes (this border stamp is two to three years old)

You are invited to the Inlinkz link party!

Click here to enter

Sep 19, 2016

DIY Kraft Resist and Berry Stems for a Rustic Reindeer Tag


I am thrilled to be sharing another round of inspiration with you on the IndigoBlu blog with my teammates today.  I have been about to bust to publish this post because I have developed two new techniques, which I think you will be just as excited about.  I hope you will pin these images to remember the techniques.


When thinking of how to use this gorgeous, yet rustic reindeer, my mind went straight to kraft paper.  I created a DIY kraft resist using fabulous IndigoBlu products and I know you will want to experiment with it on your own.  While you can use any stencil, you will definitely need a bottle of IndigoBlu Super Thick Slap It On.  This product is genius because it is thick enough to use as a texture paste, but sticky enough to bind almost anything, and all the while dries completely transparent.  I applied it through the Stars Stencil onto kraft chipboard and let it dry thoroughly before coming back and sponging my distress inks.  It resists beautifully!


I stamped my beloved reindeer from the Winterland Wood Set and the Christmas Word Block and embossed in gold to add a bit of bling to my rusty creation.  You can see gold and copper splatters, my new favorite trick using Goldfinger and Miss Moneypenny Copper Metallic Paints diluted with a tad of water.  This adds a beautiful sense of drama to any project.


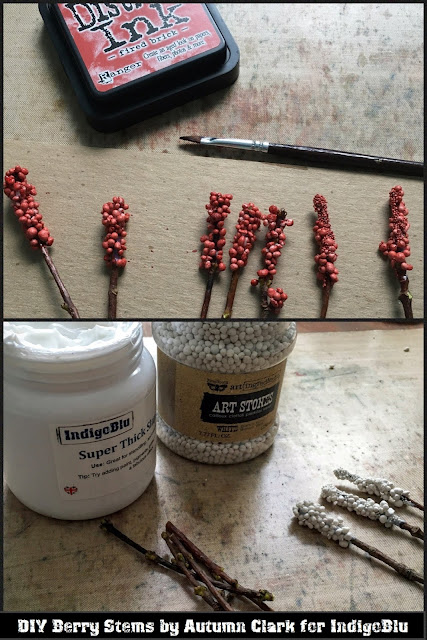
I wanted a beautiful dimensional bough for my embellishments and longed for some red berries to tuck in with my pine branches.  I've perused the craft store's flower isle and never found anything I really wanted to use on a card, so the wheels began turning.  I went into my yard and clipped some branches from my maple tree.  I put them in the microwave for a few seconds to dry them and kill any germs.  Next, I dipped the ends into Super Thick Slap It On and then into my Art Stones and let them dry completely before brushing on Distress Ink for color.  Viola!  Beautiful natural elements for any project!  I completed the bough by adding some basket fill, twine, and a beautiful Christmas brad.


I truly hope this project was inspiring for you today and will get you in the spirit for Christmas crafting.  Do check out the selection of Christmas stamps just released in the IndigoBlu shop today.  As always, I truly appreciate each and every comment.  

Popular Posts