Dec 23, 2019

Inky Antics Oxide Spray Birthday Card


Happy Monday!  It's time for a new challenge at the Simon Says Stamp Monday Challenge and the theme for the next two weeks is Party Time!  That means you have two weeks to play along this time.  I've created a card with Distress Oxide Sprays and fabulously fun images by Inky Antics.


This is my last week in the designer spotlight, but I have so enjoyed joining the Monday Design Team for the past month!


I was anxious to play with my new Distress Oxide Sprays my dear husband gave me for Christmas, so I sprayed several colors on a watercolor panel until I was pleased.  Next, I stamped the panel with the Tim Holtz Dots & Circles stamp set in Distress Oxide Tumbled Glass and Twisted Citron.  I used my Stamp Platform so I could stamp each design multiple times to get a more vivid color.  I cut my panel to size, then stamped Tim's Stitches stamps along the perimeter.  


This darling birthday girl is from the Inky Antics Sassy and Saucy stamp set.  I colored her with Zig Clean Brush Markers.  I drew her a hat with a marker on scrapbook paper and adhered her to my panel.  I stamped the coordinating sentiments from a very old Tim Holtz clear sentiment stamp set.  Then added a Shadow Script 2 die to complete the saying.  


I hope this fun card has made you want to party with your art supplies today!  I know I had a blast making it.  We hope you will join along with your Party Time creation for a chance to win a $50 gift certificate to the Simon Says Stamp shop.


Dec 20, 2019

PaperArtsy Row Houses and Recipe Cards


Hello my friends!  I'm thrilled to be sharing a new post on the PaperArtsy blog today for the current A Bit of Sparkle Topic.  I've used several fun images by Elenazinski Art for this housewarming giftcard set.  Here are a few of my favorite sparkly things this year.  What are yours?  Come on by and check out the post and have a happy weekend, Autumn


https://shop.paperartsy.co.uk/zinski-art-387-c.asp

https://shop.paperartsy.co.uk/zinski-art-387-c.asp

Dec 16, 2019

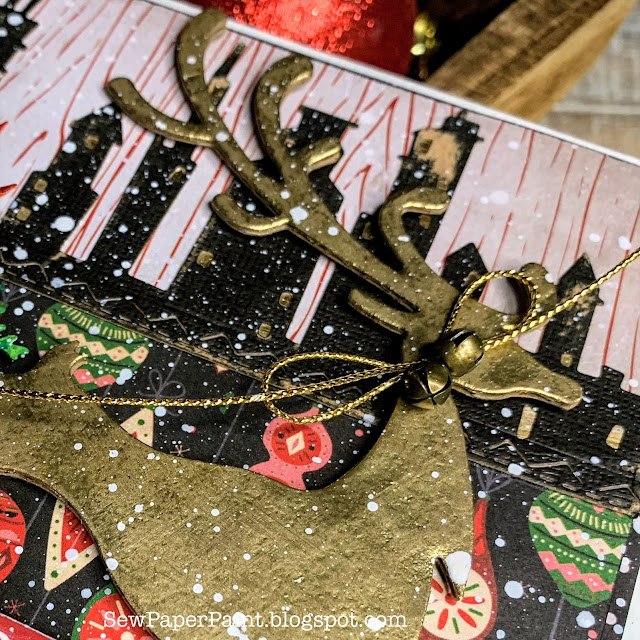
Tim Holtz Reindeer Cityscape Christmas Card


Hi friends!  It's time for a new challenge at the Simon Says Stamp Monday Challenge and I'm thrilled to be back again in the Designer Spotlight this week.


Our theme for this week's challenge is Cityscape.  We hope you will come and play along!  My card features the Tim Holtz Reindeer Bigz die , Cityscape die. Tim's Christmas Paper Stash and his Large Funky Festive poinsettia dies.


I layered my paper and used the Stitched Rectangle dies to cut the edges of the paper layers.  The sentiment comes from last year's Christmas Quote Chip.


I cut the Reindeer from corrugated cardboard and embossed with Ranger's Princess Gold embossing powder.  I sanded him to tone down the glossiness, then tied a bow around his neck with some Tim Holtz Tiny Bells.  The Large Funky Festive poinsettia lays over a bed of punched Juniper greenery.  The center is adorned with Tim's Metallic Droplets.


We hope you will join us for this week's Cityscape challenge for a gift to win a $50 gift card to the Simon Says Stamp shop.


I'm also sharing with:

Dec 9, 2019

Simon Says Woodland Gnome Christmas Card


Happy Monday!  It's time for a new challenge at the Simon Says Stamp Monday Challenge blog and I am thrilled to be back again in the Designer Spotlight.


Our theme this week is Stars.  I made a card featuring some favorite new Christmas products including the Simon Says Stamp Large Gnome and Tim Holtz Alpine sets with stars from the Snowy Stars and Great Outdoors stamp set.


I used Tim's Christmas Paper Stash to make my mountainscape and to cut my gnome.  I added splashes of gesso for a snowy effect.  I doodled "hangers" for my star banner and colored my stars and background panel with Evergreen Bough Distress Ink and Oxide.  I coated the stars with Ranger's Glisten Stickles.  I stamped the stars from the Great Outdoors set in the same ink and also embossed some in Ranger's Mint Chip Speckle embossing powder.


I added a holiday Small Talk sentiment and a die cut from Tim's Circle Words with twine and jingle bells for embellishments.  Make sure to check out the Christmas dies at Simon Says Stamp for even more fun inspiration.


We hope you will come play along for a chance to win a $50 to buy your favorite Christmas products at SimonSaysStamp.com.   Thanks for visiting and happy Monday, Autumn <3

https://www.simonsaysstampblog.com/

Dec 7, 2019

Tim Holtz Into the Woods and Plaid Stamps Christmas Cards


Call it obsessive personality if you like, but when I love something I LOOOOOVE it hard!  And this year's new Tim Holtz Into the Woods stamp set is one set of images that I LOOOOOVE!  ;0  And because of that I have used it again and again.  And again and again and again!  LOLOL!  Today I'm sharing some of the cards I have been working on this Christmas season.  I've adapted a new motto for this December and it is #2019finishline.  Maybe it should be #2019finishwell?


I haven't done so many things that I intended to do this season, like post these cards, clean up my studio, make time for special projects and people that are important to me...  But I've made up my mind to finish this year well by getting to things that are tugging at me.  I read an amazing article recently on procrastination HERE.  It has truly helped me change my mindset and push me towards a better, more productive life.  I hope it will be an encouragement to you too. 


This one is my favorite of these cards.  The traditional vibe speaks to me with all the Christmassy touchy-feelyes.  <3  I wanted to play with the Tim Holtz Lumberjack stamp set.   I was curious to see if I could get a two toned plaid by stamping the image right side up and up side down.  I put my inky panel in my Stamp Platform and stamped in black.  Then I turned the paper upside down and embossed in Ranger's Vintage Pearl embossing powder.  I LOVE this color!  I decided to make a window of this panel and not wanting to waste any of this cool design I had created, I used Tim's stitched rectangle die and cut out the center to save for another card.  I added a second, smaller window by inking a panel with Gathered Twigs and embossing with the 3D Lumber texture fade.  I cut it with the next smaller sized rectangle die. 


I embellished with another new favorite, the Large Funky Festive die set.   The ribbon is by Tim and I inked it with more Gathered Twigs.


The tree and greenery are from the Home for the Holidays die set.  I embossed the bare trees with Distress EP in Walnut Stain.  The sentiment is from last year's Great Outdoors stamp set, which coordinates so beautifully with this year's Into the Woods.  


The mistletoe bundle is also from the Large Funky Florals set.  Mr. Moose is looking for his Mrs.  Ha!


This card evolved from some fun experimenting.  I inked Ice Spruce Distress Oxide onto my craft mat and pressed a watercolor panel into the ink, focusing on inking the center only.  When I lifted the panel, I spritzed the edges of the ink to allow the color to bleed outward.  I blasted with my heat gun, then added some silver embossing powder to the areas that were still a little wet, where the color had pooled.  It made the coolest icy, crystalized effect.  :)


I layered over Tim's Snowy Stars background die over Metallic Kraft Core.  I embossed Mr. Polar Bear and made him a snowy scene with dies from the Home for the Holidays die set.


And another play with the Lumber plaid stamp.   Stamping in two colors of Distress Ink.  I used the same colors (Peeled Paint and Chipped Sapphire) along with Pine Needles to ink up my background.  I wanted to cast the full set of characters, so Mr. Fox came to play in this woodland scene. 


I could make plaid backgrounds for DAYZ y'all!  <3  And I'm so excited about using the Snowy Stars background dies on my inky panels.  I have quite a pile!  I hope you've enjoyed seeing these cards and are inspired to play with your stamps today.  Happy holidays!   Hugs, Autumn


See my other cards with the Into the Woods stamps HERE.
http://sewpaperpaint.blogspot.com/2019/12/into-woods-tim-holtz-stamped-christmas.html

I'm sharing with:
You are invited to the Inlinkz link party!
Click here to enter

Dec 3, 2019

How to Host a Holiday Craft Party

 
Happy December crafters!  Last year I couldn't get around to participating in the In My Creative Opinion 25 Days of Christmas Tags challenge, but this year I just had to find time to play along.  This is Tracey McNeeley's NINTH year of hostessing this fun and easy challenge.  This is my second year participating.  But the idea for making this into an annual holiday craft party has been brewing for some time...  My daughter and I regularly craft with my friend @carolinasweetlee.  Together, we developed quite the system for making a load of tags in one day's play.  Here's how...  Make sure to pin this for reference later.  :)

https://inmycreativeopinion.blogspot.com/2019/11/the-25-days-of-christmas-tags-2019-main.html


Start an assembly line.  Either come to the craft party with multiple sized tags precut/purchased for each participant or do like we did and spend the first hour in assembly line style production die cutting your tags and embellishments.  Cut at least four of each element for every person.  Make sure to have a variety of sizes and shapes for your tag bases.


Break for food.  Our arms were tired at this point so we stopped for tasty snacks/lunch.  Ask each participant to bring something simple to pull together a quick bite. 


Get inspired.  Have the coordinator email/text Tracey's Pinterest board to the group for inspiration.  Each player can pull up the board on her phone while they craft.  CASE the tags using products you've gathered beforehand.  Have each player bring a few key stamps or dies.


Make multiples.  The best way to end the day with a great variety/quantity of tags is to make at least 3 or 4 of each tag as you go.  It is so much easier to  make a few of one tag at a time than to spend all that time and end up with only one tag.  Go for gold!


Finishing touches.  Assemble your tags first, embellish last.  As you hunt for bling or ribbon you can grab what you need for each set of tags at once rather than spending time on a treasure hunt for just one set.  Plus if you all pull our your ribbons and accessories at the same time you can trade and share.  

 via

Wrap it up.  To finish the day sort and photograph your tags, take a group selfie, then make a few quick and easy gift boxes.  I've shared a post HERE with tons of sized boxes you can make with a bit of cardstock and a scoreboard.  Give away sets of 6-12 tags in little boxes.  What a perfect way to say thank you/Merry Christmas to teachers and coworkers!


I made a simple box following the instructions on my post, die cutting a window before gluing, then embellishing with upcycled ribbon and Tim's Shadow Script Christmas dies.

My original post:
https://sewpaperpaint.blogspot.com/2018/10/boxed-gift-cards-tutorial-free-printable-template.html

Now let's take a look at my tags and the beautiful creations that inspired them.  I used 95% Tim Holtz products for my tags because those are the products I have and love the most.  It's always fun to make something "your way" you know?  :)  Make sure to visit Carol and Sydney's Instagram pages to see their tags. 


First up, this bright set.  I used Distress Oxides with Tim's Tattered Christmas stamp set and coordinating die cuts.


I stamped Tim's Festive Overlay stamp set onto tags I cut from the Labels die set and embellished with Festive Things dies.


  Day 25
Inspired By Leanne West


The sleigh stamps are from the Mini Carved Christmas stamp set stamped onto Stacked Postage dies.


 Day 25
Inspired By Tracey McNeely


I layered Festive Things dies and Holiday Words dies with stamping from the Flurry and Pine stamp set stamped in Picket Fence Distress Ink.


Another version of this tag using the Tattered Christmas stamps and Distress Markers.


I used an Elizabeth Craft mistletoe die over Tim's Snowfall and Speckles Texture Fade.


Mini Carved Christmas stamped in Festive Berries DI with punched Juniper over Mini Swirly Snowflakes


Using punches is a great timesaver.  This XL snowflake punch is by Martha Stewart.  I used the castoff portion to CASE these tags.  I inked them with Evergreen Bough DI and stamped them with the Tattered Christmas sentiment.


Throughout the year when I participate in the 30 Day Coloring Challenge, I do some coloring with my future tags in mind.  This darling stamp set is by STAMPlorations, colored with Distress Markers and layered over Tim's Paper Stash.


More Paper Stash layered with Mini Carved Christmas

Inspired By Just Me: Carol


More Tattered Christmas stamps colored with Distress Markers over sponged Distress Oxide backgrounds. 
 
Inspired By Leanne West


Ranger Mint Chip Speckle embossing powder over the Martha Stewart punched snowflakes, layered over Tim's Snowfall and Speckles Texture Fade.

Inspired By Julie Beech


These were a fun way for me to mark my kid's Christmas Eve gifts.  We always forget which box they are in!  LOL!  I used Tim's Storybook Bigz XL die with stamped Mini Swirly Snowflakes.


Thank you so much Tracey for hostessing another fabulous year of inspiring tags.   Check out these generous sponsors for Tracey's challenge.  Make sure to check out the rules in her post HERE to play along.  This challenge ends on December 6, but make sure to follow In My Creative Opinion in anticipation of next year's challenge.  Hugs, Autumn

https://inmycreativeopinion.blogspot.com/2019/11/the-25-days-of-christmas-tags-2019-main.html

I'm also sharing with:
You are invited to the Inlinkz link party!
Click here to enter

Popular Posts