Showing posts with label Fresco Acrylics. Show all posts

Mar 29, 2024

PaperArtsy Scrapcosy Spring Tulip Cards


Hi friends and happy Easter weekend!  I’m so thankful that He is risen indeed!  I had a little crafty time with some friends and we had a good play with Raquel’s/aka Scrapcosy stamps by PaperArtsy. 


I picked out some pages from Raquel’s Art Journal Volume 1 collage book and lightly brayered first a darker color of PaperArtsy Fresco Chalk Acrylics. Then lightly brayered a lighter color. For the green page I used Granny Smith and Peppermint. Sadly, I didn’t note the other colorways. :(


I overstamped the tulips from ESC31. 


I then stamped images from ESC30 in the background using coordinating colors of Distress Oxides. 


I colored each flower with colored pencils, using white as a blender and to make the colors pop against the background. 


I finished each card with stitching and crocheted lace. And added a stamped sentiment from ESC29. I hope you are inspired by these grungy spring makes and have a wonderful Easter weekend. xx, Autumn 


May 17, 2023

Tracy Evans AALL & Create Accordion Mini Book


Hi friends!  Today I have a new accordion mini album to share with you from my second time working through Tracy Evans' Accordion Book Workshop.  I made Tracy's album very similar to her original in the live class several years ago, posted HERE.  It's always great fun to take one of Tracy's classes, which you can join through her FB group HERE.  


For the covers of my book, I used an Eileen Hull die.  My insides were a little too thick, so I added a button closure.  I used PaperArtsy Fresco Chalk Acrylics in Hint of Mint, Sargasso and Blue Jeans.  I've created a little flip through on YouTube HERE.  


For my pages, I used Distress Oxides in Cracked Pistachio, Shaded Lilac, Faded Jeans and Salvaged Patina.  I added in some Squeezed Lemonade Distress Ink for the pops of yellow.


My mom and I worked through this class together and it was a lot of fun.  I ended up making two similar books rather than decorating the backsides of my accordion and will try to share book two with you soon.  


You can see many of my projects featuring Tracy's stamps HERE.  

Mar 28, 2023

Topflight Stamps Birthday Blog Hop Rocking Circle Cards with Jofy PaperArtsy Stamps


Hi friends!  It's Topflight Stamps 6th birthday and to celebrate, I’ve teamed up with some great designers to showcase celebratory projects using the unique products available at Topflight Stamps. Please hop along with us and see all the beautiful talent from this group of amazing designers! There is a master list of Hop stops on the Topflight Stamps blog! We are also Hopping on Instagram! You can start at the Topflight Stamps account @topflightstamps.

Did we mention there will be prizes?

To celebrate, I decided to share a quick tutorial with you on using gel prints to make rocking cards - how fun!  First, let me show you how I made a couple of bright and cheery prints for my backgrounds.  I used my 8x10" Gel Press printing plate, but for this project you could use a 6x6" or 5x7" plate, as you only need two 5.5" circles to make four cards.  


I started with a color palette of PaperArtsy Slimed, Bubble Gum, Cherry Blossom, Sargasso, Aquamarine and Cloud 9 Fresco Chalk Acrylics.  You can see I added a tiny blob of each color along my plate.


Next, I used my small 2" Speedball Brayer to blend the colors all around.  I was careful not to mix the colors, but to blend them in small sections and brayer off onto a scrap paper before switching colors.  


Because I used a lot of colors, even with the smallest blobs of paint, I still had a very wet gel plate.  I wanted to leave a lot of the color on the plate, so I pulled my print by only tapping lightly on the paper.  You can see the result below.  


This left a lot of good paint for me to continue to work with.  Those built up layers are what you want when making gel prints, so never clean your plate!  ;0  Now, I added PaperArtsy stencil 309 by Jofy (PS309) to my plate and added a few dabs of paint to brayer OVER the stencil.  I tried to add the colors in contrast over the base colors.  


I lifted the stencil then pulled some of the dark pink dots onto my first print by lightly bending my paper and pressing lightly into the paint.  


There was still plenty of paint left for a second print.  The second prints are usually the best because you've built up your layers.  This is the one I used for my cards.  


Next, I took the largest cutting dies from the Crealies XXL Nesting Circle Dies and cut four circles from heavy white cardstock.  Then I took the next size and cut two circles from my gel prints.  I folded all of the circles in half and creased with my bone folder.  I cut the printed circles in half.  


Next I worked on my focal images, the beautiful rainbow stamps by Jofy for PaperArtsy, JOFY110.  I stamped them all out onto Bristol using Versafine ink and heat set them.  I stamped an additional image onto a post-it note to create a mask, then used my Studio Light Ink Blending Brushes to sponge the circles from the coordinating stencil by Jofy for PaperArtsy (PS308) around the stamped rainbow.  My Wendy Vecchi Stay-tion worked great for this!  I chose coordinating Distress Inks, choosing Tumbled Glass, Twisted Citron and Picked Raspberry for the sponging.  


I got really excited at this point, seeing all of those loopy borders after removing the mask.  


I used my Prism Brush Markers to color the rainbows and adhered my pieces, layering with stamped clouds from the Studio Light Art by Marlene Sunny Days stamp set, which I tinted to match.  


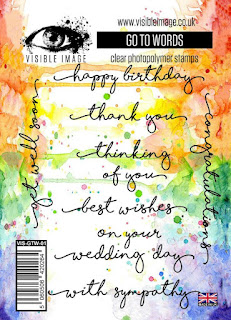
I stamped the happy birthday sentiments using the Visible Image Go To Words set.  I really enjoyed mixing up the color scheme based on the portion of the gel print I used for each background.  As a bonus, the cards rock when you touch them!  Make sure to visit my IG @sewpaperpaint for video clip.  If you haven't tried this style of card or played with your Gel Press in a while, I do hope you've been inspired to do so today!


GIVEAWAY DETAILS
Of course, it wouldn’t be a birthday celebration without prizes! Topflight Stamps is giving four lucky winners $50 Gift Certificates to the store. Two winners will be chosen from commenters on the blog hop and two will be chosen from commenters on the IG hop. For a chance to win, make sure to visit the stops on the hop and leave a comment by April 1st. Winners will be announced on the Topflight Stamps blog on Monday, April 3rd. Please note winners must be US Residents for shipping purposes. Good Luck!



Find these stamping products at Topflight Stamps!


Sep 30, 2022

Art by Marlene So-Fish-Ticated Mixed Media Art Journal Pages


Hello friends!  I'm back with you today to share a couple of funky journal pages I made with my Art by Marlene stamps.  This first page was made with the fun blowfish stamp from the Sea Creatures stamp set from the So-Fish-Ticated line.  I just love this set!  I used the stamp to make a pair for this page and colored them differently to make a male and female.  


I used my Prism brush markers to coordinate with a gel printed background I made using the Vibrant Flowers stencil and PaperArtsy Fresco Finish Chalk Acrylic Paints.  On the side I embossed in white the Bold and Bright Floral Simplicity stamp set stems.  Then I added black die cuts from the Floral Style Marlene's World die cut set.  


I finally got to play with my Essentials Rub-On Transfers for the sentiment.  I added some white highlights with my Posca paint pen.  


My next page features another gel print using the Vibrant Flowers stencil and the plus sign stencil.  I added some doodling and lots of messy stitches.  


The fantastic lobster image is from the Underwater World set, also from So-Fish-Ticated.  I love him so much!  


And finally, the shell is also from the lobster set.  I had so much fun coloring these images.  I hope you've enjoyed these funky pages.  I'll be sharing some others on the Topflight Stamps blog and you can see my Sally Seahorse page HERE.  She is my absolute favorite ABM stamp!  Thanks for your visit today, Autumn

Popular Posts