Nov 25, 2023

Studio Light Christmas Cards


Hi friends!  I’ve been in Christmas cardmaking mode and have had a few great sessions using new Studio Light stamps. My first card features the Poinsettua Song stamp by Jennie’s Mindful Art (JMA). 


I did a simple white embossing and colored with Distress Inks in Chipped Sapphire and Blueprint Sketch with Festive Berries and Lumberjack Plaid. I finished with a bow using the SL Craft Twine. 


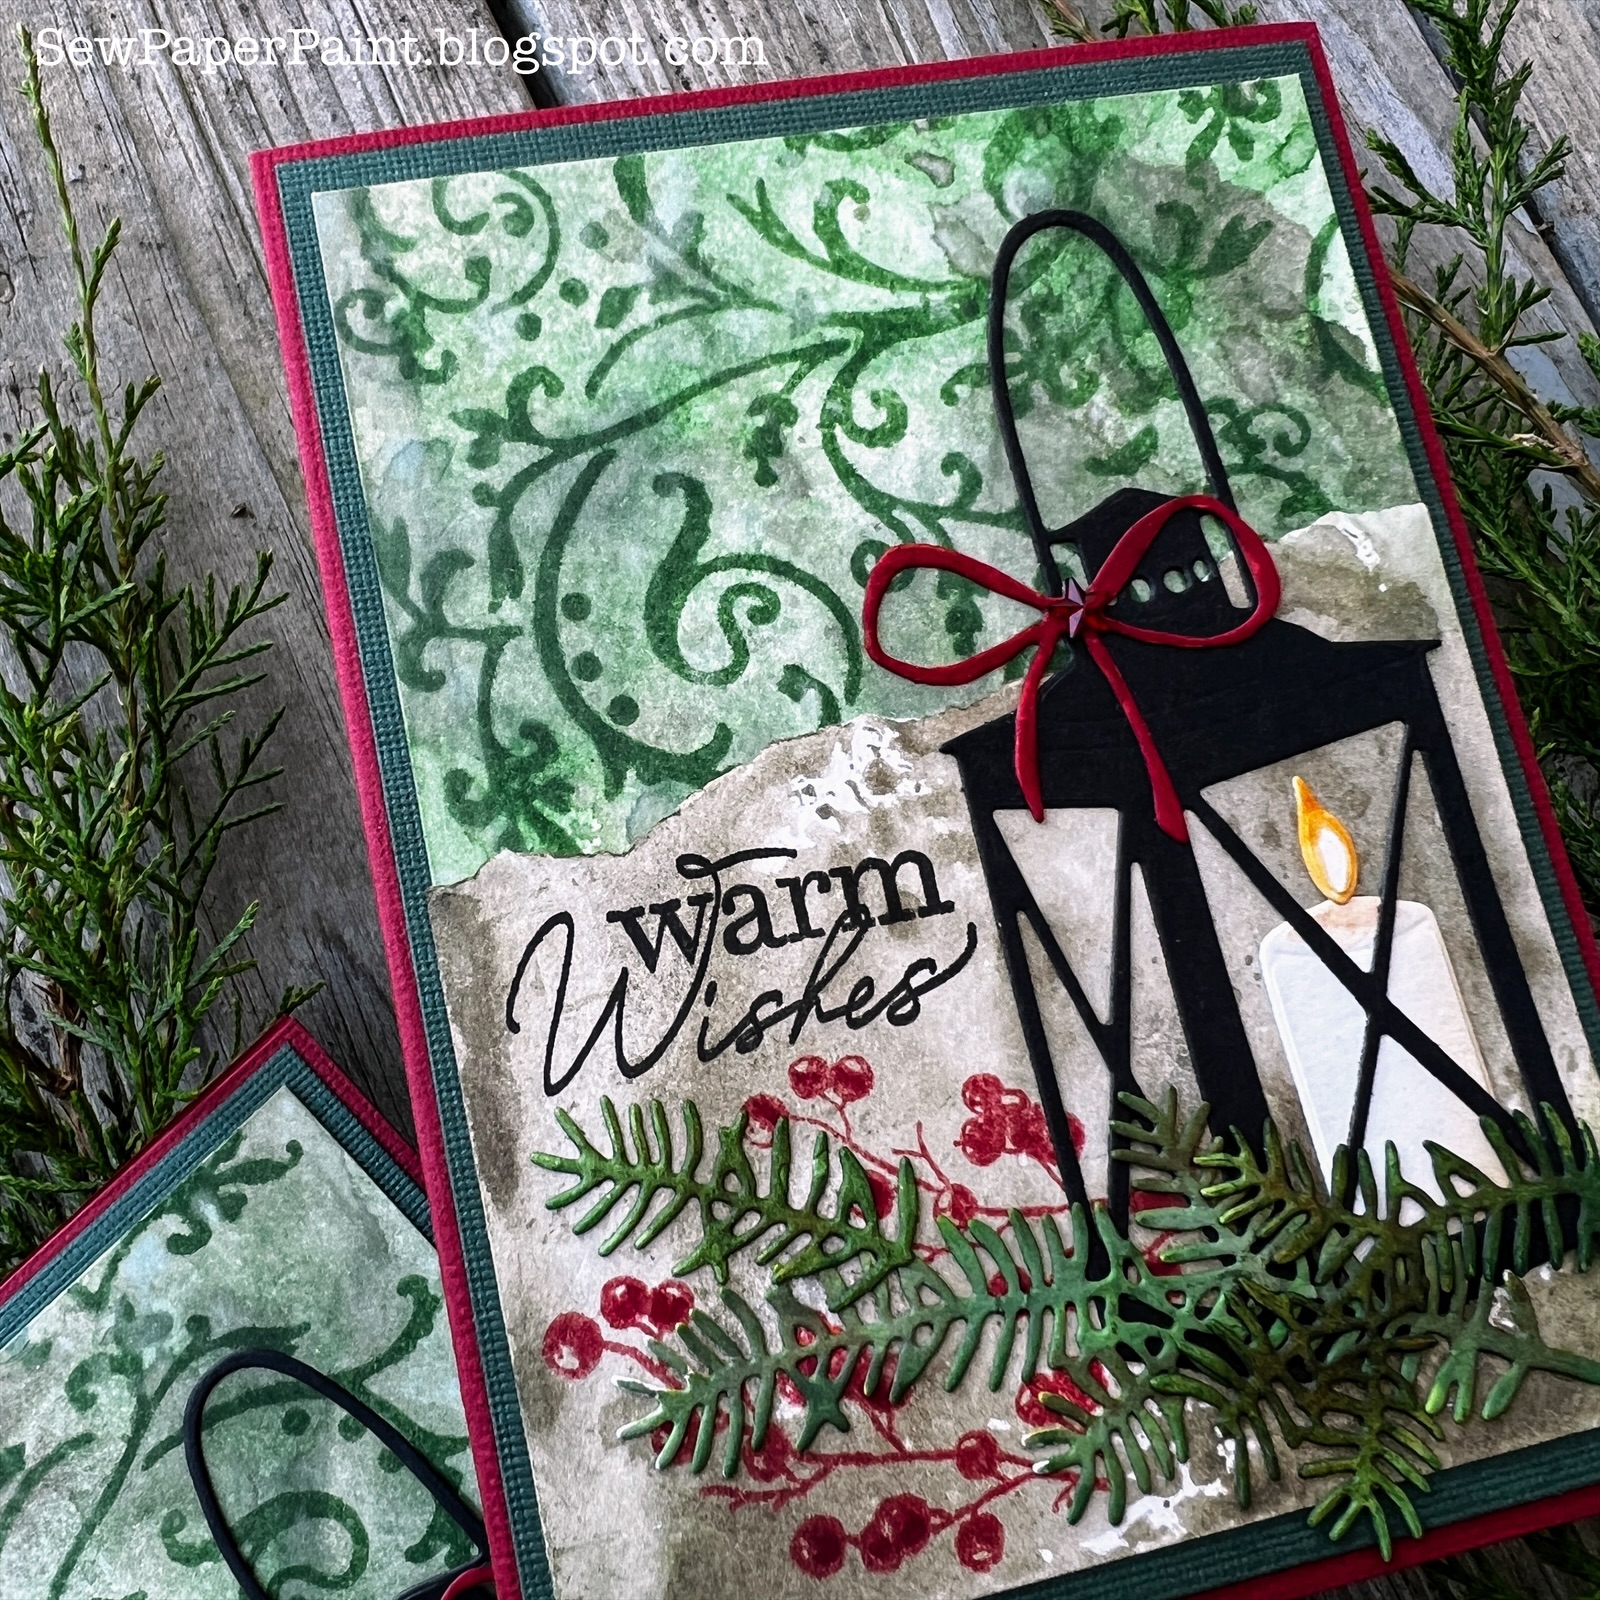
My next card features the Lantern Scenery dies. I sponged an inky Rustic Wilderness background with the Ornamental Swirls stencil for the top portion. 


Behind the die cut greenery I stamped berries from the Christmas Greenery set in Lumberjack Plaid. I finished with a sentiment from the English Sentiments and a Self-Adhesive Star gemstone. 


This card also features the English Sentiments with a background made using Antique Linen and the Christmas Script stamp. I embossed the Making Christmas poinsettia in gold and colored with Peeled Paint, Old Olive, Fired Brick and Rustic Wilderness. 


This card has an inky background of Frayed Burlap and Antique Linen with a spray stamped from the Christmas Greenery set and Sentiment from English Sentiments. 


I absolutely love these stamps and look forward to using them again soon. 


This card features my favorite set from the Magical Christmas collection, Birds. I enjoyed repeat stamping this robin with my stamp platform then adding additional watercolor details. 


I layered him over another of the sentiments and a flower made from the Poinsettia Cutting Dies. The center was filled with SL Adhesive Pearls in black. The background was stamped with the Wood Background stamp. 


I made another card with the Birds stamps and Lantern Scenery dies. This one has a Chipped Sapphire and Black Soot background stenciled with paste using the Winter Sparkle stencil. I added ornaments from the Christmas Embellishments Cutting Dies. 


I finished with the SL Snow Effect 3D snow writer. I love the dimension!  I hope these cards have given you some ideas for your own cardmaking fun. xx, Autumn


2023 Studio Light Christmas Collections


Oct 18, 2023

Sweet 'N Sassy Stamps Christmas Cards


Hi friends!  I'm back to share part two of my projects for my guest designer stint with Sweet 'N Sassy Stamps this October.  For today's first project I have a pair of shaker cards made with the gorgeous new Pine stamp & die bundle.  I'm really excited about the addition of these dies and how well they add dimension.  


I created some inky backgrounds by dipping two bristol panels in watery Antique Linen and Frayed Burlap Distress Inks.  This warmed up the white just a little and left some good ink drops here and there.  Next, I used Bundled Sage, Peeled Paint and Gathered Twigs to ink each pine bough, then off stamped, then spritzed with water for very faint images in my background.


I then used my stamp platform to restamp the images in the same colors multiple times, with much less water spritzing for my focal pieces.  I used the coordinating dies to cut them out.  On the pinecones, I used a little extra ink to watercolor and fill in the images.  On the center of each of my background panels, I stamped the gorgeous hymn from the Best Gift Ever sentiment set.  Finally, I cut some square frames from kraft card to finish the shakers.  I gave each card a splash of white watery gesso and a loopy baker's twine bow.  I'll share a video on Instagram so you can see these shakers in action @sewpaperpaint.  


For my next card, I created a faux snow globe by cutting a circle from kraft card and layering over a rectangle with the top corners snipped off.  I edged the black in gold ink to help it pop.  Inside I stamped the bear from the Woodland Scene Silhouettes.  I just love him!  I added some watercolor with Black Soot Distress Ink to ground him.  I layered a sentiment from the O Holy Night set and a loopy twine bow.  


For my background, I used the incredibly cozy new Knit background stamp.  I clear embossed it onto red card, then sponged the edges with Black Soot and gave everything a splash of watery gesso.  


For my last card this month, I used one of my very favorite old sets, We Three Kings.  I embossed it on a black panel and gave it a splash of Finetec gold metallic watercolors.  These are highly pigmented watercolors.  I used Staz On to stamp the sentiment onto gold card.  For my background I used the newly released Large Snowflakes background stamp.  I embossed it in gold onto silver card, then splashed with black gesso.  I hope these cards have inspired you today.  Find more inspiration in my previous posts HERE.  xx, Autumn


More beautiful products used:


Oct 9, 2023

Winter and Christmas Release at Sweet 'N Sassy Stamps


Hi friends!  I'm delighted to be joining Sweet 'N Sassy Stamps as a guest designer for October.  It was great fun to make a batch of Christmas cards with the new releases.  Up first, I used the incredible Large Snowflake 6x6" background stamp.  


I used Distress Ink in Festive Berries with my stamp platform to stamp the snowflakes, then over stamped in Versamark ink and embossed in holographic glittery embossing powder.  I really love the shimmer!  


I finished the card by adding a strip of glitter cardstock in aqua and a row of cocoa or lattes - you choose - using the adorable Coffee Talk stamps & coordinating die set.  I tucked in a folded doily and added the stamped "Joy" using the same technique as the snowflakes with Distress Ink in Evergreen Bough.  The stamp is from the Choose Faith set.  I finished with a loopy crinkled bow.


Up next, I played with the perfectly cozy new Knit background stamp.  I inked it with Distress Ink in Evergreen Bough and spritzed it with water for a different effect.  

I layered two of the mugs from the Coffee Talk stamps & coordinating die set over a Vintage Photo inky circle and paired with a sentiment from the Blessings in Disguise stamp set.  I used my tiny attacher (stapler) and a little bakers twine to finish it off.

My last card for today is an ink blend design.  I used torn paper as a mask and blended snowy hills using Distress Oxides in Salty Ocean and Faded Jeans.  I gave the panel a splash of water, watery gesso and each watered ink color for a faux snow look.  I stamped the deer from the Scene Silhouettes stamp set.

I finished by repeat stamping the beautiful new Christmas Pine stamps with Distress Inks in Chipped Sapphire and Black Soot, then cutting with the coordinating dies.  I topped the card with a loopy bakers twine bow.  


Make sure to take advantage of this awesome stamp & die bundle sale!


Other beautiful products used:


Aug 2, 2023

ICAD Faith Art Journaling Cards with Sweet 'N Sassy Stamps


Hi everyone!  I've been very sick this month, but am finally able to share the remainder of my projects for my Sweet 'N Sassy Stamps Guest Designer spot.  I decided to create some journaling cards, after finding a really neat old wooden recipe box, and thinking it would be great to pull one out from time to time for daily inspiration.  I'm sharing a quickie video on my gel printing methods using my Gel Press printing plate and neon paints HERE.


I used the gorgeous Floral Doily Stencil by Sweet 'N Sassy Stamps for my printing and neon paints from Michaels, mixed with a little Folk Art Acrylic in white.  


I added some doodling with my Posca white paint pen and then proceeded to layer my torn gel printed papers with stamping.  For this first card I focused on the awesome Grace stamp from the Choose Faith stamp set.  


I actually printed on some upcycled tabbed dividers and thought it was fun to incorporate the tabs into the design.  I added some layers with washi tape and staples.  I tucked in a stamped and die cut image from the Be A Wildflower set, which I just smudged neon yellow paint onto with my finger.  


On my next card, I stamped the tiny leaf silhouette to make some faux washi and added one of the beautiful Hope Word Art sentiments.  I did a little stamping in Tumbled Glass Distress Oxide in the background for a hint of blue and gave everything a splash of watery black gesso.  I mounted the cards onto black cardstock for stability, used a corner punch, then edged in black ink.  I really look forward to building my collection of cards in my recipe box and drawing out daily inspiration.  


I hope these cards have inspired you today and you'll take a look at the inspiring products available on the Sweet 'N Sassy Stamps website!  xx, Autumn


Popular Posts