Dec 16, 2021

Graphic 45 12 Days of Christmas Cards


Happy Christmas friends!  I hope you are having a beautiful season of warmth and love.  Today I have some cards to share with you featuring the beloved 12 Days of Christmas paper by Graphic 45.  I try not to share too many "throwbacks" with you, but my mom and dear friend bought this paper years ago and never quite found time to make cards together.  With last year's rerelease of some Graphic 45 collections from "the vault" I thought some of you might have this paper now and appreciate these cards.  We had a delightful day of making and ended up with all of these cards from one day together! 


We did A LOT of fussy cutting to maximize the paper, as it was all we had (no chipboard, cutouts, etc.) and I think the results are really beautiful.  I also think I need to ask dear old Santa for a Scan 'N Cut for Christmas!  Whew!  LOL!


We feed off of each other's ideas.  This gorgeous maids a-milking card and the beautiful calling birds were designed by my friend, Barbara.  She has such an elegant style!


I hope you've enjoyed these and are inspired to do a little paperwork of your own.  Merry Christmas, Autumn

 Click the InLinkz to view more Graphic 45 Collections!

You are invited to the Inlinkz link party!

Click here to enter

Dec 2, 2021

Sweet 'N Sassy Stamps Woodland Christmas Cards


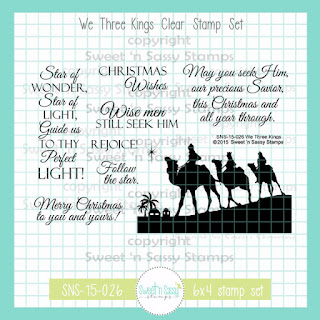
Hello friends and happy December!  I'm delighted to be joining Sweet 'N Sassy Stamps as a guest designer in December.  I've had such fun playing with these stamps for some simple Christmas cards.  First, I used the Scene Silhouettes: Woodland set to stamp in white on a black cardstock panel, then rubbed over it with chalk for a chalkboard stamping effect.  I know there are other ways, but I find it easy just to use white EP and chalk, easy peasy.  I stamped the Texture Tiles plaid background set in black onto red cardstock for a bold look and added a sentiment from the Christmas Wordfetti set.  I ADORE this sentiment set and stamped the whole panel at once to have a stash of sentiments ready for my next project. 


I think I had the most fun stamping this background.  I've been drooling over the Pinecone Background stamp since it was first released.  It's a perfect 6x6 size.  I added it to my stamp platform and used Distress Ink Pads to stamp different colors at a time with a light spritz of water between stamping.  This way I was able to build up various shades of greens and browns.  When I was happy with the panel, I added some loose watercolor to the pine cones themselves for a richer look.  I paired with a sentiment from the Best Gift Ever set, I just love that phrase!


I'm so into plaids, y'all just don't know.  So I had to make one more buffalo check project.  I used the above mentioned Texture Tiles stamp set for my background.   I used a sentiment from the O Holy Night set and added some twine, and punched spray. 


For my final project I had fun with ink sponging to make a wintry nighttime scene.  I used torn paper as a mask to sponge the snowy hills I then gave everything a generous splash of water and blotted the droplets to remove some of the Distress Ink.  I stamped the images from the Scene Silhouettes: Woodland set and doodled in the branch with a "flowy" black ink pen.  I added a little shading beneath the creatures with watery black.  Then I went in with a white Posca paint pen and added highlights to the hills, snowy piles to the branch and dots of falling snow randomly across the entire panel.  I finished with one of my leftover stamped sentiments from the Christmas Wordfetti set.  I could sit all day and stamp these types of scenes.  It's really enjoyable!  I've been completely inspired by the work of Lisa Taggart on YouTube.  If you're interested, make sure to check her out.  And please take a moment to visit the Sweet 'N Sassy Stamps website to view the entire line of gorgeous stamps!  xx, Autumn


Nov 26, 2021

Free Christmas Collage Printables for December Daily


Hi friends! I'm excited to share some new collages with you today.  After much thought, I decided against doing a December Daily journal this year.  I want to free up my time to do more fun things like watch the good Christmas movies and make cookies with  my kiddos.  I LOVE DD and think it is a great project and hope you will find inspiration from my journal last year posted HERE.  I'd love to see links for yours in the comments and maybe by next year I will have my ducks in a row again.  For now, I've spent a small amount of free time working on these collage style cards.  I'm excited to share the links to these free printables with you to help you get your projects together too. 

Y'all know I'm from South Carolina, so this magnolia card really gives me the southern feels.  :)  I paired it with a gorgeous fussy cut deer.  Find the deer image HERE.  Find the vintage magnolia image HERE.  I used my photo storage software (Google Photos) to edit the image and intensify the colors/contrast.  Here is my version.  Right click to open in a new window to save.


I used lots of scrap Tim Holtz papers from years gone by for the backgrounds.  I enjoyed using this deer illustration, which I cut as a tag.  I also fussy cut THIS vintage holly postcard from The Old Design Shop.  This blog is a great resource, but it takes time to hunt through.  I recommend pinning each page's graphic to a Pinterest board so you can find it easier later.  HERE's my printable Pinterest board.


I love a good reindeer image for Christmas!  This one was a free Graphics Fairy download with lots of other great deer images on the post HERE.  I love to pair non-Christmas vintage postcard images, labels and postage with my more Christmassy images to make my collection work harder for me.  It takes time to collect images and to prepare your files and cut the printouts, but I love how I can customize my finished work with them!

Finally, my favorite card from this batch features a stunning red bird, the Pompadour Chatterer.  You can find him HERE.  And below is my edited version.  And the gorgeous Rowan berry image is another The Old Design Shop freebie found HERE.  I use recycled cardboard boxes to build up layers in my collages for sturdy finished work.  This year I went to prescored card blanks because I found making 5x7 cards was a big waste of cardstock.  I got two sets with matching envelopes on Amazon HERE.  I hope these gorgeous images will set your ideas a spinning and wish you a very merry Christmas crafting season.  Hugs, Autumn

You are invited to the Inlinkz link party!

Click here to enter

Nov 12, 2021

Tim Holtz Winterscape Stamped Christmas Scene Cards


Hi everyone!  I'm back today to share a couple of inky scenery cards with the gorgeous Tim Holtz Winterscape stamp set.  I loved this stamp so much and never got to buy any stamps last Christmas so somehow over the course of this year I bought two sets!  I'm giving one away on my Instagram page @sewpaperpaint.  I was about to bust to play with these stamps!  I used a combination of ink blending onto Bristol paper and watercolor techniques for these cards.  I added white details with a Posca pen and fussy cut the central images to add extra dimension. 

The trees were the trickiest part.  I colored them mostly with Rustic Wilderness, adding a little other colors for depth.  I left the snowy sections blank and then went back and added crisp white detail with the Posca pen. 

I used a torn sheet of paper to mask the hills for sponging.  For the sky I splattered water over my sponging and lifted as one effect, then splattered my blue Distress Ink as another, plus added tons of white dots with the Posca pen. 


For the moon I used a small circle punch and a post it note to make a mask, then added watercolor "clouds".  I've been very inspired by the videos of Lisa Taggart on YouTube.  She makes the most delectable scenes.  I cannot do what she does, but I've loved trying to mix my own techniques with some of hers.  And I will share a great tip I just realized.  I always use a Posca pen because I have bad luck with Uniball white pens.  But I just realized if they get clogged you can wet the tops and massage them and they will write beautifully again!  The Uniball is so much better over the extremely water reactive properties of Distress Ink and the Posca sometimes pulls up the color, which isn't always good.  I hope this helps you if you're interested in scenic stamping.  Holiday hugs, Autumn

You are invited to the Inlinkz link party!

Click here to enter

Nov 5, 2021

Guest Designer Cards for Sweet 'N Sassy Stamps


Happy November friends!  I'm so excited to be sharing some new projects with you for my November guest designer term with Sweet 'N Sassy Stamps.  It's also SNSS's birthday month and they are celebrating 14 years of business!  There are some amazing deals going on.  You can save 20% off of birthday stamp sets now through November 8.  You can also get the Stamp of the Month set free with any $60 purchase.  But the main reason I am so excited to be partnering with this company is their beautiful faith based stamps.  You guys that have followed me for years know how much I loved Verve Stamps for that reason but may not know that Verve owner Julee Tilman now partners with SNSS by designing select stamps and is on their design team.  I especially love to incorporate scripture stamps in my Christmas cardmaking.  So my first project features the gorgeous Oh Holy Night stamp set

I was totally giddy to use the Peppermint Stripe stencil with my beloved BoBunny glitter paste.  Look at how beautiful!  I wasn't sure about the gold and black color combo at first, but I decided I really like it and hope you do too!

 
Next I tried using the Peppermint Stripe stencil with ink.  I used Rustic Wilderness Distress Ink and a blender brush to add the color, then added a layer of clear embossing while the ink was wet.  I did the same for the gorgeous tree stamp, also from the O Holy Night set.  I added some red in my matting and with a loopy bow.
 

Once I got in the grove, I fell back to my "go to" messy ink dipping!  I made an inky panel by dipping bristol card into watery Rustic Wilderness Distress Ink and dried it completely.  Then I repeat stamped the large star from O Holy Night in Rustic Wilderness and dried it completely.  After, I stamped the small star from the We Three Kings set repeatedly in Versamark and embossed in gold.  I wanted this to look like patterned paper.  I'm not sure it does, but I hope to keep playing with this concept because I love the star pattern.

 
I used my leftover green ink to dip a much lighter panel and stamped the Three Kings and a sentiment from Best Gift Ever, a gorgeous sentiment collection.
  
 
I wanted to have one everyday card in this mix, so lastly I had some fun with the Succulents stamp set and my Zig markers.  The background was black on black embossed with the Geometric Background stamp.  I pulled the small sentiment from the O Holy Night set and embossed in white on black.  I sincerely hope you've enjoyed these cards and will take a look at the entire Sweet 'N Sassy Stamps collection.  I'll be back in December with another batch of card inspiration.  Big hugs, Autumn

 
Make sure to join the Sweet 'N Sassy Stamps Facebook group for more inspiration and follow on Instagram @sweetnsassystamps.  Follow the BLOG for tons of DT inspiration. 


Popular Posts