Apr 25, 2022

Blue Knight Rubber Stamps Swan Silhouette Cards


Hi friends!  I hope you are enjoying some beautiful springtime weather in your neck of the woods.  I've been extremely busy with a lot of traveling.  I've been to Dallas, TX to visit old friends from our military days and to Georgia twice.  Once for basketball and the other on a date weekend with hubby.  We've got two more out of town trips planned, whew!  Hubby took me to the final Heirloom Rubber Stamp Convention in Lawrenceville.  There I met the owner of Blue Knight Rubber Stamps, Lynn Anderson, who I was encouraged to speak to by my talented friend Connie Messer, a member of the BK design team.  Well, of course we had a great chat and of course I had to buy some stamps!  Ha ha!  And now I've been so graciously invited to be a guest designer for the month of June.  I can't wait to share those projects with you all!

In the meantime, I managed to make a couple of cards with the Silhouette Swans stamp set I picked up at the show.  I played with ink blending and watercolor for these cards and added some Pan Pastels to my pieces for the first time.  They had lots of the pastels as sets and singles at the show and I was eager to see how they worked over inks.  I love the result and hope you do too!  I used paint pens and gel pens to add some of the more dramatic highlights. 

I am really into swans these days and have used a lot in my collage journal.  These stamps are just so beautiful and seemed a must have.  Gloria, if you are reading, I made the top card for you!  Go tigers!  :)  I do hope the rest of you will take a moment to check out the Blue Knight website and get to know this awesome (new to me) company.  Big hugs, Autumn

Apr 20, 2022

Darkroom Door New Stamp Release Cards


Hi friends!  I'm so excited to share a few more card designs I created for the latest Darkroom Door stamp release.   I had so much fun creating with this release and am itching to use these stamps again in new ways.  This first card sums up my current state so well, ha ha!  I absolutely love the Creative People Quote Stamp!  I certainly think we all can relate to this one.  What a fun sentiment to use for cards for artsy friends.  I made an inky background with Distress Inks, then stamped the new Arty Pods Collage Stamp in Seedless Preserves, then used the coordinating Arty Pods Small Stencil to press Versamark ink through and embossed in gold.  What fun!


There are four fabulous new Quote Stamps in this release, so make sure to check them out HERE!


For my next card I had some watercolor fun making another inky background.  I repeatedly embossed the new Geometric Ovals Abstract Stamp over my background in silver.  This stamp can be used in so many ways, so make sure to follow @darkroomdoor on Instagram for more inspiration.  I embossed the quote on a lighter, torn and stitched panel using a quote from the Amsterdam Vol. 2 stamp set.  It's such fun to mix and match from the new and old stamps.  There's a great blog post with many more ways to use the Geometric Ovals stamp on the Darkroom Door blog HERE.


I am absolutely mad over these Abstract Stamps.  See how I used the Faded Circles and Distressed Diamonds in my first post HERE.

 
For my final card, I did what I love most, grunge!  I had a great time stamping the AMAZING new Layered Handwriting Background Stamp over an inky panel.  I then pulled a piece of 3D embossed paper from my scrap pile and stamped the flower from the Botanical Script stamp set onto a book page and colored it to match.  I finished with some trim, some pleated torn fabric and a stamped sentiment from the Thank You Sentiment Stamp.  I have to say the Layered Handwriting stamp is my absolute favorite new stamp.  It is so perfect and I'm thrilled that Rachel added it to the Darkroom Door stamp collection. 


She also added several other new Background stamps and shared a blog post with more ideas on the Layered Handwriting stamp HERE.   I hope you'll check these out and will enjoy them as much as I am.  Hugs, Autumn


Apr 7, 2022

Lavinia Stamps Spring Bunny Cards & Blog Hop WINNER!


Hello friends!  Today I'm sharing several cards I've made recently from Lavinia Stamps and Elements Dye Ink Pads that I've shared in detail on the Topflight Stamps Blog.  Here's a peek of them all.  If you want to know more about how they were made, do hop over to the posts HERE and HERE, where I shared closeups and more info, including links to purchase these cards from Topflight Stamps. 


And now, the winner from the Topflight Stamps 5th Birthday Blog Hop.  Thank you so much to everyone who took the time to hop along and comment.  

 
Congratulations to Stephanie from Stephanie's Stampin Spot!   You've won a $25 gift certificate to Topflight Stamps.  Have fun shopping!  To find out who won the grand prize of $50, please visit the Topflight Stamps Blog.  I hope all of you will follow the Topflight Stamps Blog for more inspiration from our design team. 

Apr 3, 2022

PaperArtsy Printed Tissue Mixed Media Butterfly Panel


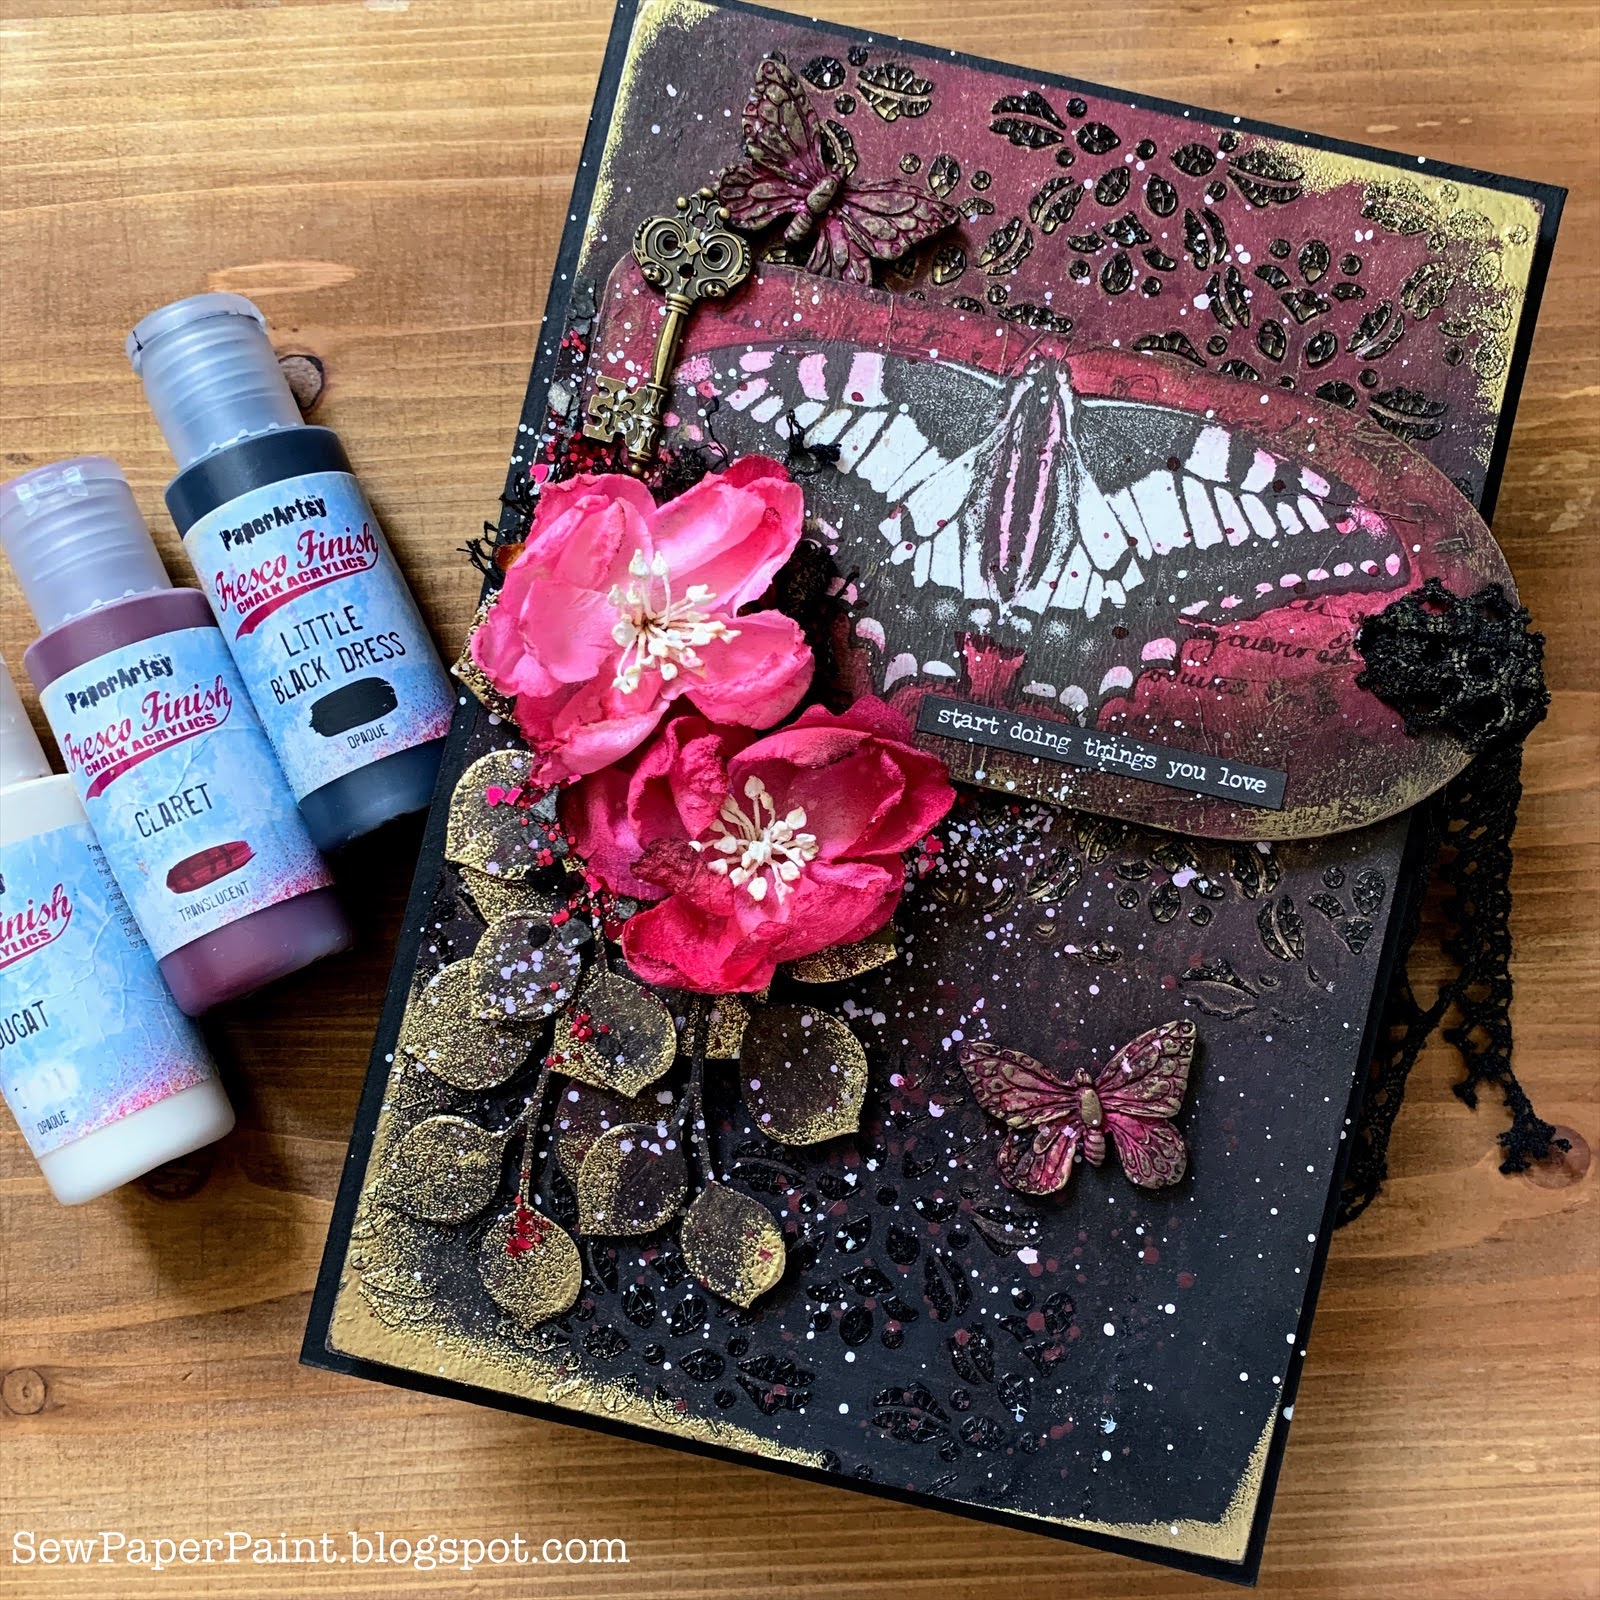
Hi friends!  I'm so excited today to share with you a new mixed media panel, inspired by week one of the Art Poetry Challenge on Instagram.  You can find out more about the challenge on the @artpagespoetry posts HERE.  I've been in quite the creative slump for a while, and I'm so happy I persisted with this panel because it makes me happy.  Sometimes we just have to push through, maybe walk away and revisit, and keep on creating.  

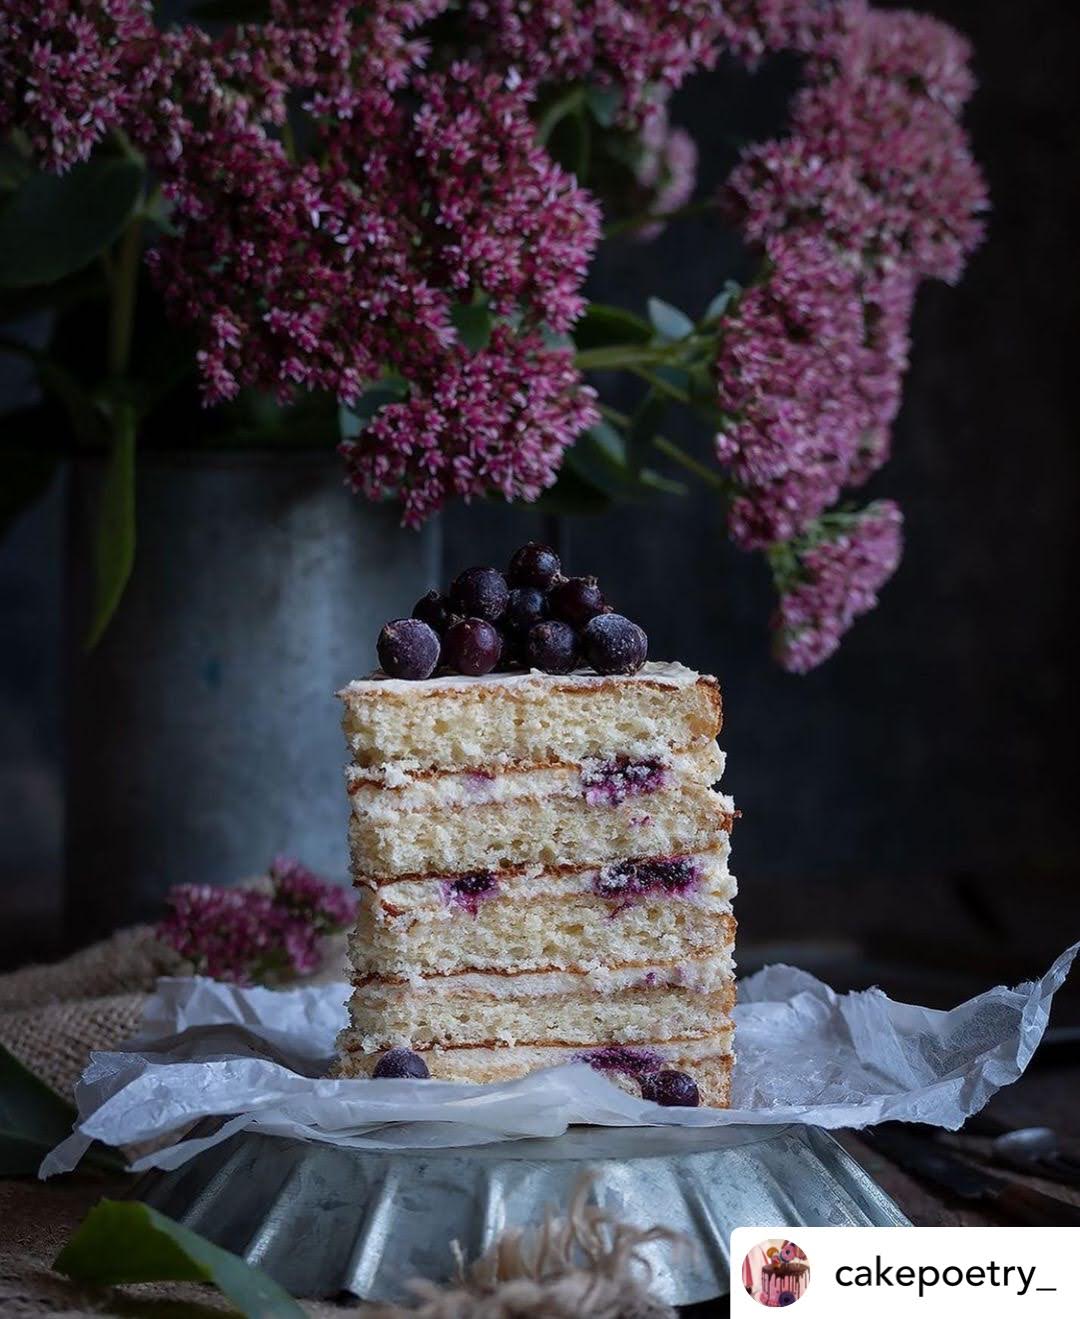
This week we were encouraged to use a gorgeous cake photo from the @cakepoetry gallery as inspiration.  I chose a beautiful moody cake photo.

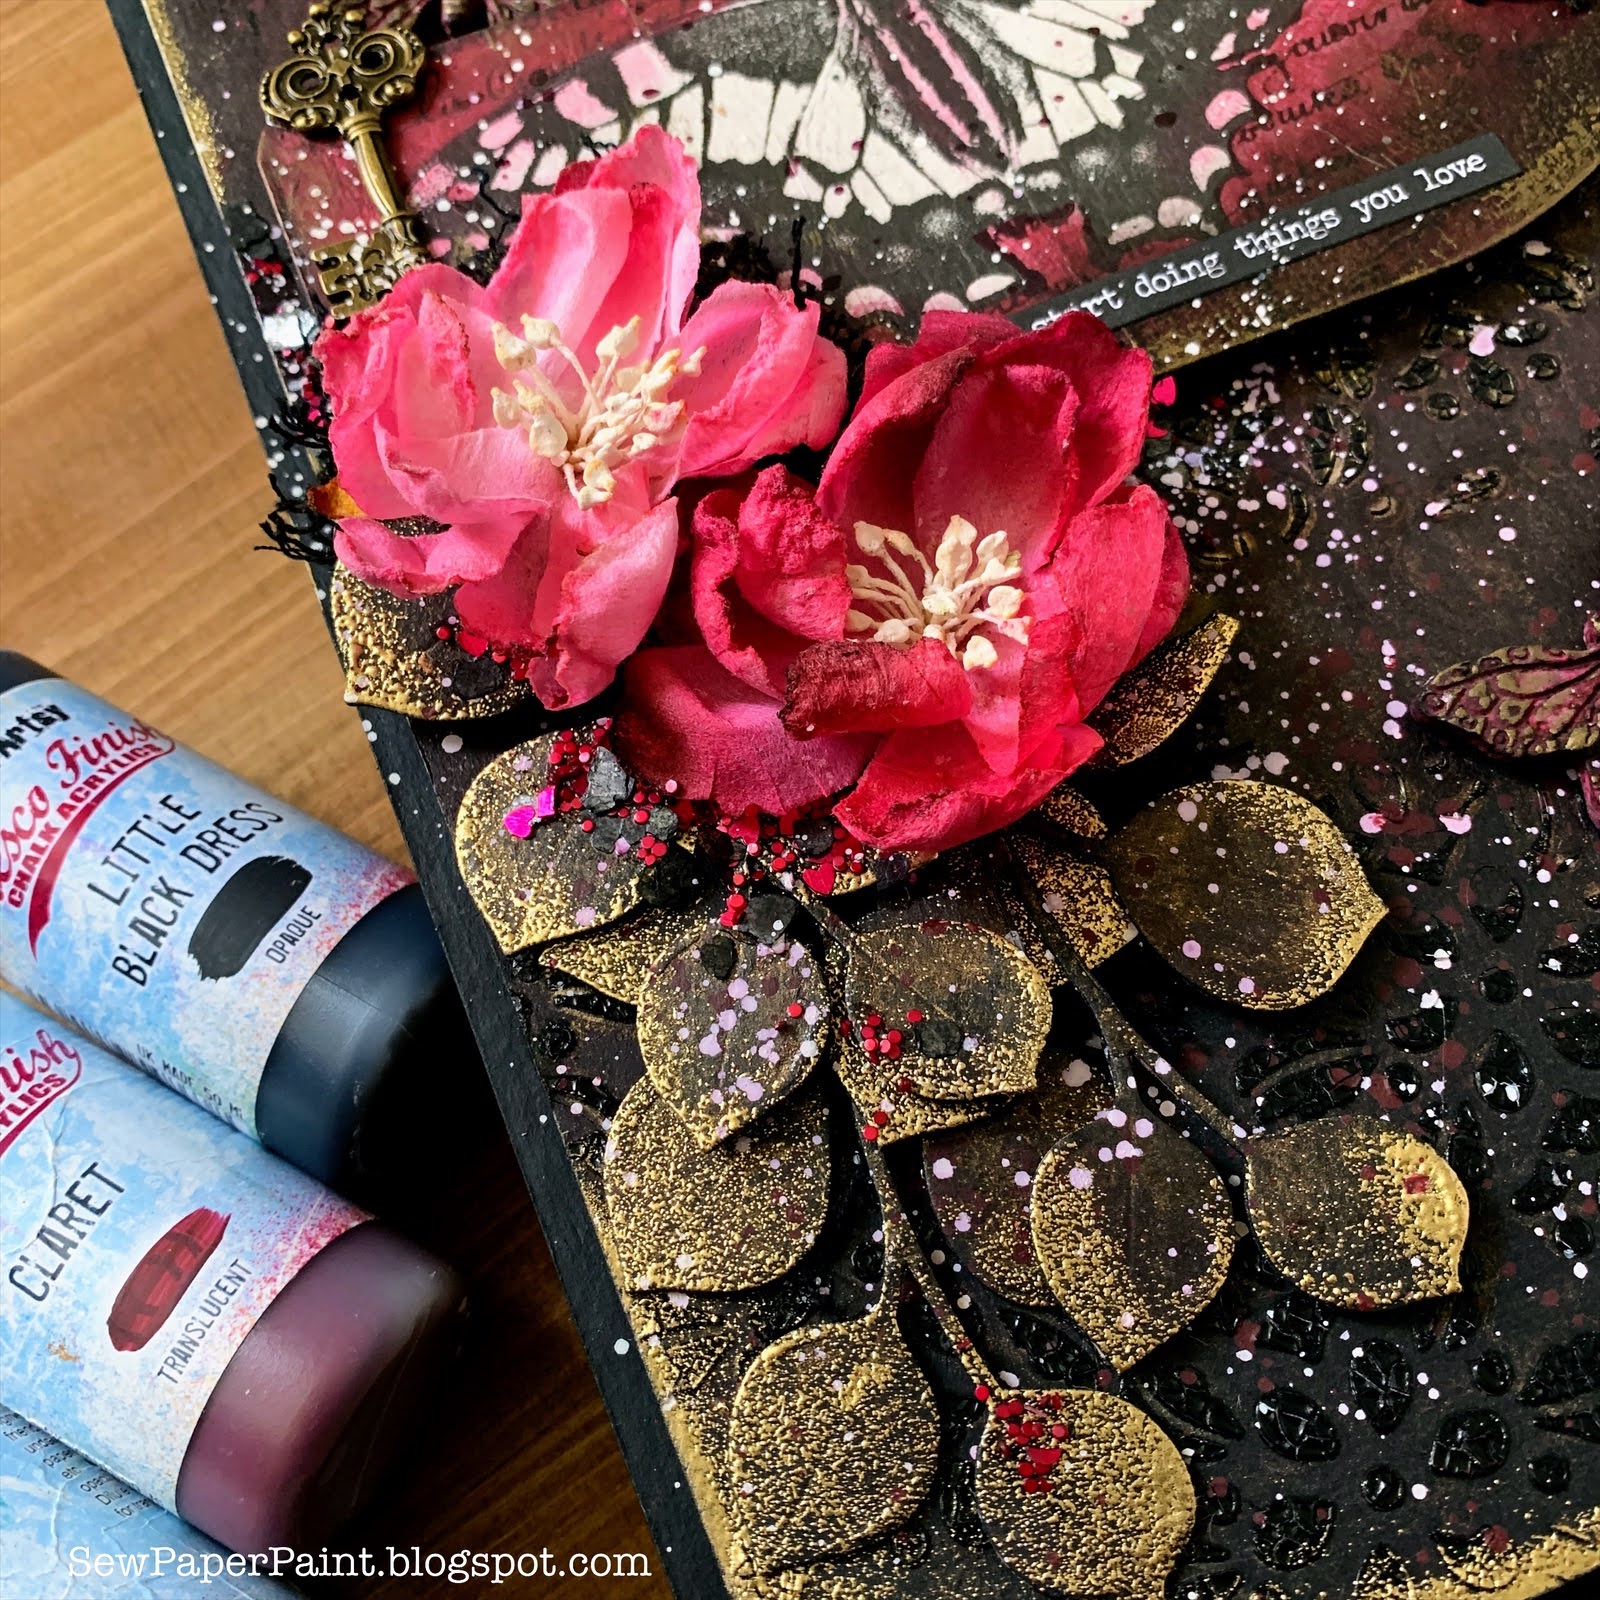
I tried to pick my deepest berry color and went with PaperArtsy Claret Fresco Chalk Acrylic blended with Little Black Dress,, painted onto a chipboard panel  I used a black crackle paste through a PaperArtsy stencil by Scrapcosy (PS106).  How moody and dramatic this was!

I sprayed Glimmer Mist by Tattered Angels in a beautiful deep berry color over the panel and let it run in and around the black crackle paste to add some shimmer.  Now, I decided to use the new PaperArtsy printed tissue for my focal image and was digging through my scrap bin for something to use as a base and came across this rounded thick tag that came out of a shoe and I had saved.  Ha ha!  It was the perfect shape and I chose the gorgeous butterfly from the tissue and used a water brush to draw around it and tear it away from the tissue page. 

I painted the back surround with the same Claret Fresco paint and let just a bit rub onto the butterfly.  Then I painted the shoe card with Nougat Fresco to mimic the yummy vanilla cake.  I adhered the tissue to the card with matte Mod Podge.  Then I painted more claret around the tissue.  This color is translucent and works great with tissue.  I sponged the edges with some black ink to add drama.

I rubbed some Antique Gold Art Alchemy Metallique Wax (a Finnabair product by Prima) on those darkened edges.  It picked up the slight texture of the tissue paste, which I loved.


I picked out the most delicious berry colored flowers from my stash.  I think they are by Petal-lou, then die cut some leaves from thin chipboard.  I painted them with Little Black Dress and a dab of Claret in the middle, then added some gold embossing.

I layered the flowers and leaves together over some black croched lace and used more wax to soften the color.  I adhered a sequin mix and some Finnabair black mica flakes around the flower bundle. 

Then I had a blast pulling out ephemera.  I chose a metal key and two paper clay butterflies my friend Sara Emily shared with me.  I do believe they are from Prima molds.  I misted them with water then sprinkled Infusions pigment powder in Blackcurrant over them and spritzed again, repeating until the color was as desired.  I am so excited to discover how well Infusions work with dried paper clay!  I will definitely be using this idea again in the future. 

Later, I added some more wax to the butterflies, but I wish I had photoed them before so you could see how cool the muddled Infusions looked. 

Finally, I cut a second chipboard panel, painted with Little Black Dress and mounted the piece over it with a couple of sheets of fun foam in between.  I gave everything splashes of watered Nougat and Claret Frescos.  It was really fun to see it all come together.  It's been ages since I did this style of mixed media and now I realize just how much I've missed it.  I hope you've enjoyed this post and will check out the challenge and see if you can find some inspiration.  xx, Autumn

Popular Posts