Showing posts with label stamping. Show all posts

Jan 12, 2026

My First Stamp Illustration: Snowdrops!


Dear friends, I'm so excited today to share some samples with you using my first ever stamp illustration.  You may recall I've recently released a stencil and another definition stamp set with Creative Worship Stamps, but this release is extra special to me because it's my first hand drawn illustration.  I chose a snowdrop bunch because they are perfect for wintertime crafting and so symbolic.

I have a few cards I created with the Snowdrop set to share with you today.  First is a a grungy design with lots of inking and background stamping.  I had a background making party with some friends and used Distress Oxide Spray in Tumbled Glass, then added some Vintage Photo and stamping with the Texture Tiles 1 stamp set (music and splatters) and sponged through the Lots of Dots stencil.  


I watercolored the gorgeous Snowdrops stamp set and cut them with the coordinating dies.  I used a combination of Bundled Sage, Weathered Wood and Vintage Photo for the coloring.  I finished by stamping the gorgeous Psalm 30:5 sentiment in Chipped Sapphire across the bottom.  


My husband and I celebrate our 26th wedding anniversary this month, so I used the Snowdrops stamp set to make him a lovey/Valentine/anniversary card.  I made a pink background with Spun Sugar Distress Oxide and sponged Worn Lipstick through the Blotchy Dots & Hearts Stencil, which I sprayed with water and dabbed for a more subtle effect.  


I stamped the Snowdrops in Cobblestone grey inks and watercolored the with the same pinks plus Bundled Sage then cut them with the coordinating dies.  I made a tag layer by stamping the 1 Corinthians 13:4 sentiment from the With Love stamp set in Cobblestone and spritzing with water repeatedly to dab away and make it more subtle.  I finished by stamping the anniversary sentiment from the same set and layering with a piece of lace & crinkle bow.  


My final card today was made by stamping the Large Snowflake Background stamp with Peacock Feathers Distress Oxide onto a teal panel.  I spritzed the ink with water to activate the oxidization.  


I watercolored the Snowdrops with the same ink, plus Mowed Lawn.  Next I sponged through the Peppermint Stripe stencil onto a torn panel.  I finished with the sweet words from the Snowdrop set.  I hope you've enjoyed these projects and will take a look at my new designs.  Thanks so much for your support!  xx, Autumn

Oct 2, 2025

Faith Art Handmade Greeting Cards for Creative Worship Stamps


Hi everyone and thanks for visiting!  I'm so happy to be a guest designer with Creative Worship Stamps, formerly Sweet 'N Sassy Stamps, this October.  I've enjoyed the quiet time in my art room stamping and coloring and have a few cards to share today as a result.  First, I wanted to create a "fallish" card design using a not so fall stamp set, the Encouraging Peonies stamp set.  I used the leaves from the set to stamp a pattern on my Bristol panel using Shady Lane VersaFine Clair ink.  


Next, I had a fun time splashing around pools of color over both the leaves and background.  The panel was really pretty at this point, but I wanted to go a step further, and pulled out a brush marker and colored around the leaves to make them pop.  

I added some splashes of metallic gold watercolor by FineTec on the background.  Next, I gold embossed a sentiment from the Hymn Word Art stamp set and rounded the corners with a punch.  I like how the background is a striking color, but also picks up the underlayer of watercolor.  It was a fun experiment!


Next I was really excited to stamp out the images from the Botanical Collages stamp set.  I was having fun with my watercolor palette and decided to try a similar technique with the bees collage.  I colored in the main imagery, then used black watercolor to fill in the surrounding space.  I used postal edge scissors on the mat.

I finished by layering over a white panel stamped with the Diagonal Plaid 6x6" background stamp.  Oh my goodness, I love this XL plaid stamp!  Thankfully I had some vintage seam binding in the right shade of gold to coordinate and complete the card.


For my last card today, I added another sentiment from the Hope Word Art stamp set and paired it with mushrooms from the Colors of Fall stamp set.  For the sentiment panel, I dipped a scrap into Distress Inks in Fired Brick and Crackling Campfire then stamped in VersaFine black.


I fussy cut the mushrooms after coloring with Distress Inks in Frayed Burlap and Antique Linen, with a touch of Crackling Campfire for the top.  I then layered over a page from a very old devotional, which I splattered with more CC inks.  I adhered the sentiment, then stamped the Sew Many Stitches stamps around the perimeter.  There's just something about this color combo that I come back to every fall for my paper crafts.  I hope you're inspired today and will check out these and other beautiful new stamp sets from Creative Worship Stamps.  Hugs, Autumn

See my previous posts using these stamps

HERE.


Jun 24, 2025

Ten Years and PaperArtsy Bird Stamps Accordion Book Tutorial


Hi friends!  I know it's been far too long.  I have taken a sabbatical for the past year to both care for my mom and recharge my creative batteries.  

My calendar popped up a reminder for June 3 that it was my blogaversary and I looked and saw that it had been ten years since I started SewPaperPaint!  WOW!  

I wanted to share a fun tutorial with you based on inspiration by Karen Stamper and Traci Bautista from this year's Sketchbook Revival Binge Fest.  What fun!  

My friend had spent the weekend with me for some creative fun and we decided to work in our accordion books following Karen Stamper's process of adhering various paper elements and masking/washi tapes to a long accordion paper, then adding inks or watercolor, spraying and letting the drips run free.  Oh my this was fun!  We both made two panels and I could have made ten.  Ha ha!

I really wanted to turn mine into a completed work.  Karen uses her pieces as a base for future architectural drawings, but that wasn't traveling - I've become such a homebody!  

Meanwhile, I was so inspired by Traci's use of a dagger brush and the way she held it upwards to produce beautiful, fluent leaves.  We had used a bottle of liquid watercolor in black by Blick and had a lot left in our little jars days later.  I thought it would be beautiful to add some of the leaves and happily reactivated the dried color with my wet brush.  It worked beautifully, though the black does turn quite blue when very wet.  

I fussy cut my practice pieces I had done on book pages and adhered them for a variety.  


I wanted to add some other imagery, so I picked out a set of Sara Naumann bird stamps by PaperArtsy, ESN66.  I stamped them in Versafine Clair Morning Mist (deep grey).  


This awesome quote is from a Dina Wakely Typed Ledger Sentiment Stack.  


I decided to make covers for my accordion.  I cut chipboard to size and adhered more book pages & even a die cut castoff with Liquitex matte medium.  I braywered white gesso lightly onto each panel.  


Then I mixed a bit of white gesso with modeling paste and spread through two Scrapcosy stencils by PaperArtsy, PS108 and PS319 randomly for added texture.  


I used my very old Fiber Scraps e-z Walnut Ink Tintz (shown at the top of this post) and more of the liquid watercolor in black by Blick to add more drips.  


I cut out another leaf practice piece and stamped another bird to finish my cover.  


I painted the edges of the chipboard with my white gesso, then glued the accordion panel in place and left heavy books on it overnight.  I adhered the Sari ribbon I get from Felt Better on Etsy between the layers.  I am so pleased with the finished result.  I am very thankful to the entire team at Sketchbook Revival, especially Karen Abend for this wonderful journey.  I hope you enjoyed seeing this grungy little art book.  xx, Autumn

Jun 5, 2024

Vintage Gel Printed Accordion Book Tutorial


Hi everyone and happy spring!  I've enjoyed some playtime with my mom this spring and we've done a lot of gel printing.  I was trying to think of a way we could use our stash prints and decided we should make an accordion book.  I picked one of my favorite 8x10" prints and cut it in two to cover two pieces of 4 x 6.5" chipboard, wrapped around the sides with mitered edges.


Here is my pile of gel prints.  Honestly, I didn't put a dent in this set alone!  This project didn't take as much printed paper as I had hoped...  But it was a fun project nonetheless.


I cut two pieces of white cardstock and scored them to fit inside and adhered the overlap to make the accordion panels.  Then I glued these to each cover and covered with gel prints measuring slightly smaller than the covers, 


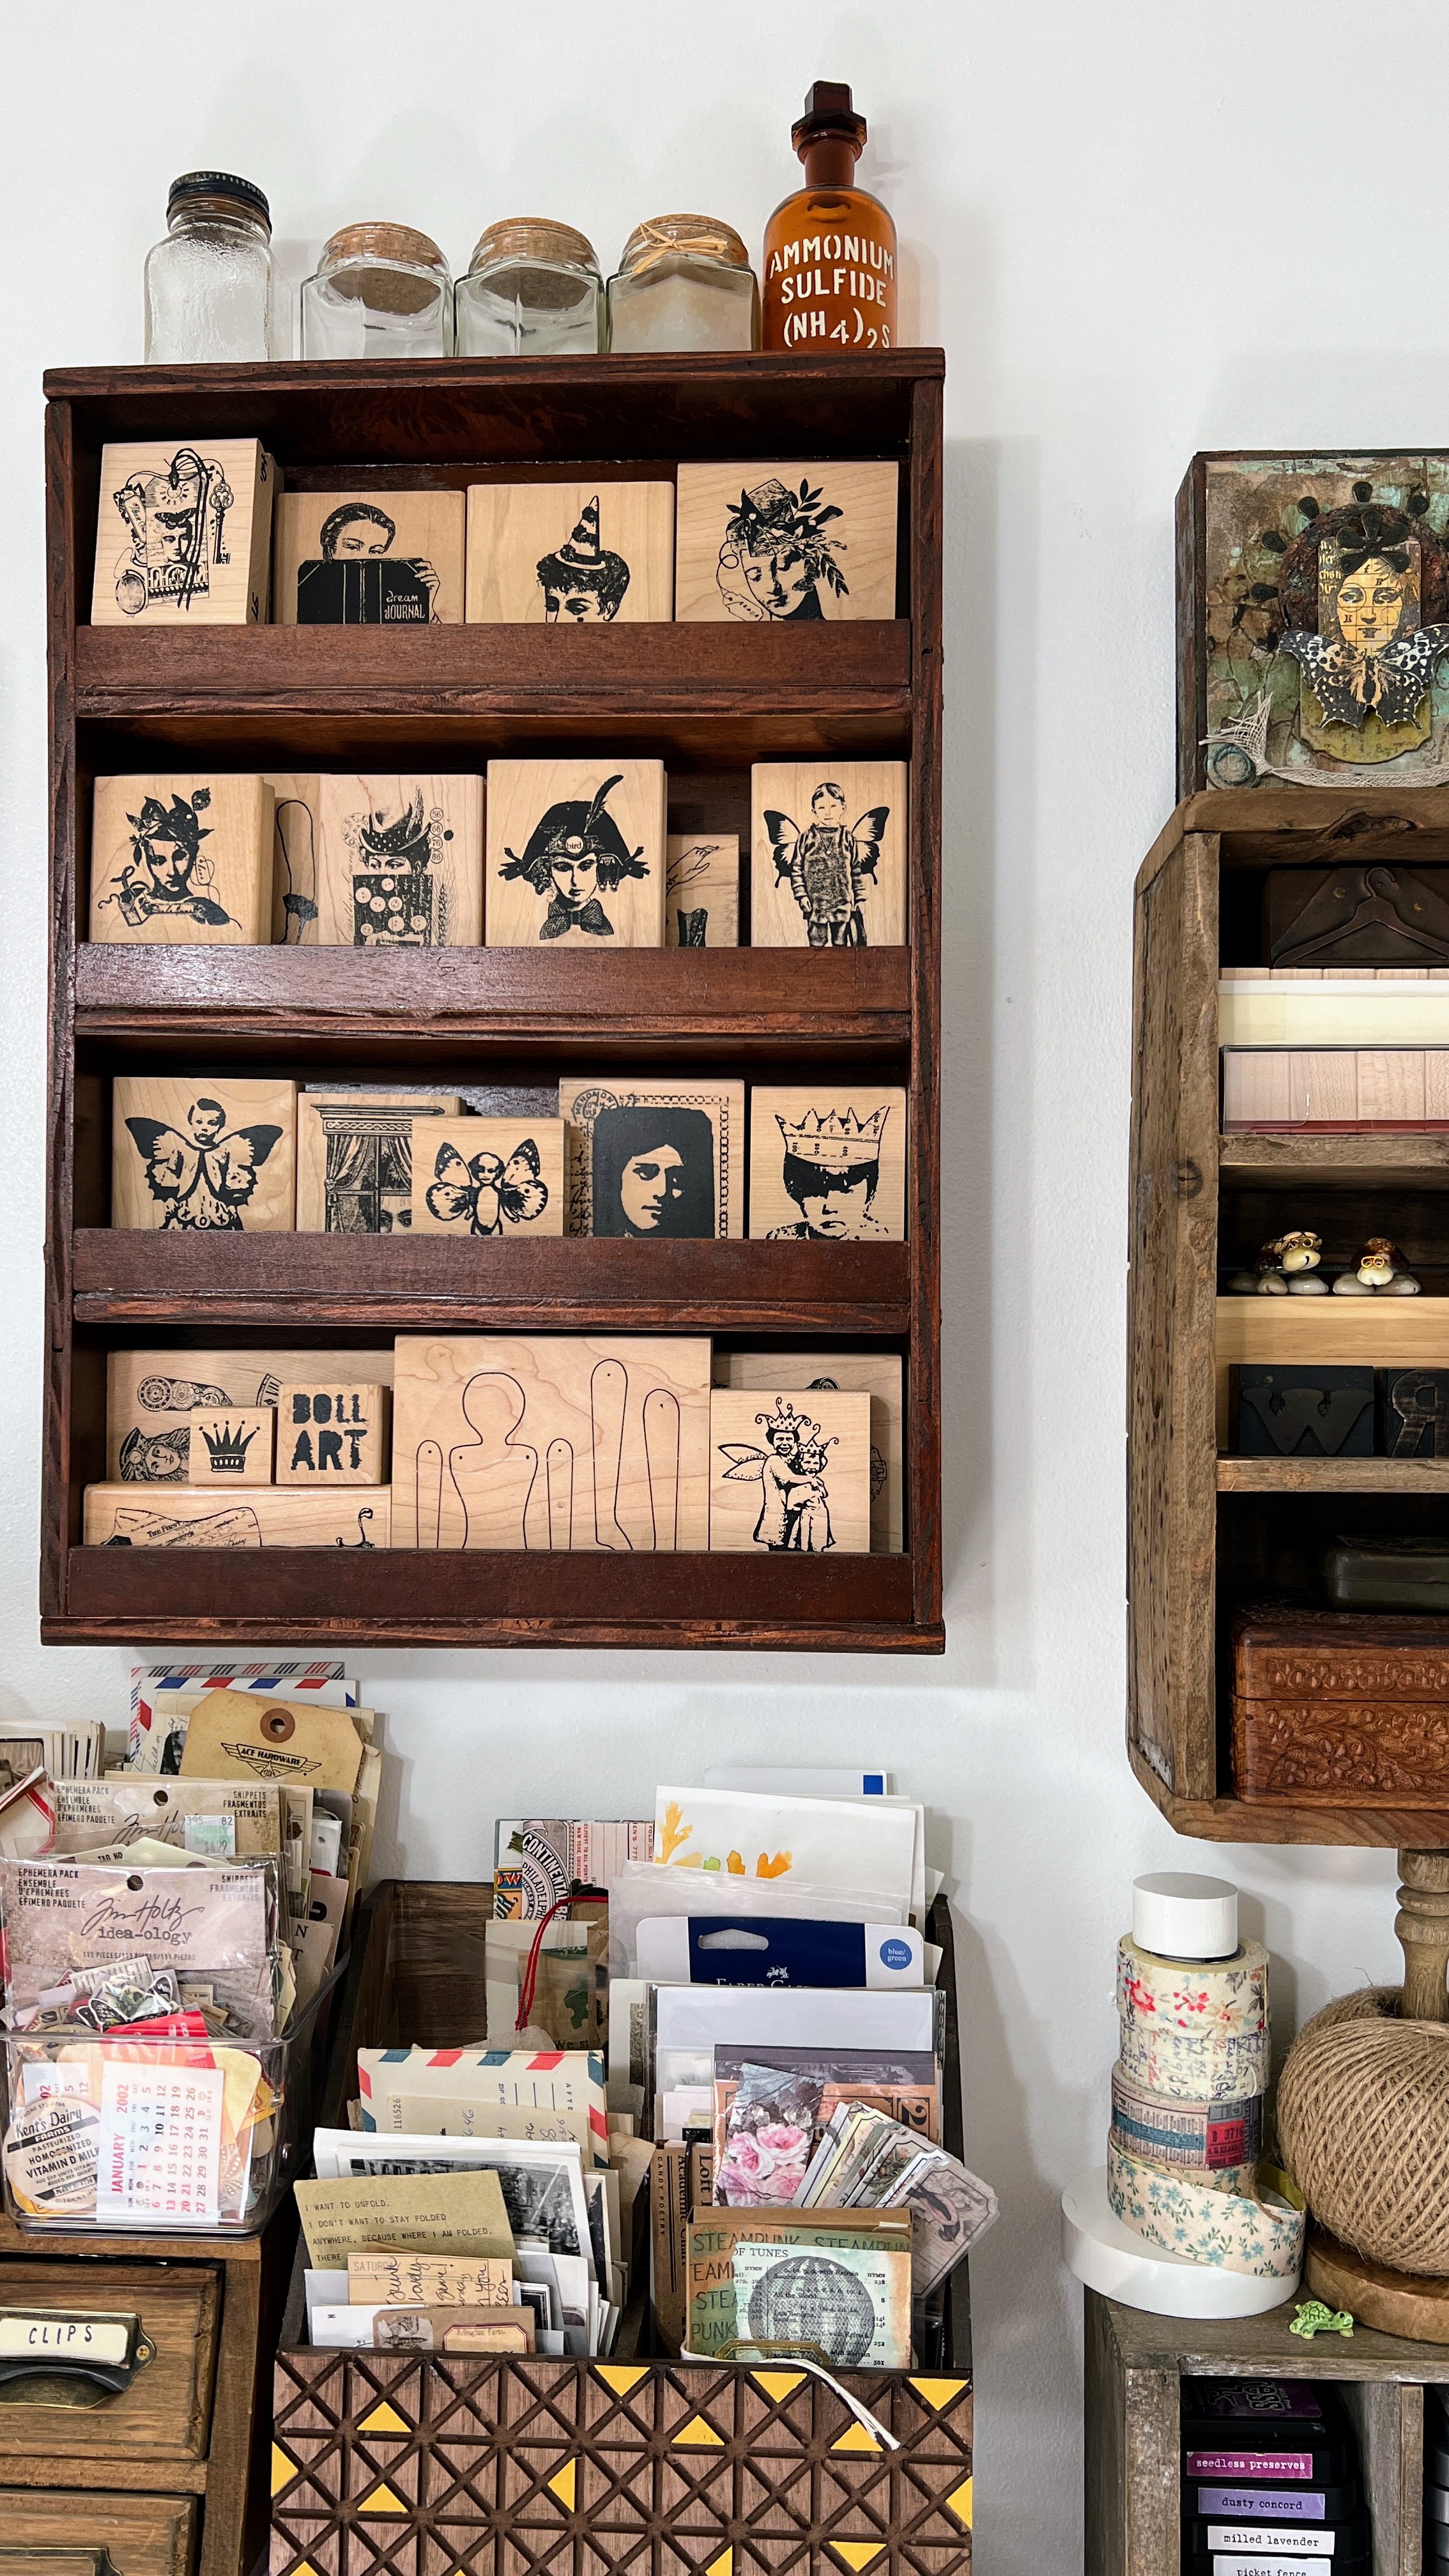
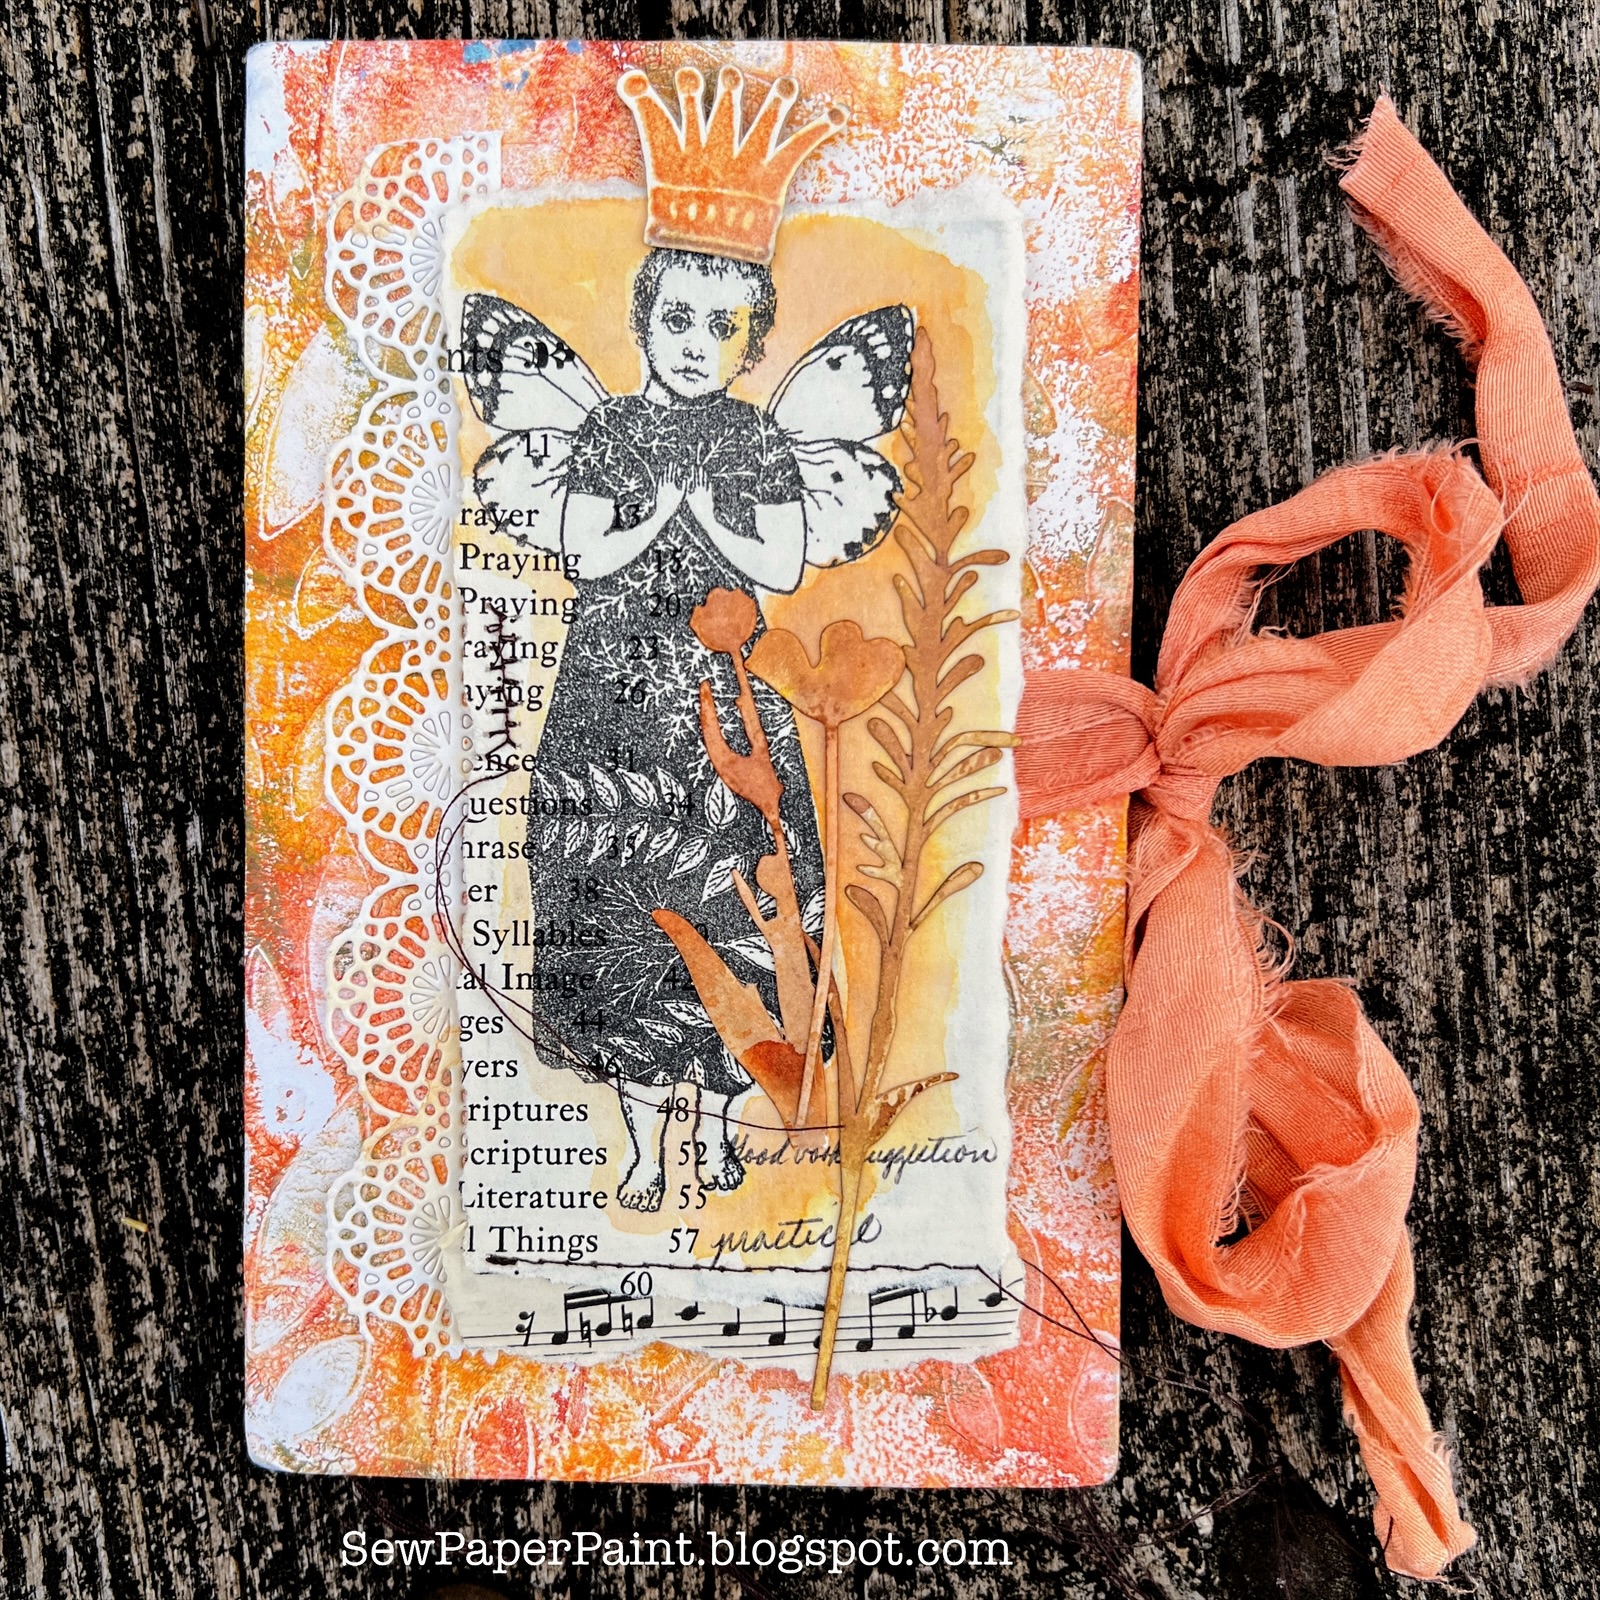
I looked at my wooden stamp display and was inspired by this darling Character Constructions girl and called up a good friend and asked to borrow some of her doll stamps so I could complete my book.  Thanks Barbara!


I stamped all of my dolls onto book pages and added a bit of watered Tea Dye Distress Ink to give them a slight coloration.


Next I dipped all of my die cut Tim Holtz Wildflower in a combination of Tea Dye, Walnut Stain and Rusty Hinge Distress Inks.  


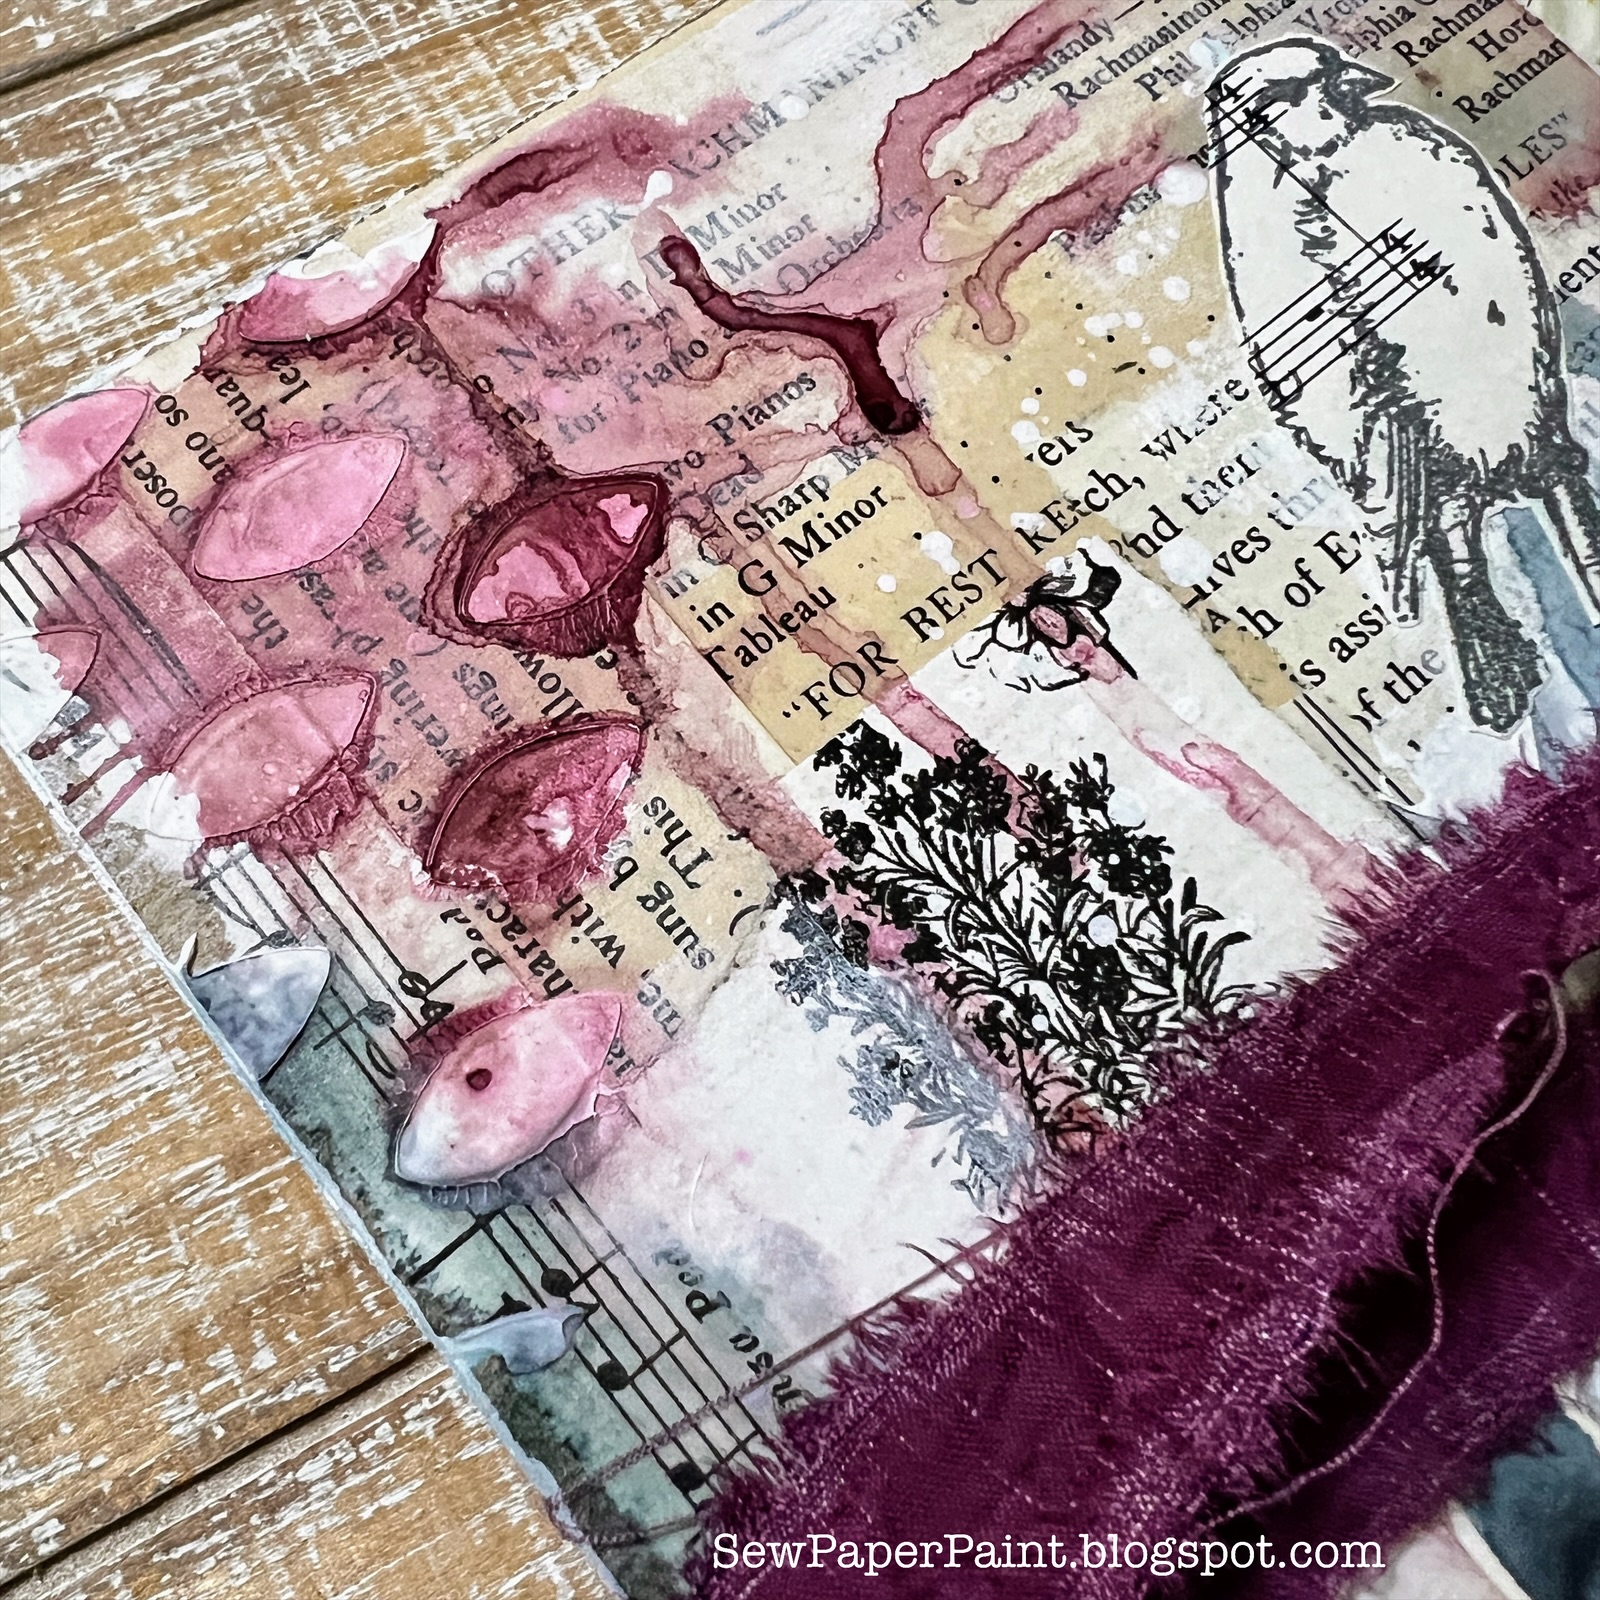
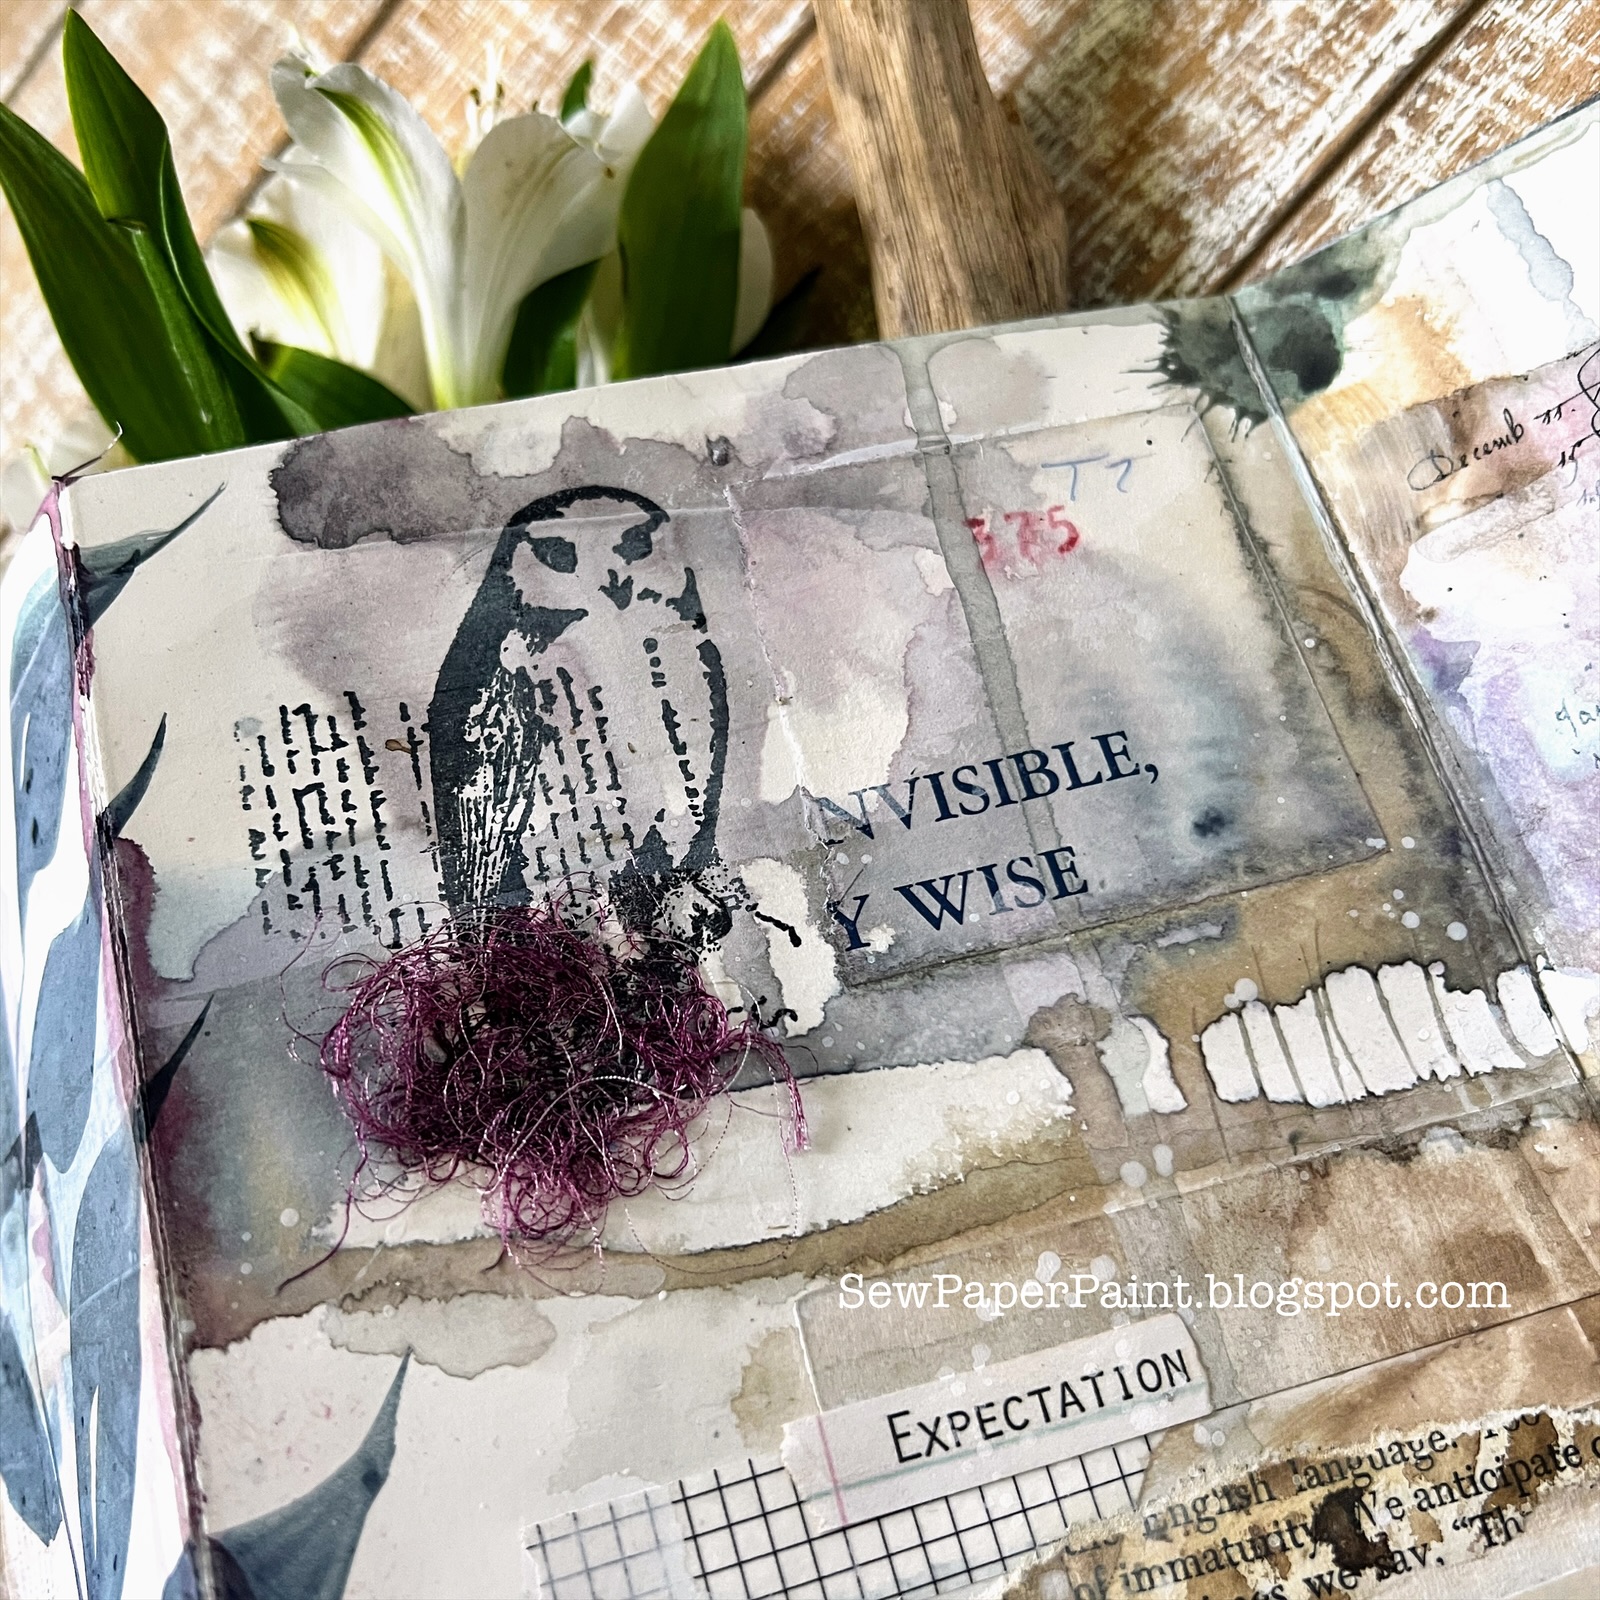
I mixed in my favorite scripture stamps with other favorite old wood mount stamps.


I always enjoy stamping on old paper.  Here I tea dyed some graph paper and it was a great backdrop to the scripture.


How many of you still own these stamps.  Personally, I treasure mine!  Both my friend and I have them on display in our art rooms.  


Here's a shot of mine from last year.  I've since changed things up a little, but still love this image.


I also took some free vintage label images and overlaid a typed font scripture and printed it.  I love the look and pop of aqua!


My finished book is a little busy, but fun to inspect.  I really hope it has made you smile today and has you considering how to incorporate your old stamps into your current work.  


I finished the book off with a sari ribbon binding.  


I just loved this particular gel print and was happy to make it the focal point of my book.  Happy crafting!  xx, Autumn


Popular Posts