

In preparation for my new Mini Album Makers Challenge blog launch I have been doing a lot of sketching and scheming of new book concepts. I hope you will take a moment to hop on over and become a follower!


I've created a tutorial for binding your die cut houses into a little book. If you aren't keen on mixed media, you could easily follow along and skip out on the additional media.

To begin, cut eight of the largest house dies from watercolor card. You will need two houses for each page. They will be sandwiched around the flaps on your spine. Cut four houses from thin chipboard for your covers. Gesso the front and back of each chipboard panel. (Gessoing the back helps minimize warping.) This results in six overall pages, including the covers.

From the scrap watercolor card, cut the sections for your nestled spine. The height of your spine will be 3.25" with three varying widths: 1.25, 1.75 and 2.25". This will leave a .25" gap between your pages for ephemera.

Score all three sections 1/2" from each side.

You will need two drying racks or boards to lay each panel onto for drying. Working in assembly line style this way will help speed things along. Apply texture paste with a palette knife through a stencil onto the front side of your four gessoed chipboard panels. I used two different stencil designs.

Apply crackle paste with a palette knife in thin layers randomly on the open spaces of the stenciled chipboard.

Apply crackle paste to two entire watercolor houses randomly. These will coordinate with the stenciled chipboard for the opening spread. Set your first six panels on one board to dry.
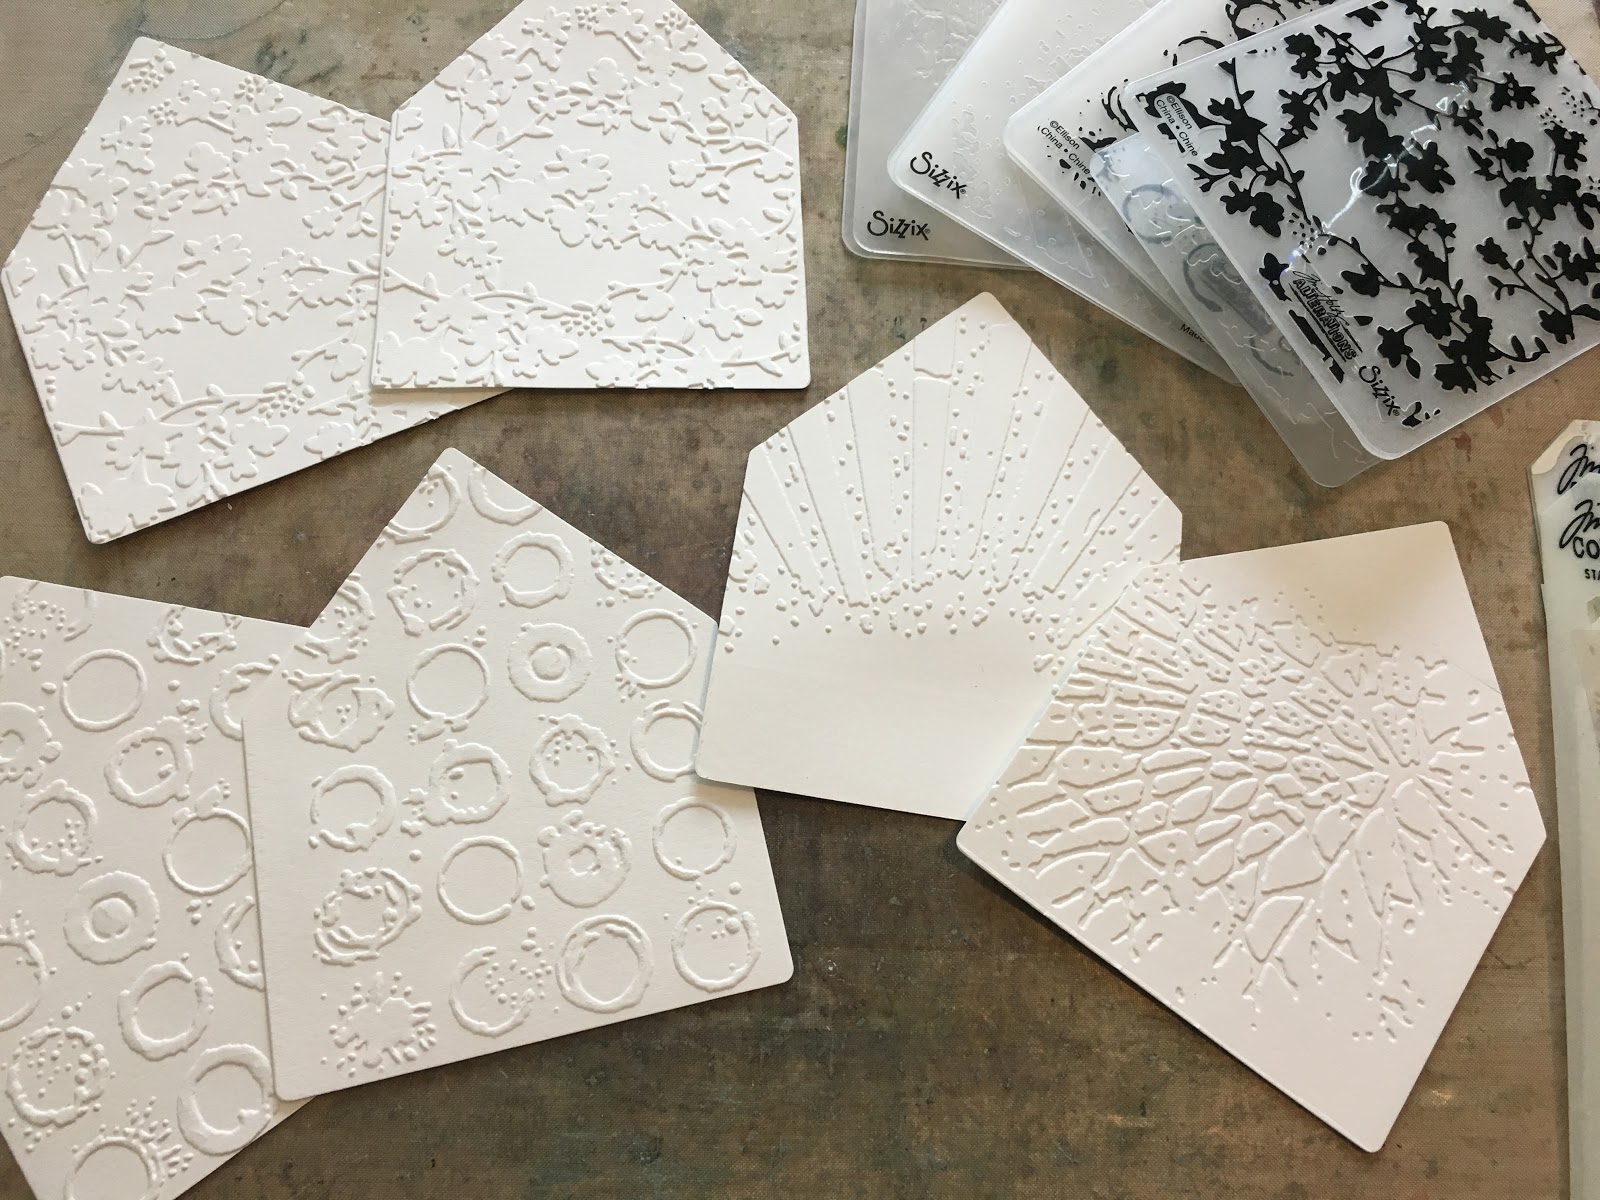
Use a variety of Sizzix embossing folders to emboss the remainder of your houses.

Apply more crackle paste randomly on the edges, open spaces, and as a highlight on the embossed panels. Set these aside to dry.

Die cut several hearts and windows from the House Pocket die set from thin chipboard. Cover with texture paste or thick goopy gesso. Allow to dry.

Apply red line tape to the backs of your spine sections. Don't get too close to the score lines.

Apply red line tape to the flaps on the front of your panels. Again, don't get too close to the score lines.

Adhere the largest spine section to designer paper, or fabric. I used a Tim Holtz ephemera card. It was a little too thick and the score marks cracked.

Apply more red line tape over the flaps on the patterned side.

Once your panels have dried sufficiently to form the cracks in the crackle paste, begin to color them. Tap a variety of Distress Oxide inks onto your kraft mat to create a palette. With a wet brush, pick up inks and paint your houses. Spritz with water to allow the colors to flow and bleed into the texture paste and embossed patterns.

Liquitex texture paste soaks up the ink. DecoArt crackle paste resists the ink. This will achieve a lot of color variation. After your panels are painted, you can also dip them into color to add more interest. I found using the brush worked best for the base layer to work the color into the cracks and crevices.

Now begin to adhere your pages to the spine. Because the corners of this die are rounded at the bottom, I used the top angle as a guide for placement. I found it easiest to get things square if I attached these upside down, but I am right handed.

It is important to have both sides aligned this way. When you adhere the reverse sides of your pages together, use the houses as your guide, not your spine. I used Beacon 3 in 1 glue to adhere them together, but the red line tape is important at the spine.

Once you have carefully determined placement of your pages and attached all of your front and backs to your signatures, then remove the tape on the centers and line them up, this time using the bottoms of the pages as your guide for placement.

Now you have a made from scratch mixed media album, ready to decorate!

When you open your pages you will see a white gap, but you can easily use more Distress Oxide to paint these, blending in with the colors on those particular pages.

The theme of my album is words of wisdom for making a happy home. I used paper doll images from TH and computer generated sentiment strips to share these words of wisdom...


I'm curious if you have any words of wisdom to share today. Is there a secret you can share that has kept your home happy along the way? I'd love to hear from you! Perhaps I can start a second book with your words of wisdom. :)


I'm sharing with:

Dies R Us: Anything w/Dies Goes
Simon Says Stamp: Back to School (I'm playing teacher)
Lost Coast: Stenciled Backgrounds
Happy Little Stampers: Watercolor
Ooh la la: Flowers
Simon Says Stamp: Back to School (I'm playing teacher)
Lost Coast: Stenciled Backgrounds
Happy Little Stampers: Watercolor
Ooh la la: Flowers
 |  |  |  |
 |  |  |  |
 |  |  |  |
 |  |  |  |
 |


41 comments:
WOW! Amazing and gorgeous!! Thanks so much for playing in our ‘Anything using Dies’ challenge at Dies R Us! Please come back again soon!
Darlene (DRU Blog Leader)
DIES R US CHALLENGE BLOG
DAR’S CRAFTY CREATIONS Please come for a visit.
Autumn...You always look like you have so much fun creating your projects and this mini album is no exception. Absolutely love all the pages, the textures, the techniques and the colours. A real treasure. Thank you for sharing this beauty with us x
My gosh, this is amazing!! The texture is off the charts!! I love the colors and the details you added to each page!! I truly appreciate you taking the time to photograph the process, too!! I love seeing how it comes together!! Spectacular, my talented friend!! Have a great day!! Big hugs :)
Lisa
A Mermaid's Crafts
Wow, this is so unique and special, Autumn! I just adore all those pages and what a great idea to make the book in the shape of a house! Brimming with inspiration!
This is amazing Autumn, wonderful colours and stencilling and what a fun shape for a mini album. Thanks so much for sharing with us at Lost Coast Designs. Sue xx
WOW absolutely amazing,I love all the textured pages and colours,love all the elements and words of wisdom-great shaped and brilliant step by step too-am following new challenge and wait with bated breath
Carol x
Oh wow! This is so pretty! I love your mixed media pages and the images you used. Such a great tutorial for the spine! So much yumminess to look at.
Kate
Love, this is amazing, I am so inspired and everytime I come here I am 'going to make this' but never have the real playing time at the moment...sigh...xx [aNNie]
This is utterly gorgeous with so many fabulous details and a brilliant finished book. Love it xxx
This is such a fabulous way to use Eileen's House/Pocket die Autumn, I really love your textured pages and wonderful words of wisdom for a happy home. A truly beautiful little album!
I think in life it is important to 'never go to sleep/bed with an unresolved argument' Hugs, Anne xx
What a delightful, storybook, colorful journal, Autumn! Your stencils and colors are beautiful choices, and the way it all came together is pure magic! Fabulous! hugs, de
Wow gorgeous project! xx
Wow, what a stunnning work, awesome.
Thank you for Joining us at Happy Little stampers and waiting to see next time.
Hugs
Meena HLS WC DT
Absolutely delightful, Autumn - your textured pages are glorious in their rainbow colours, and the house shape is adorable. Lovely work, a great tutorial, and so many words of wisdom. I don't think I can whittle down the quotes I try to live by to fit into one Blogger comment - but one of my all time favourites is from Pythagoras: "Learn to be silent. Let your quiet mind listen and absorb."
Alison x
This is totally gorgeous!! Love all the different elements and a great tutorial. Thank you for joining us at Creative Artiste this month, Jane (DT) :) x http://creativeartistemixedmedia.blogspot.co.uk
Amazing this is beautiful I just got my hands on this die I'm definitely going to give it a try! Thank you for sharing
So OTT incredible, Autumn! I just don't know how you keep cranking out these works of art!! Love your creative mind! I'm wearing a shirt right now that says "cultivate kindness" with very pretty flowers on it. I bet you could do something wonder
What a fantastic booklet and great tutorial! AMAZING!
(Oops! My computer decided to post WHILE I was typing...) I bet you could do something wonderful with that prompt!
A fabulous idea and beautiful words. Thanks for the tutorial, and thanks for joining us at Creative Artiste Mixed media Challenge!
Oh. My. Gosh. Autumn, this this album is so delightful, I squealed at every photo, and now I cannot wait for OCT!!! So fun to see your tutorial, and I'm so happy you were able to get this die! It's so YOU! Words of wisdom for a happy home??? Never go to bed angry! Say I Love You A LOT and mean it! Give out hugs like candy. Put God first....Do I practice this advice all the time? No. But it's something to aim for. You are amazing! Hugs!
Wow! What a work of art! Your mini album is stunning! Thank you for the tutorial and thanking you for joining us at Dies R Us this month for the challenge!
Just wow! What a wonderful work of art. Thank you so much for giving such a clear account of your work, too - I'm still very much a mixed media newbie and fpund it extremely helpful, so I've bookmarked your post to refer back to for various techniques and inspiration. Thank you for sharing at Ooh La La
Jane
Hi Autumn, gorgeous album and bet it would look good with family photos too though I must say I do like the paper dolls. Happy crafty weekend xXx
Amazing album, Autumn. Thank you for the great instructions. Kisses, my friend.
This is just precious, Autumn! I love this die shape (didn't know about it, either) and all of your mixed media pages are scrumptious! I especially love your theme :-) Thank you for the tutorial!! Hugs :-)
these are just amazing! love the texture and colors on all these pages - what a beautiful book you have created! thanks for joining the lost coast designs monthly challenge!
WOW what a great house book. Thanks for joining the Lost Coast challenge.
Fabtastic house album. Love the paste and embossed backgrounds and the fun shape. Thanks for joining the Lost Coast Portal to Creativity challenge. Hugz
OMGosh Autumn!!! I just LOVE this book!!! I love each and every page you made- your designs and textures are all me!! and colors, did I say yumminess??
Now I am going to bug you and ask you for a list of your embossing folders and stencils you used,please?? I promise not to make mine identical to yours!! heehee
and thanks for sending me shopping again! haahaa
hugs,Jackie xx
ps...I love love the wording you used on your pages- Perfect!!
haahaa I just saw all of the listings- never mind about the list- what a duh! lol
I think it's all been said Autumn; I can only concur with the rave reviews above. A sensational piece of art with something to capture the eye and inspire on each and every page. You rock!!!
P.S. A quote I found helpful when the children were all at home. "Be the change you wish to see in your children"
What an amazing piece of artwork Autumn. Each page is a stunner, and you have an heirloom on your hands.
Thanks for sharing with us at Happy Little Stampers.
Hugs
Carol x
What a stunning house book you created Autumn! LOVE the texture and colors on each page - thanks so much for sharing how you put it all together as well!! Julia xx
This is fantastic, so gorgeous and a true piece of art. The texture and colours are beautiful.
Thank you for sharing with us at Simon Says Stamp Wednesday Challenge x
An amazing little house album, gorgeous colours and textures and wonderful process pics, Thanks for sharing.
Avril xx
What a gorgeous project..just beautiful! Thanks for playing along at Dies R us!
Absolutely stunning mixed media piece! Great tutorial!!!
Autumn, this is special in so many ways. I love all your "ways" and think this is such a sweet and wonderful thing to display in your home. You have inspired me to give it a try with some Scripture that inspires me! I love love love your textured pages! Another thing I wish to do, but have mostly tried it with disastrous results! You inspire me to try again!!!
Post a Comment