


For your signatures cut three pieces of your base cardstock to the width of one section of your hexagons. Mine is 3 7/16":
3 7/16 x 1 1/4”
3 7/16 x 1 3/4”
3 7/16 x 2 1/4”
Score ½” from each side long ways.

Assemble the signatures and apply red line tape on one side only.

Adhere your base paper to each signature.

You will see the hinge slightly, but the designer paper covers it for the most part. You could sandwich two base pages together, but I was afraid the edges might not line up evenly. Plus this showing doesn't bother me and it's much more simple this way. My hinges show on the top half of each spread.

Soon you will have the base of your book assembled.

My book opens at the bottom. You cold open it sideways if you like. Either way, go in and adhere your designer paper with the pattern going in the direction of how you wish to open your album.

Adhere your chipboard to designer paper and make marks on each side to cut the designer paper approximately 1" wider than the chipboard.
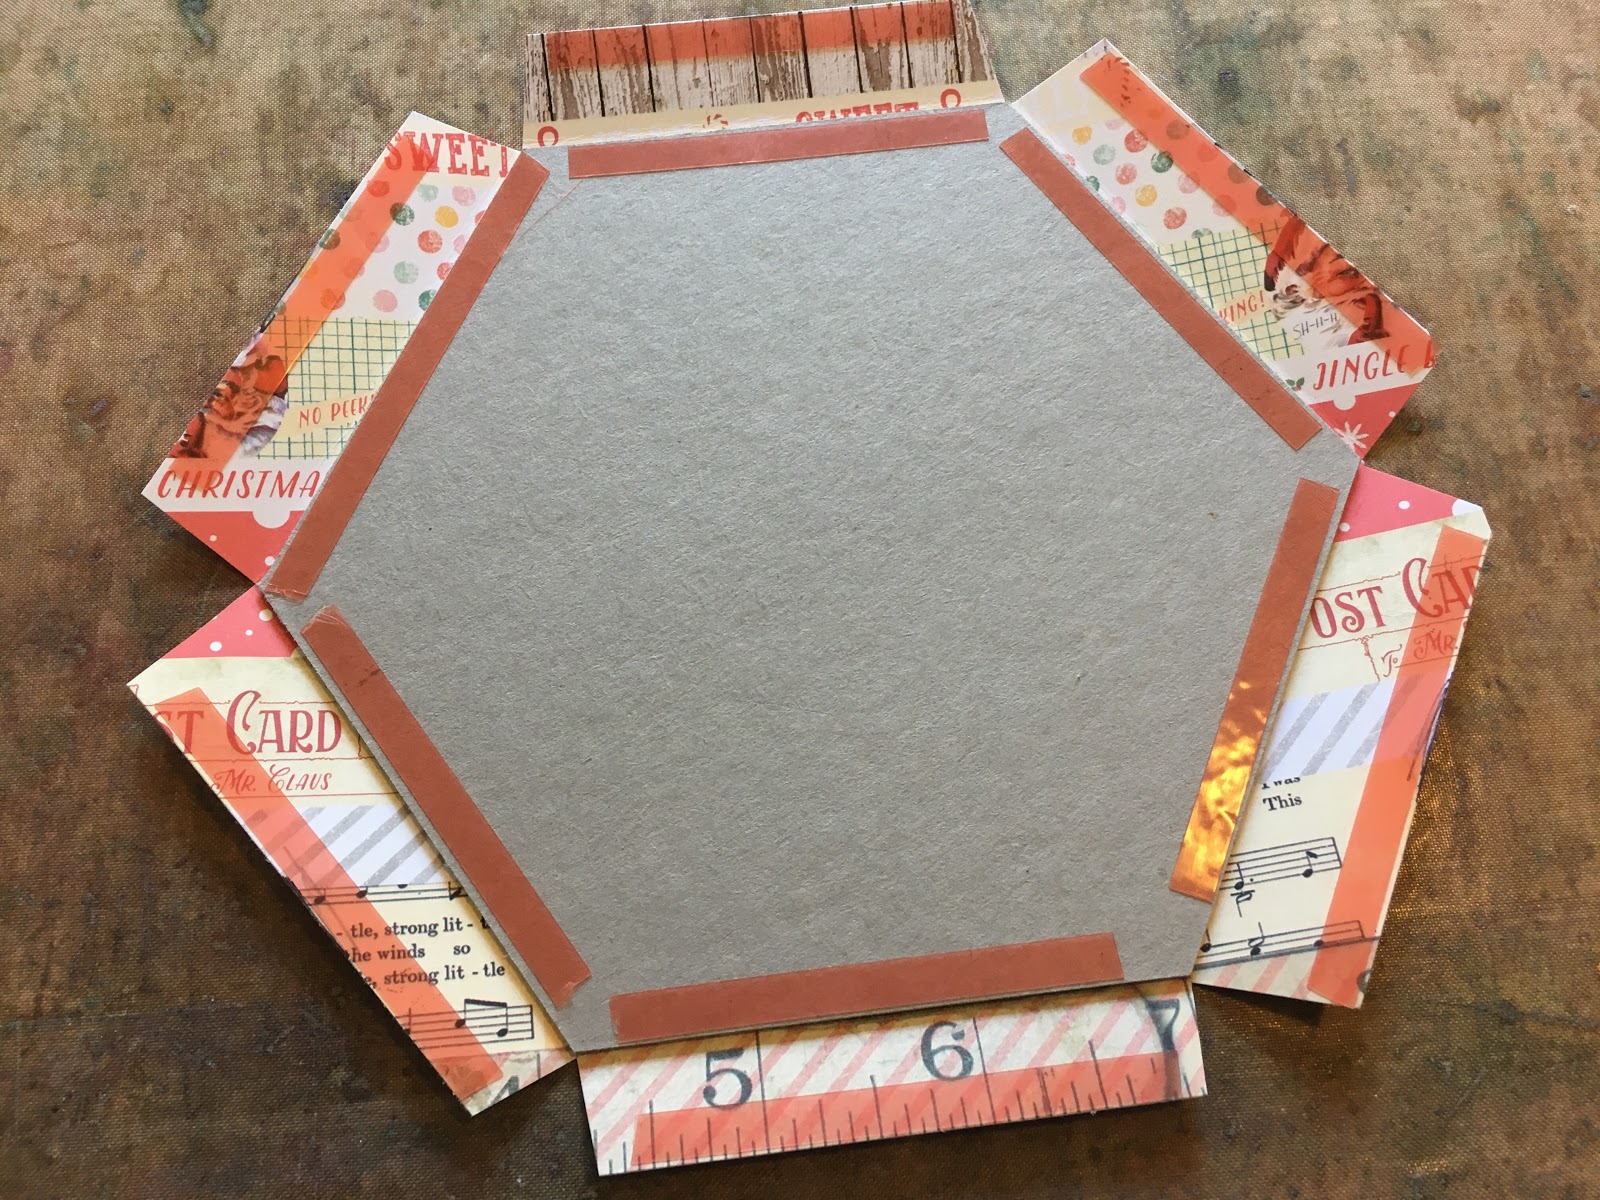
Carefully make small snips in each corner, making sure not to get too close to the chipboard. Adhere tape onto the edges of your paper and the edges of your chipboard for complete coverage.

Fold up each section and burnish well.

Now for the spine. (I was making this up as I went. You may come up with a better way to attach your spine. Please share that in the comments section if so.) Because my spine would be at the top of my album and would not show very much, I decided to just add another signature and mount it to the chipboard covers. I cut a fourth signature at 3 7/16 x 2 3/4” and scored 1/2" from each side as I did with the first three. I added a piece of designer paper over the center.

Here's how that looked. You could probably use washi tape and get a nice look too. I thought of sandwiching pom pom fringe in the cracks, but changed my mind.

The last step is to line your inside covers. I used one watercolor paper hexagon with a ribbon glued beneath, then topped it with a designer paper overlay (not shown). The thickness of these layers hides all of the wrap arounds from the chipboard cover. Plus, I like the matted look.

To decorate my cover I embossed the GORGEOUS Gypsy Soul Laser Cuts Flourished Frame Valerie Square in Stampendous Frantage Shabby Pink embossing powder.


Last month I showed you a perfectly photographed bundle of my elements beforehand. This month I'm sharing a raw photo of how I actually work! LOL! You will see I cut out all of the collage elements from the paper, made tags from the scraps, cut out a trillion die cut elements, raided my stash for coordinating colors - and barely fit it all on my table to work with! :) I find having everything laid out this way is really helpful. I sort of go shopping from the piles and "try on" elements for each spread. And here they all are...


The ribbon closure has to be my favorite part. It was the handle of a shopping bag from Altar'd State. :) I hope you've enjoyed this (very long) post and will give it a try! I'd love to see your work, so please leave a link in the comments if you make your own hexagon album. If you have any questions, please feel free to ask.

We'd love to have you play along with this month's challenge for a chance to win a $25 gift certificate to Lindy's Stamp Gang!


28 comments:
Who would have thought that a hexagon could look so amazing, I will never look at another in the same way! What a fabulous make Autumn, you really have given us all an insight into just what goes into your creations and I love it. A shaped treasure full of loveliness, this would keep me captivated for hours and hours. Thank you for sharing Hugs & Wishes Tracey xx
I just LOVE your hexagon album Autumn, it looked beautiful even before you decorated it. I love the way you did the cover, it looks so neat and the Gypsy Soul frame is gorgeous! The embellishments you chose finish your album off so beautifully - a real treasure. It did make me smile to see how you work, at least I am not alone - lol! Hugs, Anne xx
This is so adorable. Love the shape! And of course the papers, embellies and how you used them are very cute.
Oh what a wonderful mini Autumn! I just adore the hexagonal shape, so unusual and clever! The whole thing is beautifully put together and I loved seeing the photo of how you work!! A great idea to get everything ready cut and laid out before decorating the individual pages. Each one is a delight!
Stroke of creative genius, Autumn! I absolutely love every detail and appreciate the tutorial of putting one together. That sure helps the beginner like me! I loved the photo of your craft table - it totally looks like mine LOL! My favorite detail is also the ribbon closure and confirmed that you absolutely see treasure everywhere! Wonderful inspiration!! Hugs, Debbie
It is gorgeous Autumn, love your cover, , so sweet,- and thank you for the : How to--- a lovely shape, for a beautiful little book, filled with adorable pages .
Hugs, Dorthe x
Hello Autumn,
Thank you for the sweet comment on my blog! I too love the quick Instagram view of my favorite crafters projects because sometimes life just gets too busy to keep up with everything!
You create the BEST mini albums - I always enjoy seeing the newest creation. This one is simply beautiful -- love the shape and elements! I wish I had more time (and patience) to join the mini albums link up, but for now I'm just enjoying seeing what everyone else creates!
Have a beautiful day, my blog friend!
Oh my gosh, a hexagon album - so creative!! And wow!! You decorated it so perfectly!! I love, love this, Autumn!! Your tutorial is fabulous, too!! Going back to look at the pictures again now!! Have a great day!! Big hugs :)
Lisa
A Mermaid's Crafts
Oh my word, what a GORGEOUS album! It is so beautiful with all the fantastic embellishments and fine details!!! I lvoe the shape to~what a GREAT gift idea to!! Love this Autumn!
Hugs,
Sherrie k
Oh, that's such fun - what a clever design, Autumn - the hexagon is a delightful shape for your album. Brilliant use of all those wonderful papers too - it's a Christmas treat come early!
Alison x
Lovely idea Autumn, love your shaped album. Gorgeous papers too. Thanks for the step by steps x
Wow you sure enjoy what you do. Attention to detail is amazing, lots to look at, lots of hard work and I love it x Thank you for the amazing inspiration x
Oh Wow! So lovely and perfectly vintage Christmas! My favorite.
Kate
HOw beautiful your mini is!!! I do love it!! Thank so much for visiting me.I'm sure you will see my next mini in your challenge.
Hugs
Virginia
How beautiful your mini is!! I do love it!! I'm sure you'll see me in your challenges.
Hugs
Virginia
Jaw off the floor time again Autumn! This is something right out of the box. Brilliant work and you are so generous to share the process with us.
Fabulous Autumn! I love the shape and how you decorated the book. I tend to spread everything out on the table too, especially for layouts, where I need to choose from my supplies as the design evolves.
SIMPLY FANTASTIC --- I have at least made a simple model out of watercolour paper of your binding system as you showed it recently - I so like this genious art of binding - have to use it once,
and great with the hexagon form. And the whole mini is a treasure!
You are such a talented and inspiring artist - you never cease to amaze me with your creativity!
Wow swoon drool faint...this is STUNNING! I ADORE this mini! Such a fun shape, too. And...smart you for figuring how to WRAP the paper! I looks so much more finished than trimming around the edges of the cover!! Just amazing work, Autumn!
Oh Wow!! What an amazing Mini Album, Autumn! Inside and out, this is super sweet and super gorgeous!! I love the fun shape and I love the papers and ephemera you used to decorate it! So much amazing detail and absolutely stunning!!! Thank you for sharing the process! hugs xx
OMG Autumn ... this is just GORGEOUS!! WOWZA! I love it! Thanks so much for joining us at The Sisterhood’s ‘I See Spots’ challenge and please come back again soon!
Darlene
one of the 'Sistahs'
The Sisterhood of Crafters
DAR’S CRAFTY CREATIONS Please come for a visit!
Oh my! This is so cool, Autumn. I loooooove all your projects and love to see their details and how you have made them. Thanks for the steps to obtain such a fabulous hexagonal album. Great job, as always, no surprises! Thank you for joining SSS Monday Challenge.
Love this mini album. A great shape that is fun to work with. Thanks for joining us at MMM.
Robbie
Your album is fantastic Autumn!!! The shape is so appealing!!! The decoration you have chosen, is so pretty!!! Thank you for your tutorial!!!
Hugs, Nora.
Wow, so much to look at! Love the idea of a shaped album - thanks for the tut! All your elements in a pile look so amazing! I wish I was organized enough to do that - I usually just forage through my scrap box and use whatever I can find LOL!
Oh my. This is breath taking. What a gorgeous album and I love that you used a hex shape. Super idea.Thanks so much for entering your lovely card into our 'Anything Goes with a Handmade Bow' challenge at Craft-Dee BowZ this month. I look forward to seeing what you create for our next challenge. Hugs, Barbara
Great idea! Brilliant project !
WOOOOOWWWW! What an incredibly FUN mini album! I love the unique shape, the sweet papers you've chosen to decorate it and every single little detail from the sparkly snowflake, the wee bells, the pom pom trim to the die cuts, ribbon closure, and yummy layers! Oh, what a treat this is from cover to amazing cover! Sending big hugs! PS Wish I coulda been at that overflowing table!
Post a Comment