

Today we launch a new challenge at Mini Album Makers! Last October I designed this album to be your "go to" for 4x6 photo storage. You could make this book as simple or complex as you want to. It could be filled to the brim with 4x6 photos or embellished as desired (or to the max like I have done!) Either way, I hope you will find it useful and will pin this post to remember. :) We're also having a Design Team call through May 15, so hop on over and check out those details too.


The pages are envelope style and have two-sided photo pull outs. Since I made this book six months ago, honestly I forgot why I added the ribbon to one side only (closure I guess?), so I decided to use it to wrap a twig for extra interest. LOL!

I filled my album with family photos from our various mountain/hiking trips. You can see how easily the photos fit the pages and pullouts. They are straight from the photo center, not cropped at all.

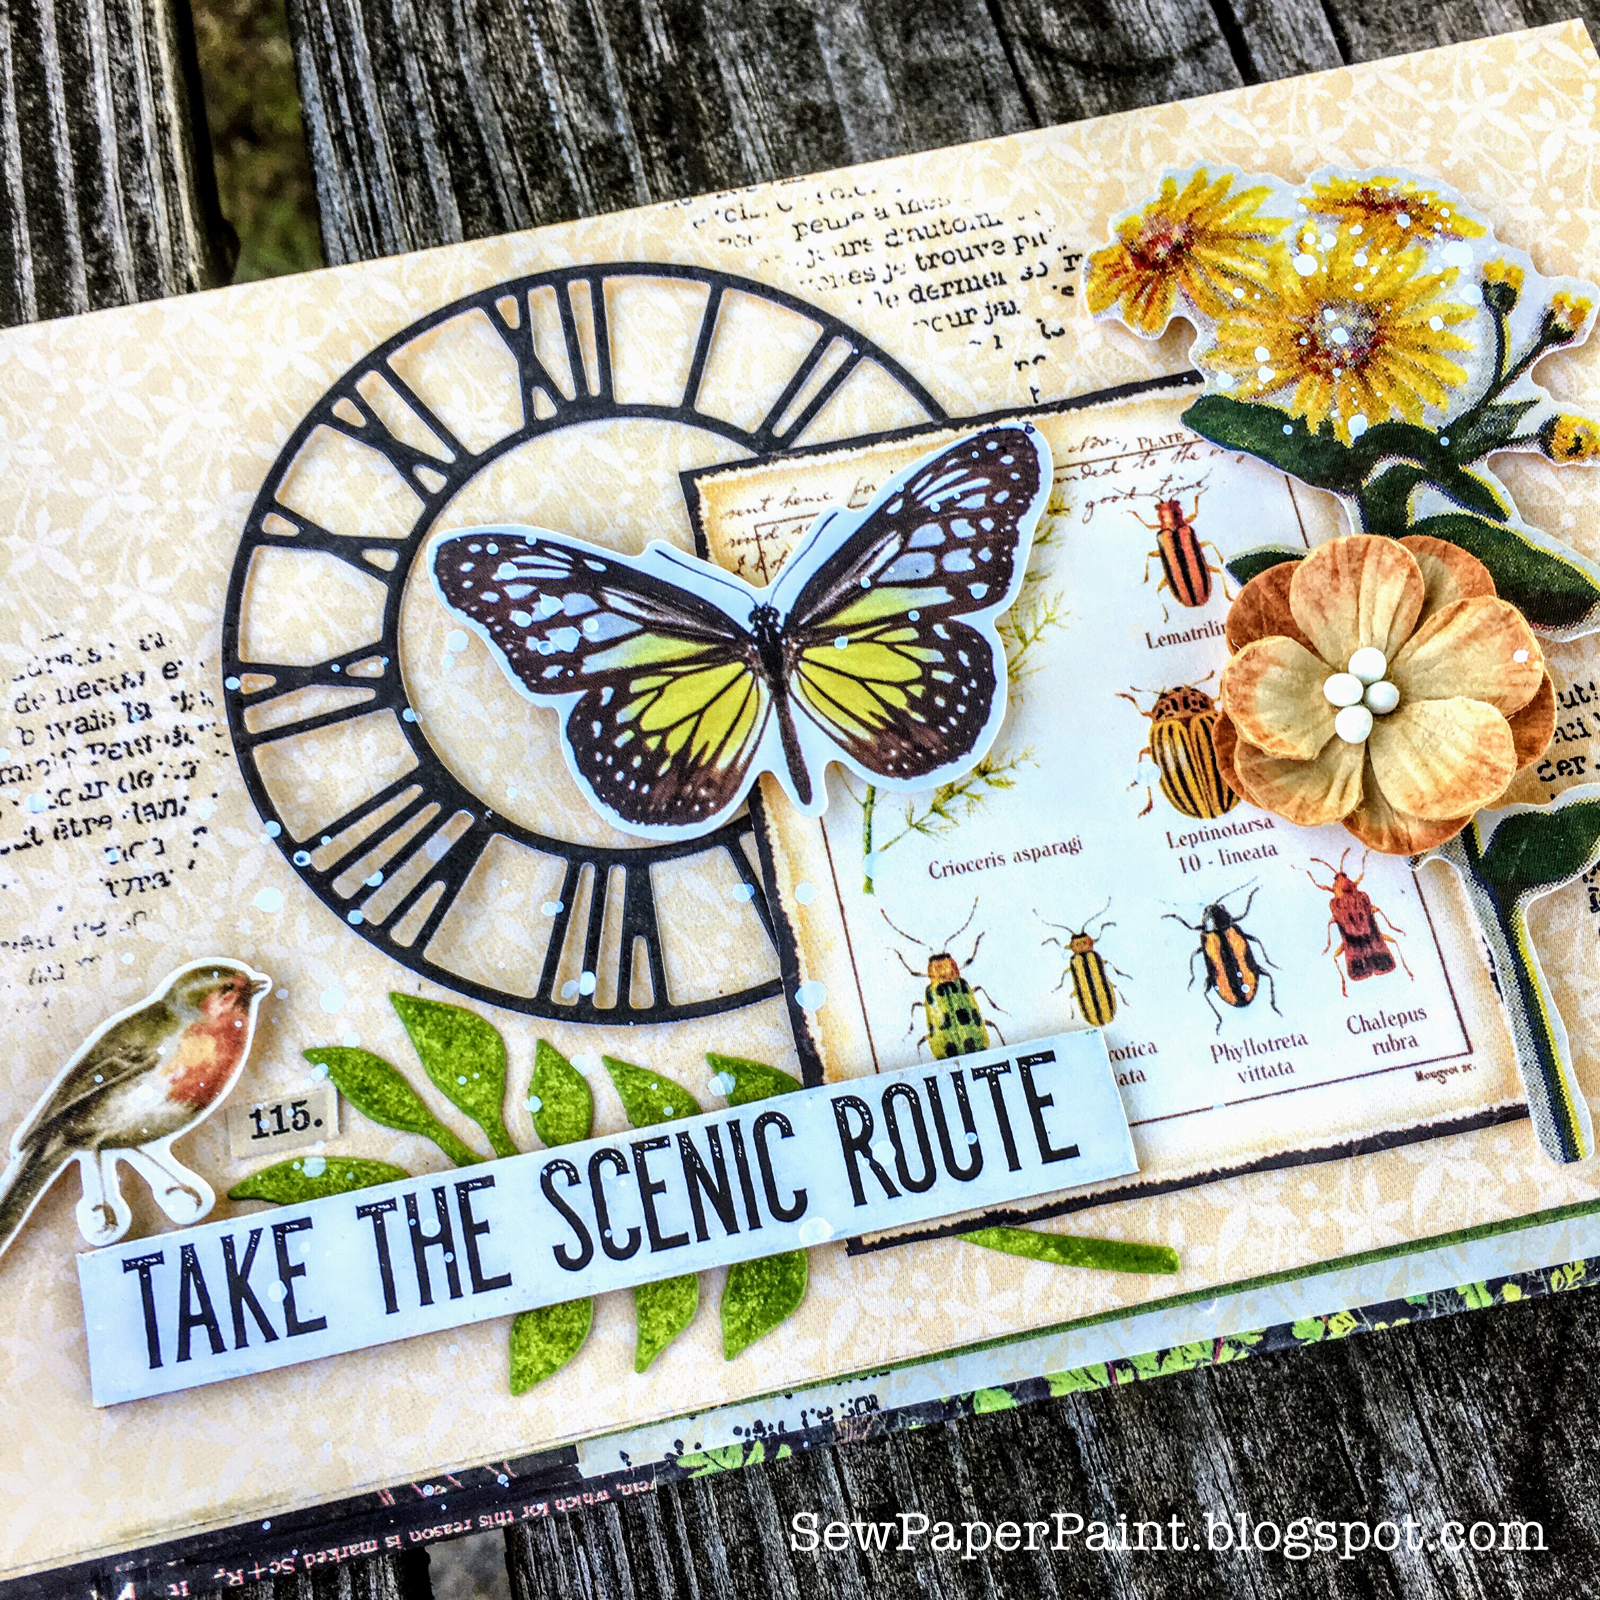
I mixed lots of fussy cut images from the Graphic 45 Nature Sketchbook collection with die cuts, paper flowers and Tim Holtz Botanical Ephemera cutouts for embellishments.


Prepare your nestled/stacked binding using the following measurements (see THIS post for a more detailed explanation):
4 3/16 x 1 1/4"
4 3/16 x 1 3/4"
4 3/16 x 2 1/4"
Score each piece 1/2" from each side. Adhere by stacking from smallest to largest, leaving the 1/2" flaps free.
Cut the your paper for the envelopes to 7 x 9 3/4" strip (pattern up and down). Score this piece at 1" and 5 3/16". Then glue the 1" section to the inside like shown above.

This will leave you with cylinder shaped pieces. Apply red line tape to both sides of the flaps on your signature. Snip off the corners of the flaps to miter them and make it easier to slide your cylindrical pages onto. Remove tape on one side and slide your page down flush with the spine, then remove the tape on the other side. It is easier than trying to attach with both sides sticky.

Mark the center of each envelope and punch a 1 1/4" circle punch half way to make the openings for the pull outs. Cut the mats for your photo pull outs. The mats will be 4 1/4 x 6 1/4" for 4x6" photos.

Cut your covers and spine from chipboard. Wrap the front and back covers with patterned paper by mitering the corners and wrapping on all four sides (photo not shown). The covers are 4 5/8 x 7 1/4". Your paper wrap should be 6 1/4 x 8 1/2".
Treat the spine differently. Tape it to the dead center of your spine wrap. The spine should be cut to 1 3/4 x 4 5/8'. The spine wrap should be 5 1/2 x 6 1/4'. Add extra tape as shown above.

Carefully adhere your wrapped front and back cover to the spine wrap, allowing for a 1/8" gap between the covers and the spine. Fold the top and bottom of the spine wrap around your spine and covers . Mount a lining (the yellowish paper above) of 4 1/2 x 7" to the front and back covers. Next add a center lining (the black pattern) of 4 1/2 x 4 3/4" over your spine. Burnish the area between the covers and spine carefully to allow the paper to give for folding.
Next, simply adhere the back of your signature piece, with the envelopes attached to the center of your spine. Viola!

And now some closeups of each page collage. I'm thinking these would each be beautiful card ideas and I may make some square cards with my leftovers. :)


I hope you're inspired and will play along with our challenge at Mini Album Makers for a chance to win a $25 gift certificate to the Lindy's Stamp Gang shop! Don't forget to pin this tutorial and visit our other incredible designers at Mini Album Makers for more inspiration!

I'm also sharing with:


26 comments:
This is like bottled sunshine Autumn, those pockets are so handy to store treasured photographs and keepsakes. I too have designs I put aside and wonder why I added elements when I meet up again with them. I think the ribbon was just waiting for your found twig!! Stunning.
Creative hugs Tracey xx
I love the bright bold look of this - perfect for those happy family photos. Brilliant use of the papers - though I don't envy you all that fussy cutting!
Alison x
Wow Autumn, what a beauty and such a detailed tutorial, thank you so much! Have a very happy May, Sue xx
Gorgeous! Love all the details and the family pics are beautiful, too! Thanks for sharing your beautiful creations!
Oh my good golly, this is spectacular!! Wow!! I don't even know where to begin!! I absolutely adore everything!! Your details are perfection and what a beautiful way to showcase the pictures!! This is so stunning, Autumn!! I love, love it!! Have a great day!! Big hugs :)
Lisa
A Mermaid's Crafts
You are a creative genius Autumn! So much hard work, so worth it and absolutely stunning and amazing. Thank you for the wonderful inspiration x
this is gorgeous Autumn! Thanks for the awesome tutorial. You are the queen of mini albums and layering!
Your album is stunning Autumn, you have photographed it so beautifully too! I think you are right, each of the holders would make wonderful cards, the butterflies and flowers are so, so pretty and the doilies are beautiful. Thanks so much for sharing your tutorial too, I will bookmark it for future reference! Hugs, Anne xx
How lovely! Beautiful creation. Hope you are enjoying a great week! Hugs, de
A stunning album. I love the papers that you used. The botanical theme is so lovely.
Kate
This is so gorgeous Autumn!! I love the bold, bright colours in this book and the nature theme is wonderful .. perfect for your hiking photos!! Stunning cover and I love the collage on each page. Bookmarking this for future reference. Love it!! xx
What an amazing album Autumn - love how you have decorated it, and how beautifully the photos are displayed.
Blessings
Maxine
Another beauty full of inspiration!
Thank you so much for the awesome tutorial. A fantastic album and love the papers.
Thanks for sharing with us at Simon Says Stamp Wednesday Challenge. Have a great day x
Such a beautiful album! I love the papers and fabulous design. Thank you for sharing with us at Fussy and Fancy, good luck and I hope you will join us again.
Hugs
Gina xx
This is FABULOUS, Autumn. When I saw your post, I was like...well, Autumn and I apparently channeled the same envelope muse this month. HEE HEE I love your paper choices. That cover and the one page with the butterfly stacked elements...wow! Thanks again for having me on the team. I wish you all the best with this challenge and WILL be back to play along whenever I can!
What a perfect and beautiful little album, Autumn! I love the design and your papers are just right for the pictures you added - love the family photos and would have loved to see your picture, too!! Your ephemera and layouts are so bright and happy and a joy to look at. I could spend a good hour or more looking and trying to see everything. Beautifully done, and I agree these layouts would make gorgeous cards. Autumn, if I put a twig in a closure for my album, it would look stupid. You make it look brilliant - that is too cool!! Hugs!!!
A lovely creation! Such a lot of work and lovely detail. Thanks for sharing at Fussy and Fancy and good luck with the challenge. Judy x DT
Oh my God, this is absolutely wonderful!
How can I not exclaim WOW in front of this wonder, not enchant me in front of each page of this album?
You are a genius Autumn and I adore you! Thanks for the tutorial I really needed it!
Hugs
What a feast for the eyes! I'm totally bowled over! You never fail to amaze me, Autumn! And you do it so effortlessly! xx
Wonderful mini album, I love the layering of all those floral elements! Thank you so much for playing along with us in the Time Out Challenge over at the Simon Says Stamp Monday Challenge Blog this week :)
This is GORGEOUS! <3
oh dear Autumn! This is absolutely, positively, Stunning!
Such perfect choice of papers to use for your fmily's photos of out in nature! and what a beautiful family you have! Wait, do you have one more daughter?
Anyway, wonderful design and beautifully detailed memory book!
hugs,Jackie xx
An amazing album, love the beautiful details !!!
This is so beautiful !!!! Thank you so much for the Tutorial too
Cheers
Dr Sonia
This is amazing. so many neat details! Very nicely done!
Post a Comment