May 31, 2017

Bicycle for Two Die Cut Spring Card


I'm thrilled to be sharing this fun and whimsical card on the Tutti Designs blog.  I am wildly in love with our new Tandem Bike die and know you will love it too!  Join me today to find out my tips and tricks in putting this one together.

Purchase your Tandem Bike die HERE today!


I'm also sharing with:
Simon Says Stamp: Going Round in Circles
http://www.simonsaysstampblog.com/mondaychallenge/?p=8968

May 28, 2017

PaperArtsy Stamped Butterfly Tag


I am so excited today to be sharing my very first Destination Inspiration post on the A Vintage Journey blog today!  I truly hope you will join me as I share the step outs for this jumbo tag project.  I will also recap the other posts from this month, so you will be in for inspiration overload!


My eldest graduated from High School yesterday and we are off today to the beach today to celebrate!  I couldn't be a prouder mom!  My husband smiling from ear to ear after the ceremony.


And here she is a couple of weeks ago in her prom dress.  <3  I look forward to doing my visits to your lovely blogs when I return.  


I'm also sharing my tag with:

May 24, 2017

50th Anniversary or Birthday Card


Hello friends!  Today I am sharing a 50th anniversary or birthday card on the Tutti Designs blog.  I have used several gorgeous dies old and new from the Tutti Designs collection.  I hope you will take a moment to see more.

Purchase your 50th die HERE today!


May 20, 2017

PaperArtsy Lynne Perrella Framed Assemblage


I quite unusually woke up at 6:00 am this Saturday morning and thought I would put the time to good use.  I was fearful that I wouldn't make it around to PaperArtsy Topic #8, Assemblages.  I have scratched my head for days with what to make and decided that I should just do what I love to do.  Almost all of my mixed media projects are assemblages, after all.  We are in the process of packing for selling our house and I almost sent this frame to charity, but at the last minute ripped it out of the box and piled it in my studio.  LOL!  I'm such a hoarder...


I tried a three step crackle on the frame in white and linen.  Not sure if it crackled enough for my fancy, but the antiquing cream seemed to bring it to rustic life.


I took the glass out of this thick frame and cut a piece of heavy chipboard to fit the inside.  I stenciled it and then sprayed it with a combination of Lindy's Moon Shadow Mist and Glimmer Mist for a touch of sparkle.


I crackled my die cut and layered with a wooden cutout.  I used Tim's new chipboard sentiments.  The butterfly stamp is new to me and I love it so!


I really wanted to add something to the frame, so I perched this snippet of an old ruler.


This is one of my favorite Lynne Perrella images.  It is so symbolic of looking back...  I tucked in a Tim Holtz key over layers of washi tape and some bundled string.  You can see how deep the frame is.  The collage embellishments must stick out 2" and still aren't nearly as hefty as the frame.  I hope you liked my rustic, neutral project.  I was very much inspired by Jennie's post HERE and her use of neutral colors.


I'm sharing with:

May 19, 2017

Stamped Hand Lettering Painted Tag


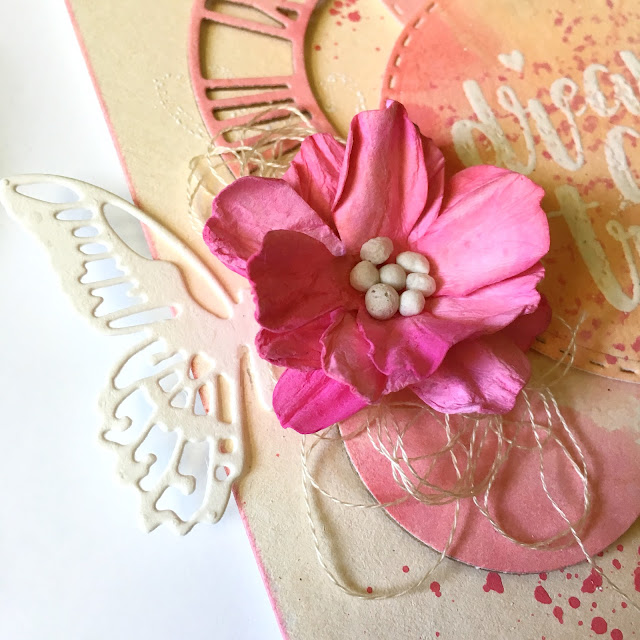
Today I have a teaser post for a soon to be released stamp set by IndigoBlu.  This set features so many beautiful "hand lettered" sentiments.  I just had to do a pretty pastel tag to celebrate spring and new beginnings.


I used the fabulous new Portrait Paint Acrylic Matte set to hand paint the background on the left.  I spritzed the panel with water to help the colors blend and went for a random/abstract look.  Next, I stamped the panel with a texture stamp from another gorgeous new stamp set repeatedly with pink ink.  I used this panel to cut some circle and clock die cut shapes.  Then I created the painted tag base on the right.  I was going for an ombre effect and used the lightest colors in the range.  Again, I spritzed the panel first with water to help the colors blend easily.


I embossed my hand lettered sentiment in white and bundled it with the other die cuts and a handmade flower from my tutorial HERE.


I added half of a butterfly die cut beneath my flower.  I kept the butterfly white for contrast.


I embossed the hearts that are included in the sentiment set randomly over the tag and gave it all a splash of Rouge paint.


I sponged the edges of the tag with pink to help it pop a little.  I hope you like this very "clean" mixed media project.  The photos just don't do it justice, but I hope you are inspired nonetheless.  Thanks for your visit and do head on over to the IndigoBlu blog to see more inspiration from our other talented designers.  <3


May 18, 2017

Fabric Covered Tag Book Tutorial


Please join me at the Stamps and Stencils blog today for an inspirational post.  I've created a tutorial for you on this fabric covered tag book.  Our current challenge, Fabric and Fibres, is just the place to test this little album out.  I do hope you will join us!
You are invited to the Inlinkz link party!
Click here to enter

May 17, 2017

Elegant Handmade Graduation Card


It's time for a new challenge at Scrapy Land and our theme for these two weeks is Lace and Pearls.  My lovely niece Kelsey is graduating from Clemson University (ahem THE National Champions - woot woot!) and I needed a very special card for her.  I always struggle with making cards for specific people, lol!  I wanted something elegant and timeless, just like Kelsey, and with an encouraging word.  I chose my favorite (and life) verse, Philippians 1:6 from Verve Stamps.


"Being confident of this very thing, 
that He who has begun a good work in you 
will complete it until the day of Jesus Christ."


My crafty BFF, Sara Emily, gifted me with these Spellbinders Opulent Oval dies and I couldn't wait to use them!  Thank you my friend!  I stamped in Frayed Burlap.  I added a loopy bow and flower and tucked in my new Yvonne Creations Spring-tastic Flora Die.  Last but not least, I added a row of pearls and two tiny pearls to my focal point.  I hope this gives you some idea for your own graduation/wedding/anniversary cards.  Thanks for visiting!


Handmade Wedding Shower Card


I'm sharing this lovely layered traditional wedding card on the Tutti Designs blog today.  This intricate and completely romantic Wedding Cake die is AMAZING!  If you need a card for a wedding or anniversary, you will love working with this one.  Do hop on over for the details.


I'm also sharing with:

May 15, 2017

Simon Says Stamp Abstract Triangles and Stitched Florals


It's time for another Simon Says Stamp Flickr challenge and the theme this fortnight is Favorite Technique.  I absolutely love watercolor resist!  For my first card I chose the Abstract Triangles stamp and some warm shades of Distress Ink to create a coppery design.


I had a stack of already cut out Sizzix Brenda Walton Peonies and decided to create a matching flower from my tutorial HERE.  I used a Basic Grey brad to coordinate with the copper embossing.  I just received the Autumn Blessings die in the mail and simply had to use it on this card.  I used kraft core in copper.


I cannot get enough of these triangles!  And I always enjoy using Fossilized Amber on anything!


For my second card I used my new Spring Flowers, embossed in white and watercolored.  I applied all of the stamps in the set to a giant acrylic block to speed up the stamping/embossing process.


I fussy cut each design and then gave it a spray of Glimmer Mist, which you can see if you click to enlarge.


I raised the oval die to "frame" my arrangement, then sponged with Cracked Pistachio and stamped the stitches in the same color.  The tiny "Hello" die by Sizzix was a gift from my dear friend Madelyn.  Thanks Mad!  You can see below how I barely glued the petals down to add some dimension.  I hope you've enjoyed these projects.  Thanks for your visit!


I'm sharing both cards with:

And Triangles with:


And Flowers with:

May 10, 2017

Background Die Cut Technique with Magicals Pigment Powder


Today I am sharing a delightfully fun background die cut technique on the Tutti Designs blog.  I promise you will enjoy this.  Learn to extend the use of your dies for mixed media and embellishments.


I used the amazing Oriental Screen background die and cut the Fluttering Butterflies die in half to form two card embellishments.  So hop on over for the details.


May 8, 2017

No Line Coloring with Prismacolor Pencils


Happy Monday my lovely friends.  <3  Today I am sharing a CAS card for the current Power Poppy challenge, Frame It Up!  My mother had quite the stash of PSX floral stamps from back in the day, so I raided that drawer and found this beauty.  I decided to try no line watercolor, only with Prismacolor pencils instead.  I really like the effect!


I inked the greenery with Pistachio Distress Ink and the blossom with Abandoned Coral DI, then went about coloring until I was pleased.  I never thought I would get into coloring, but I admit that once I begin building layers and the depth begins to form with the colors I get very caught up into it.  The curls in the petals were a challenge, but I was pleased that I kept some highlights after all.  I had intended on keeping the background stark white as I am trying to do CAS cards, but I couldn't help myself and dipped the colored panel into Antique Linen DI, then did some over stamping in Frayed Burlap.  I am what I am ok!  :)  I used an I/O sentiment and button/twine to finish it off, framing with a Tim Holtz postage die by Sizzix.  I had to sponge it a little to go with the grunge effect I had created.  I hope you like it!


I'm sharing with:

Popular Posts