Jan 17, 2016

Mixed Media Stamped Scripture and Stencil Card

card 1
Hey folks!  Hope you are enjoying this three-day weekend as much as I am!  I'm having a creatacation and loving it!  VLV, one of my favorite challenges has gone to a two sketch per month schedule, which means we will have more time to play along with the sketches.  Julee is also breaking the prize down to two winners - win win!
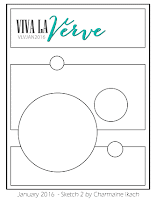
 VLV Sketch
When I first saw this sketch I was thrown!  What on earth could I do with all them circles?  ;0
card 2
 I just happened to clean up all my inky puddles with strips of file folders, the cast-offs from when I cut my tags.  I was thinking they were too gorgeous to throw away, but how on earth could I make a card from strips - then the sketch came to memory - duh!
card 3
 I desperately tried to think of something I could do for the beginnings challenged at MMCC and this verse came to mind.  I don't want to just start well, but finish the race.  Thankfully I can cling to this promise.  Low and behold, the verse was part of a set of Verve stamps that I already had.  Happy day!  Don't you love it when you can actually see an idea through!
card 4
 The inky background pieces came from mixing Pearl-Ex powder with watered down Concord Grape Distress Ink.  GORGEOUS!  The stencil is one that I made myself some time ago from a file folder.  I dropped a little pink Frantage over it when it was half dry to add a touch of shimmer.  The embossed arrows are done in copper EP from the cast-offs from a Tim Holtz Alterations edge die.  I added some cool sticker punchenella paper and a torn piece of tea bag just for fun.  The string came from a 1/2 completed cross stitch kit I found while thrifting for a buck - a rainbow of threads included.  :)  Something I've been experimenting a lot with is embossing the distressed edges of my paper.  Here I used copper, same with the scripture.  The bow is lightly dyed to match from vintage seam binding.  Finally I splashed it down with white Mister Huey by Studio Calico.
card 5

MMMC

I'm entering 

Jan 16, 2016

DecoArt Mixed Media Snowmen Canvas

canvas

For several months I've been pining that my friend Barbara was out of the country, well she's home and I couldn't be more excited!  She is my painting buddy!  Together we have the best of times getting messy.  We got together and each made these fun mixed media paintings with some favorite DecoArt® products.  We've both taken Christy Tomlinson's mixed media classes and were inspired by her paintings found HERE.

canvas 2

I started with a base of scrapbook paper adhered to canvas boards with DecoArt Decou-Page Glue under and over the paper.  Next I went all out with the chevron stencil and using Dazzling Metallics® Teal Metallic Craft Paint.  This paint leaves the prettiest metallic finish, perfect for a winter scape.  I used bubble wrap to stamp DecoArt Americana Gloss Enamel in white randomly along the canvas.  Then used more Decou-Page to adhere die cut snowflakes cut from sheet music.

canvas 3

I love the effect the bubble wrap leaves, so perfect with the printed scrapbook paper showing through.

canvas 4

The entire piece was stamped randomly in black with a variety of stamps.
 
canvas 5

I drew out some templates for our snowmen and decided to make a pair for my canvas.  Mama and Daddy snowmen - awe - I know, so cute!  I lovlingly cut each hat, scarf, carrot, and buttons from cherished Basic Grey papers.

canvas 6

I brushed a light sweep of DecoArt Media Fluid Acrylic in Violet here and there for some extra sheen.  It is so pretty when the light hits it.

canvas 8

This little section is my favorite part, the rub-ons added for shading.  They are also Basic Grey.  I added a good bit of hand drawing as well.  

canvas 9

And there she is - I hope you like it!  It was so much fun to make, especially with a good friend by my side.  Love you Barbara!

flowers

My husband and I celebrated our anniversary this week, but were sick as dogs all week.  He still took the time to send me flowers - so beautiful.  I brought them home from work to enjoy on my art table today.  So much creating going on here - I'm raring to go now that I'm feeling better.  What a mess!!!  ;0

I'm entering the following challenges:

Jan 15, 2016

Tim Holtz Style Reverse Mixed Media Wood Canvas

canvas
 A very dear friend lost her husband recently.  She is kind, encouraging, and most creative.  Just a card wouldn't do, so I decided to make her something to display as a constant encouragement.  I do hope that in some small way she will find encouragement in this.
canvas 2
 I started with a wood canvas and decided to reverse it and create a shadow box.  I thought she would love the vintage floral images in this Tim Holtz paper pad.  Her favorite color is green, so I tried to play up the greenery and fussy cut some additional flowers.
canvas 3
 I used some of my DIY Paper Flowers made with the Sizzix Tattered Florals die.  I put some green string in to resemble moss and added some Tattered Leaves and this cool little sprig punch by McCalls.
canvas 4
 Around the frame of the canvas I gessoed lightly, then blobbed ink puddles, then stamped a crackle stamp, dots, and a new Stampers Anonymouse corner stamp, hidden under the metal accents.
canvas 5
 I really wanted my new Ornate Frame die to be the focal point.  I inked it brown them embossed it loosely in gold.  Behind that I added another Sizzix die by Tim, which I pooled ink over to make it look aged.  I hand stamped every letter for the sentiment from scrap inky paper.
canvas 6
 I painted the inside rim of the canvas brown to accentuate the depth, then added some pools of vintage glitter in the corners, a sparkle of hope I pray.
canvas 7
 Remember to cherish the ones you love and make new memories as often as you can.

canvas 9

Jan 11, 2016

Mixed Media Valentine Tag

tag 1

Hello lovelies!  Today I am sharing a mixed media Valentine tag with you.  In a recent play day with some artsy chicas, we worked on a variety of backgrounds and techniques for Tim Holtz style tags.  I had just ordered this amazing damask set by Stampers Anonymous and was dying to get it inky!  Not to mention, playing with this new Queen's Gold embossing powder - it's gorgeous!!!  (Thanks Char and Nancy!)

tag 2

I bathed my tag twice in Aged Mahogany DI, drying between layers.  Then gave it a dip of Vintage Photo.  I stamped a script stamp (Hero Arts) and dots in Vintage Photo to add more depth.  I really wanted to use this pretty woman stamp by Stampington and ended up sponging ink on her to give her a flesh toned appearance.

tag 3

I layered with some Prima paper and a Sizzix Valentine strip die, which I colored with Aged Mahogany and then cracked with the same color Distress Crackle Paint.  I finished it off with the cast off of one of Tim's border dies, cut from glittered sticker tape.  The charm is also by Tim and is secured with one of his cool vintage pins around some antique seam binding.  So this tag is a bit of old and a bit of new.  Hope you like it!

tag 4

I'm sharing with:
You are invited to the Inlinkz link party!
Click here to enter

Jan 7, 2016

Hand Lettering and Mixed Media

card 1
I started playing, just going wild with my mixed media supplies this weekend.  I really needed a stress-free project, a lot on my mind these days.  Today marks the start of my new design team post with Stamps & Stencils and Cec has chosen "Oh So Blue" as the theme this month.  Although I did try to incorporate as much of the color blue into my project as possible, I went more with the emotional side of this theme.
card 2
I piled up several papers that sort of went together, then added some stencil paste through this awesome rose stencil.  When I love how the paste picked up the ink sprays, but not the glossy papers.  I added some UTEE over, that's the hint of sparkle you see in this pic.
card 3
 I didn't have a stamp that suited my desired sentiment, so I decided to do some watercolor lettering.  I've been following @randomolive on Instagram and ever single post she adds with her lovely brush style lettering gets my creative juices flowing.  I plan on purchasing her practice guides (a great price of $27 for 45 days worth of practice with video tutorials, etc.) found on her site HERE.
card 4
 A friend saved this cool packaging fill and I thought it would make a great layer, plus it gave a cool pattern to the paper beneath when I sprayed it.
card 5
I tucked in some vintage lace and added some gemstones.  I saw on a YouTube video that you should layer both paper and fabric flowers when spraying because they each accept the inks differently, so I did that here and really loved the contrast.  Click the photos to enlarge.  All in all, I really enjoyed getting messy for this Oh So Blue challenge.  We'd love to have you play along with us at Stamps and Stencils.  
card 6
I'm also sharing my card with:

Popular Posts